Using Blackfire Metal Polishing System to create a mirror finish on aluminum

Todd, you read my mind. I just got some Blue Job in on Monday and if weren't so darn hot, I'd do at least a little test area first. I watched a Youtube and got some great ideas on how to polish with it. The Blackfire System really piques my interest though, I'm thinking for starters just a little bit by hand with a MF,see if that does anything, then polish with some of my demoted cutting and wool pads. I'm thinking 4" pads. I can try that with both the GG and the rotary. I can read up on techniques to be sure of the best ways for the time being.

I'm going to do a write up with a pictorial. Something to look forward to once it finally gets cooler. Stay tuned.

Let us know how it works out! I want pics!!!!
 
I also will be waiting Bill for your write up. I'm happy to see more of the BF Metal Polishing System being mention here and around the net.:bigups
 
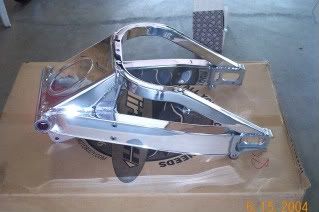
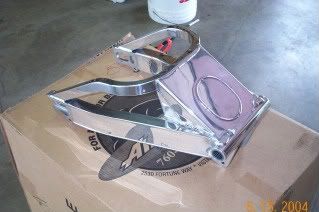
I have to say that turned out great Todd. I would have never thought it would have come out so nice using the equipment you did. Normally for that type of shine would require rouges and a dedicated buffer wheel. Like I used to polish this swaingarm.
P1000514.jpg

P1000517.jpg
 
I have to say that turned out great Todd. I would have never thought it would have come out so nice using the equipment you did. Normally for that type of shine would require rouges and a dedicated buffer wheel. Like I used to polish this swaingarm.
P1000514.jpg

P1000517.jpg

That looks amazing! :yourrock

The BLACKFIRE Metal System was developed to create professional results with out the buffing wheel. I have a Caswell buffing system at home and I guess it takes a lot of experience to get good with it because I can get much higher quality results using BLACKFIRE.
 
Todd,

The results are quite astounding. I honestly had no idea that such a transformation could be accomplished. The finished product looks like a silver serving tray on a banquet table.
 
On another forum I belong too there was someone who polished something and they spent 3 days doing it. It looked ok but not that great, I have to say you have done an amazing job. It's reviews like this that make people believe in products like this.

:yourrock
 
On another forum I belong too there was someone who polished something and they spent 3 days doing it. It looked ok but not that great, I have to say you have done an amazing job. It's reviews like this that make people believe in products like this.

:yourrock

Thank you very much. Metal polisher (regardless of the way it is done) is time consuming to do right. The BLACKFIRE Aluminum Polishing System was was co-developed with experts in the aluminum, aircraft, and sheet metal polishing industry. This stuff is really unique in its ability to create a high gloss shine on even dull aluminum and stainless, but its still not a simple process. It requires patience.

However it is more than capable of delivery professional results (or in my case better than professional results). On my trips to the Great White North they have a gentleman named Rory who is a metal polishing expert. He has forgone using traditional polishing pads and a wheel and uses the BLACKFIRE system almost exclusively.
 
i need this system for the old benz im working on. i have a ton of metal to be polished & the customer is picky.
waiting to hear back from todd. if your nut hungover buddy, please get back to me.
yours truly
- Big A

gracias!
 
I finally bit the bullet and picked this system up last night during the 20% off sale..... I'm anxious to see if I can get similar results :)

Todd, you mentioned in your write-up that you'd sanded "up to 400" in some areas and "up to 1000" in others. By chance do you remember how many sanding steps you did and what grits you used? I'm sure cleaning up a rough casting takes the most amount of time, but choosing the right abrasives for the job should make doing the work as efficient as possible.
 
Todd, can you post a link to the system? I've reread the article a couple of times looking for the link and can't seem to zero in on it. I searched the store and came up with Blackfire Heavy Cut Aluminum Compound. I'm assuming the system is this and more??? I polish my share of stainless (revolvers) and am do for some new product. Right now I use a couple different products that have worked perfectly well but thought I would be game to give something new a try. It's that old thought that perhaps when compared to something else I may be spinning my wheels. I suspect as you've already mentioned, more than anything it's the elbow grease that makes it shine. ;)
 
Todd, can you post a link to the system? I've reread the article a couple of times looking for the link and can't seem to zero in on it. I searched the store and came up with Blackfire Heavy Cut Aluminum Compound. I'm assuming the system is this and more??? I polish my share of stainless (revolvers) and am do for some new product. Right now I use a couple different products that have worked perfectly well but thought I would be game to give something new a try. It's that old thought that perhaps when compared to something else I may be spinning my wheels. I suspect as you've already mentioned, more than anything it's the elbow grease that makes it shine. ;)

I didn't pick up *all* the parts of what is listed in the store (I skipped the pads, as well as the sealant since I've already got similar products on hand), but here's what I see listed:

Abrasives/Sealant:
Blackfire Heavy Cut Aluminum Compound
Blackfire Fine Cut Aluminum Polish
Blackfire Wet Diamond Aluminum Show Polish
Blackfire Wet Diamond All Metal Sealant

Pads:
Level 1, 6-1/2 inch Pre-polishing Wool Pad
Level 2, 6-1/2 inch, Metal Polishing Wool Pad
Level 3, 6-1/2 inch, Metal Finishing Wool Pad
Level 3, 8-1/2 inch, Metal Finishing Wool Pad
 
Todd, you mentioned in your write-up that you'd sanded "up to 400" in some areas and "up to 1000" in others. By chance do you remember how many sanding steps you did and what grits you used? I'm sure cleaning up a rough casting takes the most amount of time, but choosing the right abrasives for the job should make doing the work as efficient as possible.

Polishing metal is no different from removing scratches and swirls in paint just a harder surface but the correction steps are the same. Correcting casting is a bit more work but not really. Just as correcting paint, start with the least aggressive approach. On really rough castings I've had to start with as rough as 36 grit sandpaper to level it out. You’re then going to need to sand the scratches out with a less aggressive sand paper moving progressively finer to make them more uniform, there is no other way.

When polishing metal I don’t use water with the wet dry I use WD40. There is no need to soak it first the WD penetrates the paper pretty quickly, yes it’s messy but the paper will last a lot longer.

Simply start off with a grit that is going to level out the scratches that you currently have and work up to a finer grit. Just as in using paint compound the aggressiveness of the polish will determine just how fine of paper you will need to end with, and also whether or not your machine polishing or by hand, 800 or 1000 grit would be a good starting place to test your polish if machine polishing. If your still seeing sanding scratches then simply move to a more aggressive polish or to a finer grit paper to remove them. Just as you would if it were paint.

An easy way to tell when to move to the next grade is to sand in opposite directions with each grade. Once you can only see scratches going in the direction you are sanding then move to the next finer grit. Again depending on whether you are going to finish off by hand or machine will determine just how fine you need to go, if finishing off by hand then I would go up to 2500 or maybe even 3000. Obviously the finer you go the easier it will be to polish in the end. By using this process you can have stainless or aluminum looking like a mirror.

An important thing to remember is that you don't want to end up with a wavy surface and during the sanding process it may not be obvious but will be once it's polished. One of the tools I use when sanding larger surfaces is a 4" palm sander using full sheets of paper just like you would if you were working on wood. I have one dedicated just for this because the backing pad will be shot for wood work after words. For smaller surfaces I either use a regular rubber sanding block or something else in it's place to fit the surface working on. I've even used pink erasers as a sanding block. The Mequires sanding sponges work extremely well for sanding metals

Good post! I'm familiar with the basic technique for sanding, and you give some great tips. I was mainly curious what Todd was using in terms of the specific abrasives and how many stages he had to use to get up to a good compoundable result... when it comes to the rougher grits (24, 36, 60, 80, up to around 180-220 or so when there are many more choices available) I've always had trouble finding good papers that give good even results on soft materials without taking a lot of extra effort when moving on to fine grits.

For that matter, I wonder if there are super-aggressive emery paper or crocus cloth options available as alternatives since they're far more flexible than traditional sandpaper....
 
Charles- I used Norton papers I picked up at Home Depot. The 400 grit was able to level out most of the deep stuff. On a couple of VERY ROUGH spots are started with 220 grit and followed those areas with 4000. I went from 400 grit (Norton) to 600 grit (Norton) on just the bad areas. Then I sanded the entire piece with 1000 grit Meguiar's Unigrit. This is, of course, if my memory serves me correctly.

One one spot I sanded from 1000-1500-3000, but once I started compounding I realized that BLACKFIRE Heavy Cut Aluminum Compound had more than enough power to level the 1000 grit marks on this particular metal so the additional sanding was pretty much a waste of time.
 
Back
Top