Fast and easy engine detailing - 15 minutes to a clean engine

Todd@RUPES

Just a regular guy
5050.jpg


Ready..... Set.... GO!!!!!

With careful product selection and fairly decent organization, it is possible to clean a modern engine compartment in around 15 minutes. Keep in mind, this is not a heavy-duty detailing, although the results will look like it, but rather a very quick and thorough cleaning designed to make any engine compartment look great in a matter of minutes.

  1. Pre Soak Grimy Areas - 3 to 5 minutes
  2. Protect Sensitive Engine Components - done while cleaner is dwelling
  3. Rinse Off Pre Soak - > 1 minute
  4. Spray and Agitate Cleaner - 3 to 5 minutes
  5. Rinse Off Cleaner- > 1 minute
  6. Dry Engine Compartment - 3 to 5 minutes
  7. Apply Protectant/Dressing - 1 to 3 minutes

Working at a quick base it is possible to finish all of your work in 12 to 20 minutes.

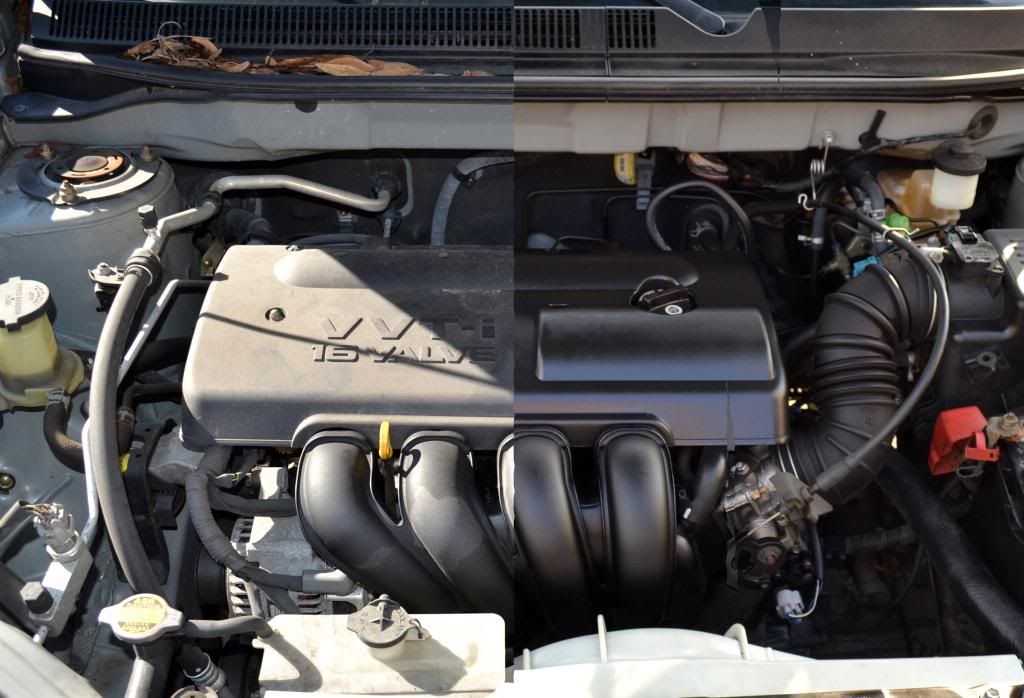
I used my "beater" 2003 Toyota Matrix to as a test subject. The engine on this car has NEVER been detailed and was covered in 10 years worth of oil, filth, grit, dirt, leaves and whatever else found its way underneath the hood.


Products Used:

BLACKFIRE All-In-One APC
Wheel Woolies Detail Brush
Metro Vac Master Blaster
Sonus Trim & Motor Kote
Aluminum Foil
Hose & Water

BLACKFIRE All-In-One All Purpose Cleaner - BLACKFIRE AIO APC is a great choice for engine degreasing, particularly when used at full strength. It's leather-safe nature makes it ideal for cleaning the multitude of materials found under your hood. Best of all, it is a fast acting formula that requires a minimal dwell time for big results.

Sonus Trim & Motor Kote: Sonus Trim & Motor Kote remains my favorite engine protectant/dressing. Older plastics can tend to look dull and gray after they have aged, particularly the plastics on an older vehicle such as this Toyota. Sonus T&MK dries to the touch and provides long-lasting good looks!

Wheel Woolies Detail Brush - The Wheel Woolies Boar's Hair Detail Brush is a great choice for fast engine detailing because it quickly gets into most tight areas, while having enough surface area to clean larger areas.

Metro Vac MasterBlaster 8hp - After rinsing your engine, it is important to blow as much water out of the compartment as possible, away from electrical connectors and sensitive components. The MasterBlaster, with the benefit of heated air, quickly and effective dries the engine compartment.

Aluminum Foil- Use aluminium foil to protect sensitive engine components. Tearing the foil into squares, prior to engine detailing, makes easy and effortless to protect the engine. Simply cover, scrunch around the part, and move on.

Note: I would also recommend getting a pair of quality Nitrile Gloves to protect your hands any chemicals, grease and splatter.


Before:

The engine was covered in 10 years of filth, grease and debris....

1.jpg


2.jpg


3.jpg


4.jpg


5.jpg


Step One: Pre Soak Grimy Areas - 3 to 5 minutes

Start your speed engine detailing by pre-soaking your engine compartment with BLACKFIRE All-In-One APC.

6.jpg


Make sure to cover liberally.

7.jpg


8.jpg


You can see the full strength BLACKFIRE breaking down the grease and grime instantly.

9.jpg


Step Two: Protect Sensitive Engine Components - done while cleaner is dwelling

Cover sensitive engine components like the alternator, throttle position sensor and electrical contectors with aluminum foil. If you don't know what you should be protecting, then consider having the car done professionally. If you are a professional, then learn!!!

10.jpg


11.jpg


Step Three: Rinse Off Pre Soak - > 1 minute

Quickly rinse off most of the pre soak. Avoid spraying a heavy stream of water directly onto the engine, instead focus on rinsing the areas around the engine.

12.jpg


13.jpg


Step Four: Spray and Agitate Cleaner - 3 to 5 minutes

For this step, I like to hold the sprayer in my left and the Wheel Woolies Detail Brush in my right. Quickly work around the engine compartment, spraying then agitating the solution.

14.jpg


15.jpg


Make sure to focus on the areas of heavy filth.

16.jpg


17.jpg


18.jpg


19.jpg


21.jpg


22.jpg


23.jpg


24.jpg


Step Five: Rinse Off Cleaner- > 1 minute

12.jpg


Step Six: Dry Engine Compartment - 3 to 5 minutes

The Metro Vac MasterBlaster easily removed 90 percent or more of the water in just seconds. Spend the remaining time blowing out all of the crevices, cracks, nooks and crannies.

25.jpg


26.jpg


Make sure to remove all the aluminum foil!

27.jpg


Once clean, the aged and neglected plastics looked gray and aged, but clean...
 
Most importantly, the details were clean...

30.jpg


Step 7: Apply Protectant/Dressing - 1 to 3 minutes

The last step in an engine detail is restore a nice, dark and rich sheen to the engine components. My favorite engine dressing/protectant remains Sonus Trim & Motor Kote. This long-lasting, polymer-based protectant creates a perfect sheen that compliments any engine. For more a more in depth how-to and review click here: Product Review: Sonus Trim & Motor Kote

31.jpg


Lightly mist onto all engine surfaces an allow to dwell (without touching) for several hours).

32.jpg


After misting onto the engine, close the hood (leave it cracked) and start your engine. Allow to warm up to operating temperature to boil out any sitting water from deep within your engine compartment.

28.jpg


After Pictures:

Note: Sonus Trim & Motor Kote takes approximately 4 hours to set completely, these pictures were taken about 3 hours after application so some wet spots are still visible.

33.jpg


34.jpg


35.jpg


36.jpg
 
Looks good Todd! I need to clean my engine bay once it warms up some. I have CG Citrus Power and Meg's Super Degreaser. Can anyone recommend a dilution ratio for either for engine bays?
 
Looks Great Todd!
I might have to try some of that Sonus, looks a lot easier than wiping every individual component.

One comment though for safety. Be very careful using aluminum foil around electrical components. Foil is a conductor and if it touches the wrong things it could create sparks and even fire. For safety, disconnect the negative terminal of the battery before using aluminum foil.
 
the results and turn around time are amazing!

Thank you. Fast, simple and easy is just the way this stuff should be (engine cleaning) :bigups

Looks good Todd! I need to clean my engine bay once it warms up some. I have CG Citrus Power and Meg's Super Degreaser. Can anyone recommend a dilution ratio for either for engine bays?


Meguiars Super Degreaser should be used between 1:4 and 1:10 depending on the grease build up. I am not sure about Citrus Power because I am not sure which product this exactly.

Awesome turnaround Todd !!!!

Looks Great Todd!
I might have to try some of that Sonus, looks a lot easier than wiping every individual component.

One comment though for safety. Be very careful using aluminum foil around electrical components. Foil is a conductor and if it touches the wrong things it could create sparks and even fire. For safety, disconnect the negative terminal of the battery before using aluminum foil.

Great point, don't use foil across the engine posts (or disco the battery to be safe). The Sonus Trim & Motor Kote is an amazing product!
 
Meguiars Super Degreaser should be used between 1:4 and 1:10 depending on the grease build up. I am not sure about Citrus Power because I am not sure which product this exactly.


Ok, awesome. I meant CG All Clean. Sorry for the confusion. I have to many APC's on my mind lol.

I was thinking the same thing with the foil. A good alternative to the foil would be garbage bags, plastic Walmart bags, or even towels if they don't get to wet.
 
Wow, Todd. You have always sung the praises of Sonus Motor Kote, and it certainly did not disappoint visually. What a great turn around!

Also, thank you for mentioning to wear gloves, and for doing so in most of the pictures (I think the first ones spraying the BlackFIRE APC did not have you wearing them.) Regardless, it is a great message since the chemicals in auto detailing products are generally harmful, and something as simple as wearing gloves can stop the potential adverse effects. We need you around as long as possible to keep writing awesome how-to articles and reviews!

:yourrock
 
Todd -
Loved the post and pictures.. Thank you !

You may need to think about making up some baking soda and water and pouring it over your Battery connections to neutralize the corrosion there and help prevent this from killing your battery when you might need it...

Better still, after the baking soda neutralizing bath, take off both connections, get that little silver battery cleaner, twist off the cap and expose the steel wire brush, and run it through both cable connectors, use the other end and push on the posts, and get all connectors clean and shiny again.
Dan F
 
I can make an engine bay look pretty stunning but I couldn't touch your speed or efficiency. Great job and one you could make money on. Then again, I don't bend at the lower back as I once did either. ;)
 
It's the way I've been doing it for some time...but I use PB BnB mixed with water 40 water 60 BnB and use a fine misting sprayer

Nice work Todd
 
Back
Top