Wet sanded chip into base coat, repair options...

alext72888

New member
So today I got around to sanding down a little bubble of touchup paint that I filled in last Month. My intention was to make a bubble of touch up paint, wet sand it flush with the rest of the paint, then compound and polish to a shine so everything is level.

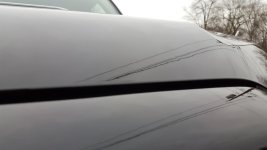
Well, after I sanded with 1500 and polished, I could see a more noticeable shiny bump.

I tried to wet sand it more, and screwed up and took off some paint in the process. So now I need to figure out how to fix it... again.

I now realize that with touchup, less is more, and the more you try and "fix" something, the worse it's gonna be.

For the future, how do you polish touchup paint to a flush finish?

I was stupid, and didn't use a sanding block with a flat surface. Instead, thinking it would be a good idea, I put a small piece of sandpaper on my fingertip and started sanding. This inevitably "scooped" out a portion of the clear coat, and paint, right next to the Original chip. So I created a new area to need fixing.......

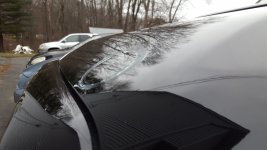
So I scraped out the small area of damaged paint down to the primer and filled it again with just the basecoat of paint. Its drying right now... here are some photos of it drying, and an animated gif so you can see the warped bowl shaped reflection around the filled in chip.

Note: look closely at the wires in the reflection. See how they warp around the chip? Yep, that sucks.

http://i.giphy.com/11Db6CW11cPgqI.gif

here is the album

Imgur: The most awesome images on the Internet

note: the filled in area is the size of a pea. the high resolution macro photo makes it look HUGE. The "warped" reflection area is the size of a dime.

I already ordered the lanka repair kit and we will see how well it flattens out.

I don't know if I should wet sand again with a sanding block, then put the top coat over it, and wet sand again, or just wait and see how the lanka works.

I'm leaning towards just waiting and trying the lanka because if I screw it up again, at least I can start over.

My other option is to go to a bodyshop and ask them if they can fix it without repainting the whole hood. Maybe they can fill it and blend it

And if all else fails, Luckily for me, I've been eyeing the AVS Aeroskin bug deflector for this car and it would cover up the whole mess, and prevent future dings in the same location
 
OK, I think a glob of touch up paint to protect the basecoat where you burned through then the protector to cover the mess is the best way to go at this point.

Now that's out of the way... Next time you want to deal with a chip I'd suggest this: Clean any wax or compound out of the chip with alcohol. If the basecoat is showing through, instead of using the basecoat touch up by itself then covering with clear, mix the base and clear together on a paper plate - three drops of base, two drops of clear - then add a couple of drops of slow lacquer thinner to the mix and stir.

Use a very fine tipped brush or one of the little daubers like the Griots touch up brushes to fill the chip with paint. Stay inside the chip and put enough so the paint fills the chip and leave a little high spot. When the lacquer thinner dries out the bump will dry more or less flush with the rest of the paint - then - walk away. Polishing over time will lay it down flatter as will just normal wear and tear. Lacquer is much softer than the current paints.

If you absolutely can't stand it and have to sand it flat - then use a very hard block so the paper doesn't role over the chip and wear through the existing paint around the chip and hit just the high spot. Then, polish with a foam pad - a wool pad will tend to pull the paint out of the chip once you disrupt the hard surface.

Robert
Thank you for the response!

I may end up just doing what you mentioned and doing my best without sanding on flattening in an area of touch up paint into the chip and calling it a day.

Tomorrow I will be asking a body shop or two for some opinions and seeing what my repair options are if they tried their hand at filling it and blending it. If it costs me less than 200 dollars I would go for it.

LESSON LEARNED THE HARD WAY.
 
..LESSON LEARNED THE HARD WAY.

Sigh...all too common.

alext72888- Welcome to Autopia!

Sorry to hear about this..kinda a perfect storm of touchup issues IMO.

A chip "the size of a pea" is pretty big, and it looked that way in the video. Doing that via a touchup with a brush/etc. is a tall order.

You learned your lesson about using a piece of sandpaper without a backing block (I probably would've used a sanding block like the ones Meguiar's sells).

I myself prefer to level with 2K rather than the 1500 but IMO it's a personal preference thing. Speaking of personal preferences, here's *my* view on touchups:

I clean the chip out with a bodyshop/paint-prep solvent. I might/might not do a little sanding after that if only to ensure that the edges are firmly attached.

I don't mix my basecoat and clear nor do I add lacquer thinner to (lacquer) touchup paint. (NOTE: I am *NOT* trying to be wrong/right-contentious with WhyteWizard, it's jst that our experiences have differed and we both go with what works for us.)

As WhyteWizard said, use either the disposable touchup brushes or a small artist's brush (sizes 0 to 000 are my faves).

I fill the bottom of the chip with basecoat and then fill the chip to "blob"-level with clear. This can take numerous applications, each done very carefully. Then I let it sit for a while to cure (at least several days and often longer).

Then level with something like a Meguar's Sanding Block, but do it *VERY* incrementally- even "one touch with the block, inspect with magnification, repeat". It's important to *NOT* mess up the surrounding factory paint very much as it'll be a lot harder to compound/correct than the touchup paint will (hence my reliance on magnification, even when doing the leveling).

I don't know what the bodyshop will say...I know *one* painter who can do touchups better than I can and a *lot* of them who can't. I doubt that I could fix your issue to my satisfaction so I caution you to have, uhm...realistic expectations.

Eh, sorry if this sounded all negative...touchups with conventional touchup paint leveled with Langka or with the DrColorchips system are one thing- they generally yield so-so results but that can be good enough; touchups with conventional touchup paint and abrasive leveling are a whole 'nother situation- they can *sometimes* yield great results, but can very often turn out worse than the original problem when attempted by people without a lot of experience. And yeah, getting that experience can take a while and you have to be *SO* careful to avoid making things worse. It's often a whole lot harder than people expect.
 
Having been a Painter before, I'm with Robert's advice, as that is how Painters have been fixing touch ups for decades...

I totally understand that there will always be another process and we all certainly benefit from sharing information here, so thank all who have contributed their best shot at this..

Sorry, Alext7288, that you have learned the hard way but there is still hope that this can all be made better..

I have always used Robert's process for touch up because especially today, the water based paint is not ever going to be user-friendly for this, as much as a good lacquer based touch up paint and a little thinner - which is guess what - the Dr.ColorChip product and method... :)

For years, I have been talking about the best ever brush I have ever found to do this. It has been called a painter sword brush, again, for decades, and finally, I have found it here ---

Amazon.com: MACK Sword Striper PINSTRIPING BRUSH 20 SERIES Size 00

You want to have a little thinner, as has been already said, to wet the brush and get it to that nice sharp point, and thin the paint so it is easy to use, will be easier to clean off if you make a mistake, and it will always "flow out" and settle in these places much better with a nicer finish when dry....

I am sad to see that big blob of paint on your hood.. Hopefully it will cut down to level and you can get this looking better...

One of the main reasons to use the brush Im showing you here is to give you the ability to use the LEAST amount of product to just do the job and NOT spread out the job to a much larger area to now have to deal with..

Good luck !
Dan F
 
Thank you everyone for the responses.

I will stop by a bodyshop and ask a guy I know there for an opinion on what he could do for it if I wanted to respray that area and blend it. If he feels he can get it close to perfect for a reasonable price, I'll go with that, because there is no way I can get to the perfection desired with the tools and experience I have.

If he feels it will always be noticeable no matter what, I will be putting on an aeroskin over it, which luckly is the same color as the car, and will cover the spot, and prevent future chips in that vulnerable area.
 
Stokdgs- Huh, I never thought of using a pistriping brush...even considering the tip, it somehow looks *big* to me, at least for a 00.

Eh, I oughta order a set of those just to see how I like 'em.
 
Stokdgs- Huh, I never thought of using a pistriping brush...even considering the tip, it somehow looks *big* to me, at least for a 00.

Eh, I oughta order a set of those just to see how I like 'em.

Mi Amigo -

Here is a link to a thinner one.. Amazon.com: MACK 20 SERIES Squirrel Hair SWORD STRIPER PINSTRIPING BRUSHES: SET OF 3 BRUSHES

Remember, you are only using the tip of the brush to - just put a little bit of paint into the spot at a time, and not get any paint anywhere else..

Lacquer thinner is the easiest thing to use to prime the brush, use it, and then clean it up..

I have had the same brush for 40 years and it is still perfect from using it in this manner..
Dan F
 
Stokdgs- Roger that, I'm on the same page as you now...just wondering how they'd be different from the various little artist's brushes I have now (sized 1-00000) since you're only using the tip. Might have to find out some time, heh heh, the Crown Vics previous-owner touchups are calling me, but I'm not listening! :D

Hey, maybe you and/or WhyteWizard can school me on something- Why mix the basecoat and clearcoat together into a "single stage touchup paint" instead of doing them separately the way I do? I always think of basecoat as being UV-sensitive so I want a lot of clear "on top" to block it.
 
UPDATE!

So I ended up finding someone who does small paint repair instead of a body shop redoing the entire hood. Cost me 200 dollars, but the man did great work.

The paint under the clear I would say is back to 100% factory, and the clear coat is 90-95% of what it used to be. If you look really hard under certain reflections, you can see there is something there that doesn't match the clear coat, but I'm okay with that. Maybe the clear bra that I will put over it will mask it somewhat more.

the 200 dollar lessons:

1. ALWAYS us a small sanding block, and ONLY if you absolutely HAVE to sand. Start with 2000+ grit with light to no pressure
2. Factory clear coat is thin thin thin
3. Unless you are a professional, less is more. As a amateur, you'll likely make things worse.

Pics:

In the Gif, keep an eye on the top part of the screen, you can see a faint area that has a warped reflection.
On one of the photos, I circled where the chip used to be with some wax.

Here is the GIF Link

http://i.giphy.com/6dgNO7I3a7p0k.gif


attachment.php

attachment.php

attachment.php


Here is the link to larger images on imgur and the GIF animation (because the forum wouldn't let me upload it for some reason)
 

Attachments

  • 20160117_151121.jpg
    20160117_151121.jpg
    280.7 KB · Views: 107
  • 20160117_151128.jpg
    20160117_151128.jpg
    252.3 KB · Views: 108
  • 20160117_151600.jpg
    20160117_151600.jpg
    317.6 KB · Views: 109
alext72888- Hey, that turnd out really well! Glad you were able to get it sorted out to your satisfaction, and IMO $200 is a good price to take the whole thing off your mind. And yeah...lesson learned. It's just one of those things that's a lot trickier to pull off than most people expect.
 
attachment.php


Some paint came off my track car when the old clear bra was being removed. I was thinking of repairing myself with a combination of touchup paint (bottled or aerosol) and sanding. This thread has discouraged me somewhat! Would you guys recommend I just have a professional touch it up? Being metallic it obviously is not going to be perfect but the cost of a full front end does not interest me.

As you can see, there is a tiny dot where the primer came up. The flat grey part is the primer. The "streak" you see is just adhesive that I was able to remove.
 

Attachments

  • IMG_4808.JPG
    IMG_4808.JPG
    591 KB · Views: 87
Would you guys recommend I just have a professional touch it up? Being metallic it obviously is not going to be perfect but the cost of a full front end does not interest me.

As you can see, there is a tiny dot where the primer came up. The flat grey part is the primer. The "streak" you see is just adhesive that I was able to remove.

Even a good repair will probably look even worse than you imagine. Now that I've primed you for disappointment ;) I'd try touching it up and giving thought to *NOT* trying to level it. See how that goes, and live with it for a while before you definitively make up your mind. And if you do decide to level it, try that by doing it chemically as opposed to mechanically/abrasively.

If that doesn't work you're just out some time and the cost of some touchup paint; no harm done otherwise should you decide to let a Pro try.
 
Thanks for the advice. By chemically do you mean by using paint thinner or the like? I am only really familiar with the Dr. Color chip method but I assume that this defect could be too large for that.
 
Thanks for the advice. By chemically do you mean by using paint thinner or the like? I am only really familiar with the Dr. Color chip method but I assume that this defect could be too large for that.

For my next chip I will be using langka blob eliminator as it has the ability to level paint without using something extreme like sand paper. If you mess up, you can just start over.

My guy that fixed my problem is in canton ct. Pm me if you want his business name and can go there.
 
Thanks for the advice. By chemically do you mean by using paint thinner or the like? I am only really familiar with the Dr. Color chip method but I assume that this defect could be too large for that.

Yeah, I was thinking Langka (AFAIK it's a mix of lacquer thinner and something else; whatever it is, itworks better for me than straight thinner) or the DrColorchips, which I've used on some pretty big spots. Being metallic does complicate the whole thing, but I've used the DrColorchips on some pretty big issues. BTW, I use the DrColorchips paint as if it were a regular touchup paint anyhow (rather than their recommended "smear it all over" approach), and I use their solvent as if it were Langka, as that works a lot better for me.
 
Back
Top