Using Meg's 105 with 205

mbs431

New member
Hey Guys

I have just recently purchased this combo and I know the 205 should be followed by the 105. Curious, do you polish the entire vehicle first using 105 then do the entire vehicle again with 205? Or, do you break them up into sections, like polish a part of the hood with 105, wipe it down with a mf towel, then follow that same section with 205 before moving onto the next section?

Thanks!
 
mbs431 said:
Hey Guys

I have just recently purchased this combo and I know the 205 should be followed by the 105. Curious, do you polish the entire vehicle first using 105 then do the entire vehicle again with 205? Or, do you break them up into sections, like polish a part of the hood with 105, wipe it down with a mf towel, then follow that same section with 205 before moving onto the next section?

Thanks!


After doing a test spot to confirm you've dialed in a good process. Do the entire car with one product first and then do the rest of the car using the next product.


Doing one panel at a time would take longer and not work very well as you need to over lap each section you are working on.
 
mbs431- The exception that comes to mind is when time/etc. constraints require you to do the job piecemeal. If necessary, you can do one panel after each of a series of regularly scheduled washes.


Otherwise, what RaskyR1 said; just dial in the process on a test spot to make sure you're on the right track.


Oh, and Welcome to Autopia!
 
mbs431 said:
Or, do you break them up into sections, like polish a part of the hood with 105, wipe it down with a mf towel, then follow that same section with 205 before moving onto the next section?

Thanks!


A similar question came up on AG and here was my reply...


I'm probably the odd man out...


If the car has a painted roof, I'll do all the steps to the room right up to the LSP and then cover the roof and tackle the rest of the car. That way I'm not getting any splatter on lower panels that have already been wiped clean from the next steps done to the roof.


I don't know why I do it this way but that's how I've been dong it for years, maybe decades. I did it that way to this El Camino and also to this 1051 Desoto, in the picture with the Desoto you can see a soft flannel bed sheet covering and taped down so that it won't slip off.


In these two cases, bot cars were sanded, cut, polished and the sealed before the buffing steps were started on the lower panels.


Taken from this thread...


If it has paint... it gets polished...


Post #4


Mike.Phillips@Autogeek said:
Edging

I edged the entire car, edging means to go around and remove the sanding marks from all the edges leaving only the major portions of the panels left to compound.


Most people just compound the entire panel from start to finish and that approach works and is used in body shops all the time, but I like to edge all the panels for a couple of reasons.


1) This isn't my car and for that reason I want to be very careful. If it were my car I would edge it, even though it's not my car I treat it like it is my car.


2) Removing the sanding marks around all the edges using a 4" pad is actually very easy to do and gives you GREAT control over the process, especially if you have the Flex 3403 or a lightweight and small rotary buffer to work with. You remove most of the risk for burning and edge or a high point due to the control factor.


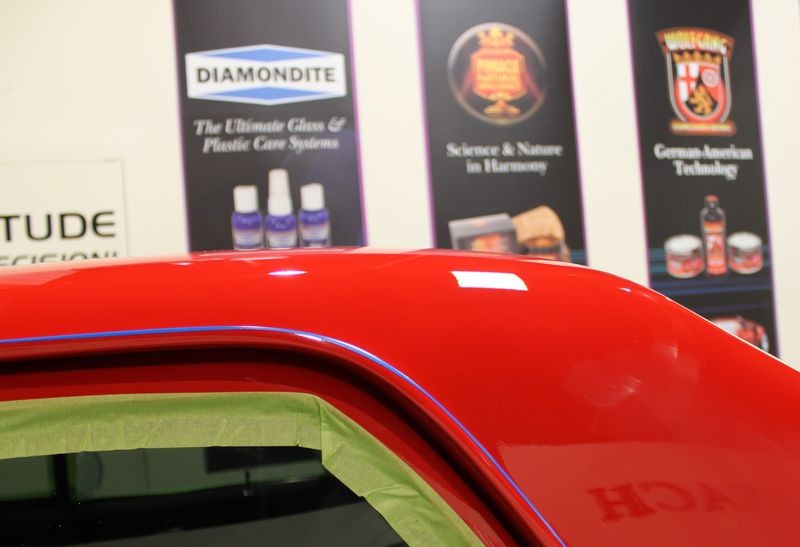
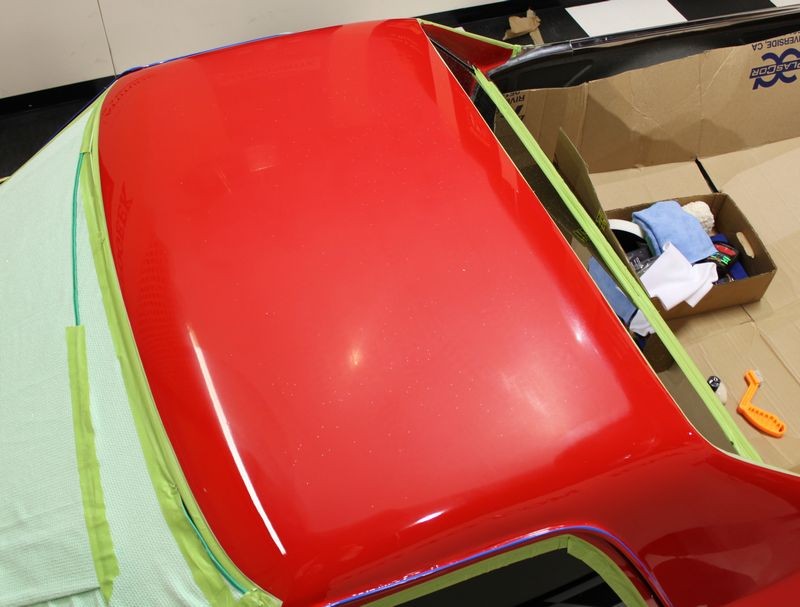
Here's the roof edged,


EdgingRoof001.jpg


EdgingRoof002.jpg


EdgingRoof003.jpg


EdgingRoof004.jpg


EdgingRoof005.jpg


EdgingRoof006.jpg


EdgingRoof007.jpg


After I finished edging the roof, I was finished edging the entire car. The next step is to remove the sanding marks out of the center portions of the roof, the major portions of the panel. Using #3000 Grit Foam Finishing Discs, means it only takes a just a few minutes to compound out the major flat portions of the roof using the Makita with a W5000 Double Sided Wool Cutting pad with the M105.


Next I machine polished the roof 3 times with the rotary and then once with the DA and then I sealed it with M21. I probably won't get those pictures uploaded and inserted however as I'm going back out to finish compounding the major portions of the rest of the panels on the car.


I usually work the roof of a car all the way to wax, or paint sealant and the tackle all the panels below it afterwards. I'll share why tomorrow but feel free to take a guess as to why someone would work a sand, cut and buff project like this?
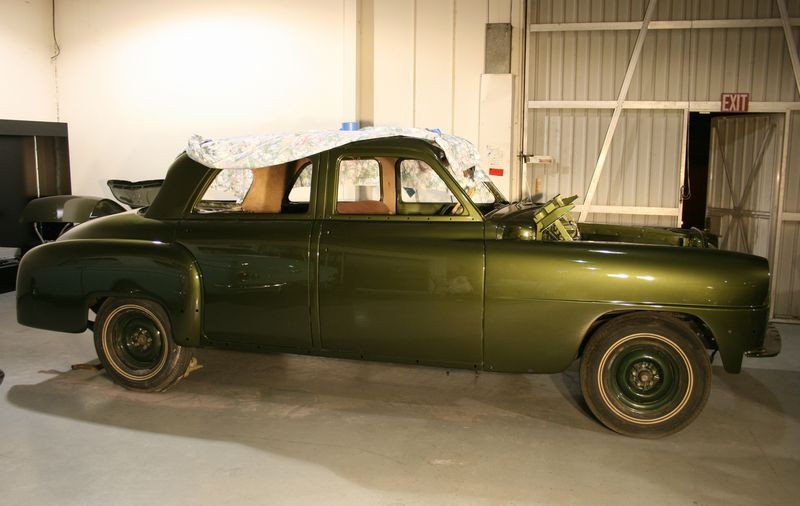


Here's a 1951 Desoto I actually Damp Sanded before Damp Sanding was a term, I did this one with Richard Lin.


1951Desoto001.jpg


If you look carefully at the roof, you'll see it has a soft, flannel sheet taped onto it, that's because we sanded, cut, polished and sealed the paint before tackling the lower portions of the car. We damp-sanded the entire thing at one time, but did the buff-out on the roof from compounding all the way through to sealing in one process and then covered it to prevent dust from accumulating on the finish.


If you're using a DA Polisher like a Porter Cable, Meguiar's or Garage DA Polisher, then here's two videos that show how to use any of these tools to remove swirls and polish to a high gloss and even apply a liquid wax or paint sealant.


http://www.autopia.org/forum/autoge...swirls-scratches-water-spots-da-polisher.html


And, how to do a Section Pass...


Video: How to do a section pass


:)
 
105 around the whole car, then 205 the whole car then final polish the whole car then wash whole car, then seal whole car.


you will add lots of time to the detail if you are constantly changing pads and machines and towels with each section! Like Chad said, you will also double the work since you will be overlapping sections
 
Mike Phillips said:
A similar question came up on AG and here was my reply...


I'm probably the odd man out...


If the car has a painted roof, I'll do all the steps to the room right up to the LSP and then cover the roof and tackle the rest of the car. That way I'm not getting any splatter on lower panels that have already been wiped clean from the next steps done to the roof.


+1


I do the entire roof through all steps up to wax/sealant- prevents any splatter, dusting, myself or the electrical cord from mistakenly brushing against a finished side panel. Follow the same process when washing with ONR- each side of the roof and then windows/sail panel/pillars, followed by hood and trunklid, then sides.


Practicing the same process improves efficiency. Know your steps and you'll never be wondering what to do next, or what has or hasn't been done.
 
[quote name='Mike Phillips']A similar question came up on AG and here was my reply...


I'm probably the odd man out...


If the car has a painted roof, I'll do all the steps to the room right up to the LSP and then cover the roof and tackle the rest of the car. That way I'm not getting any splatter on lower panels that have already been wiped clean from the next steps done to the roof.


I don't know why I do it this way but that's how I've been dong it for years, maybe decades. I did it that way to this El Camino and also to this 1051 Desoto, in the picture with the Desoto you can see a soft flannel bed sheet covering and taped down so that it won't slip off.


In these two cases, bot cars were sanded, cut, polished and the sealed before the buffing steps were started on the lower panels.


END QUOTE


Mike I'm glad that you brought this up about edging the car. You mentioned that you like to use a 4" pad. Are you speaking of wool or foam? I have a car that has been wet sanded and finished up with 2000 paper that I will be polishing out.


When buffing around door closure edges do you recommend buffing while the door is in the closed position or the alternative opening the door and holding it open while bracing it with your knee?


If the entire door panel has been sanded my concern is which way is the best approach to buff right up to the edge without burning off the painted edge. What way is the best approach to finessing this sensitive area?


Would you also be using a rotary buffer for the first step of removing the heavier scratches around these edges with a wool or foam pad?


Thanks for your feedback on this.
 
edges I would rather use either a softer foam pad like white or megs yellow, or a wool pad like PFW and make more passes rather than go after it with a cutting foam or a heavy wool pad
 
gdumond said:
Mike I'm glad that you brought this up about edging the car. You mentioned that you like to use a 4" pad. Are you speaking of wool or foam? I have a car that has been wet sanded and finished up with 2000 paper that I will be polishing out.


I personally like to use wool cutting pads for the initial cut when removing sanding marks. Usually you need the more aggressive cutting action the wool offers over a foam cutting pad plus a wool pad, (when used the same way a foam cutting pad is used), will generate less heat and thereby reduce the potential for you to burn or twist the paint if you get it too hot.


It's a lot easier to remove sanding marks with any pad and compound if you finish out to a higher grit versus #2000, for example #3000 or even #4000 in Abralon. Removing #4000 is a cake walk.


gdumond said:
When buffing around door closure edges do you recommend buffing while the door is in the closed position or the alternative opening the door and holding it open while bracing it with your knee?


The latter most of the time, opening a door, or a hood or a trunk lid gives you just one edge two focus on instead of two edges. This is especially important on older classic cars as a lot of times the panels won't be perfectly align and you'll have one panel higher or sticking out further than the other creating a potential for a burning problem to the high edge.


Use your knee or in my case, find something to hold a door, hood, trunk-lid open a few inches or so... whatever it takes to isolate the panel you're buffing.


If you tape all the edges then you don't have to open doors, hoods, trunk-lids etc, but then you have about an 1/8" of paint surrounding the panel that doesn't get buffed, (it shouldn't be sanded), and you'll also have a residue line to remove at some point. Which approach you use is up to you...


gdumond said:
If the entire door panel has been sanded my concern is which way is the best approach to buff right up to the edge without burning off the painted edge. What way is the best approach to finessing this sensitive area?


Tape the edges. This is a pain but it prevents you from accidental burning the paint on an edge. Even if you're the Highest Master of the Rotary Buffer, it's all to easy to flutter over an edge at some point while buffing out and ENTIRE car so taping reduces the potential.


The problem as stated above is anything covered by tape will not get sanded or buffed and can have a different appearance then all the paint that gets sanded and buffed. At some point you have to ask yourself...


How much am I getting pad to create a work of art?


I'm all for doing your best no matter what the dollar figure, but doing perfectionist work can become very unprofitable and burn you out, so find a balance of doing great work and doing perfectionist work.


Bring the focus back to the customer, what they want and what they are willing to pay for can be to different things, we already know "we" all want to do our best but you still have to find balance.


(I get tired of the question about the 1/8" of paint that doesn't get polished to perfection if it's taped-off, usually by guys that don't even do perfectionist detailing)


gdumond said:
Would you also be using a rotary buffer for the first step of removing the heavier scratches around these edges with a wool or foam pad?


Definitely.


I'm impressed with what a Surbuf pad with M105 can do on the Griot's Garage ROP but for practical reasons, when it comes to removing sanding marks out of an ENTIRE care, you just can't beat the speed and effectiveness of a Rotary Buffer. Not saying other ways don't work, just saying the old RB is a workhorse that can remove a lot of paint quickly and that's what you want when making the initial cut.


:)
 
Great feedback. Thanks again Mike! It's nice to have a Pro in my Bull Pen I can get great advice from. Keep up the great work and valuable comentaries you so unselfishly contribute to this forum.


Greg
 
Back
Top