Navigation
Install the app
How to install the app on iOS
Follow along with the video below to see how to install our site as a web app on your home screen.
Note: This feature may not be available in some browsers.
More options
Style variation
You are using an out of date browser. It may not display this or other websites correctly.
You should upgrade or use an alternative browser.
You should upgrade or use an alternative browser.
UPDATED: Menzerna/Lake Country Polish Range Charts
- Thread starter JonB
- Start date
I really like the Water Bandit. Highly recommended. Here's some details on my experience with it.
- It doesn't get moldy for me. Whenever I take it out of its container, it's about as damp as when I put it in. It's not really wet or dripping wet, just damp, moist. I wonder if the mold problems are due to humidity in those locations or something in the water.
- One time, I forgot to put the WB back into its container and the next weekend it was almost hard as a rock. Not good. Instead of unfolding it, I very carefully ran it under water until it became soft again. I was afraid of breaking it otherwise. Nonetheless, I think from this incident, there's 5 small 1/8" tears in one corner.
- I rinse it (hose it down) before and after use. When using it, I fold it and use it like a squeegee, wiping it across the car. I read and followed the instructions on the container.") I wring it out after a few swipes. After each time, I check for dirt. I think this is about as risky as dragging anything across your car, so as suggested above, I'm going to try just laying it on the car next time, even though that may be less efficient, but it's also less prone to scratches. Then I'll follow up with a 100% cotton towel.
I wring it out after a few swipes. After each time, I check for dirt. I think this is about as risky as dragging anything across your car, so as suggested above, I'm going to try just laying it on the car next time, even though that may be less efficient, but it's also less prone to scratches. Then I'll follow up with a 100% cotton towel.
-- Ed
- It doesn't get moldy for me. Whenever I take it out of its container, it's about as damp as when I put it in. It's not really wet or dripping wet, just damp, moist. I wonder if the mold problems are due to humidity in those locations or something in the water.
- One time, I forgot to put the WB back into its container and the next weekend it was almost hard as a rock. Not good. Instead of unfolding it, I very carefully ran it under water until it became soft again. I was afraid of breaking it otherwise. Nonetheless, I think from this incident, there's 5 small 1/8" tears in one corner.
- I rinse it (hose it down) before and after use. When using it, I fold it and use it like a squeegee, wiping it across the car. I read and followed the instructions on the container.
I wring it out after a few swipes. After each time, I check for dirt. I think this is about as risky as dragging anything across your car, so as suggested above, I'm going to try just laying it on the car next time, even though that may be less efficient, but it's also less prone to scratches. Then I'll follow up with a 100% cotton towel.-- Ed
Todd@RUPES
Just a regular guy
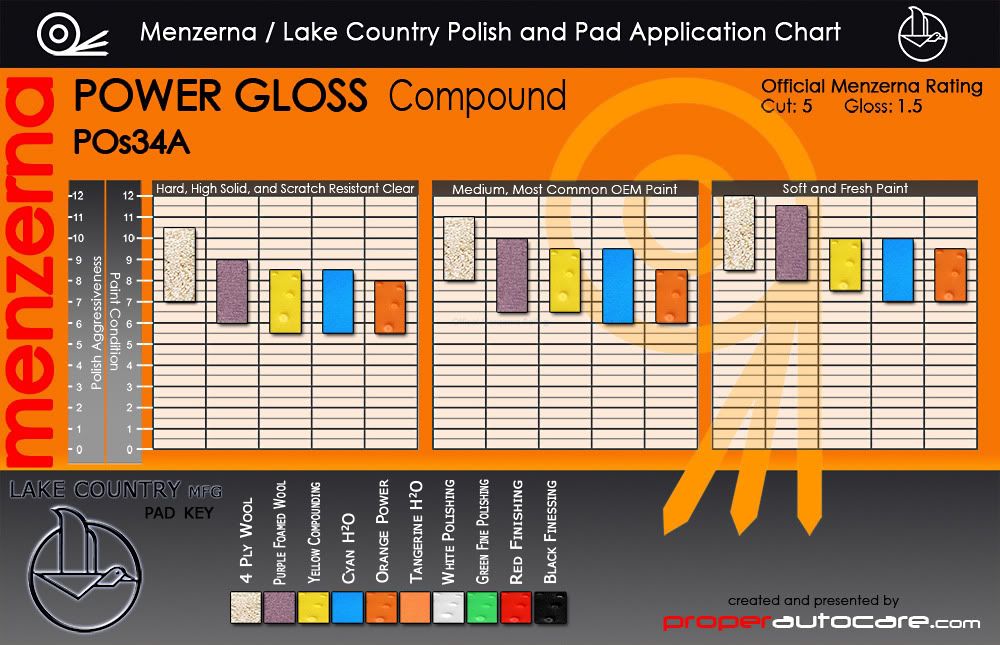
These charts are for reference only. The process of machine polishing removes trace amounts of paint and leaves behind very fine scratching on the paint's surface.
The total amount of paint removed would be referred to as the cut. This is as also known as the Polish Aggressiveness. The higher the number at the top of the pad, the more aggressive the pad and polish combination.
The paint condition key works the same way. The higher the number, the more damaged the paint, in terms of the depth of the defects. This is allows theses charts to show which polish and pad should be capable of removing the defects (top of the bar) but also the resulting finish of using that combination.
EXAMPLE: The paint is in condition 10. This would be heavily scratched, with deep penetrating defects or even sanded with 2500 grit. These defects have serious depth. If we are working on medium paint we could use a Lake Country Purple Foamed wool pad in combination with Menzerna POS34a Power Gloss.
This would leave the paint in a condition of roughly 6. Menzerna PO203 Power Finish and a Tangerine H20 Pad should clean up the residual marks left behind from the first step while leaving the finish at roughly a 3. 3 would represent very very fine (sometimes invisible) marks that could benefit from a final polish.
From here we could choose Menzerna PO106fa and a Lake Country Black Finishing pad to bring the car to a perfect luster.
Power Gloss is a nice cutting compound that is recommended for use with a rotary polisher. Power Gloss is very effective at removing sanding scratches, deep swirl marks, and other extensive damage.
Cut: High
Finish: Moderate
Dusting: Moderate
Filling Potential: Low
Ease of Use: High
New Label Chart
Old Label Chart
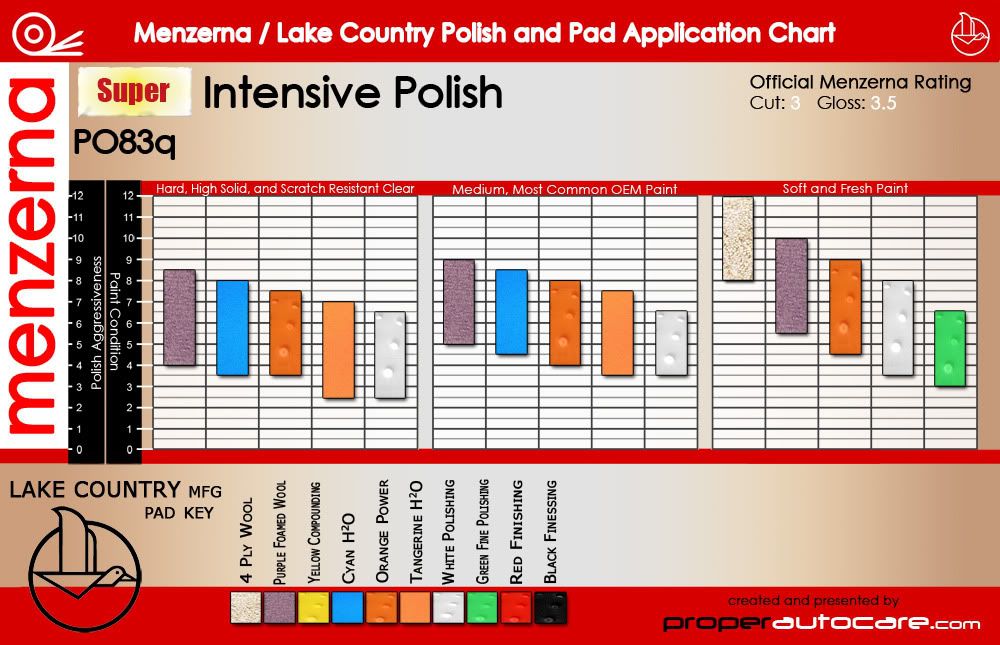
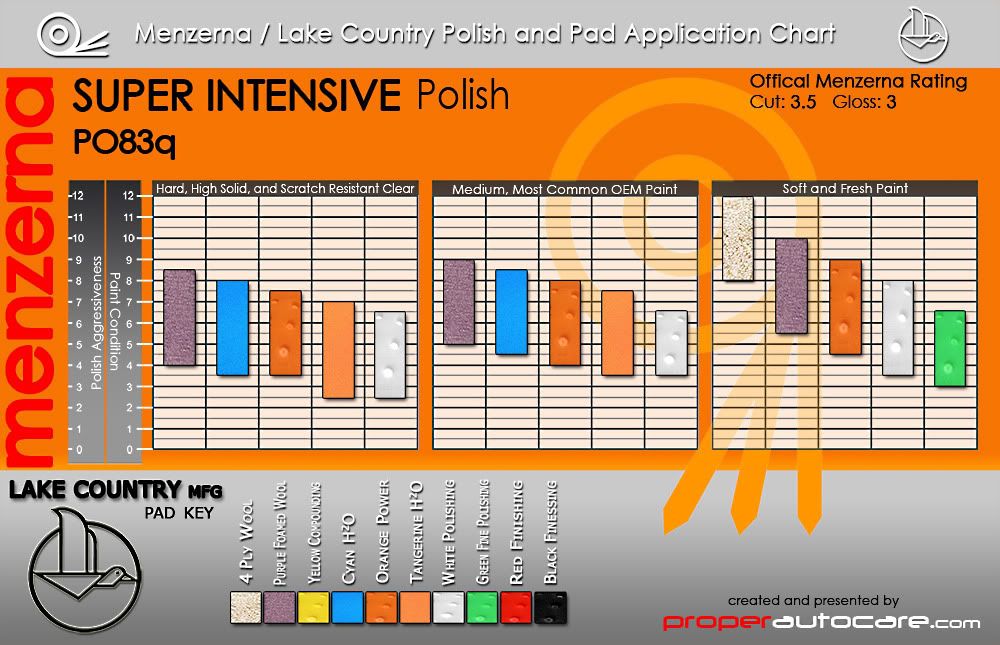
'Super' Intensive Polish is an amazing polish which can remove moderate to severe defects and finish out to super high gloss with very little swirl. 'Super' Intensive Polish features a super thick lubricant which can cause problems on certain paints or in certain climates. The lubricant can be difficult to remove fully as well, leading to unintentional filling.
Cut: Moderate-High
Finish: Good
Dusting: Minimal
Filling Potential: Moderate
Ease of Use: Moderate
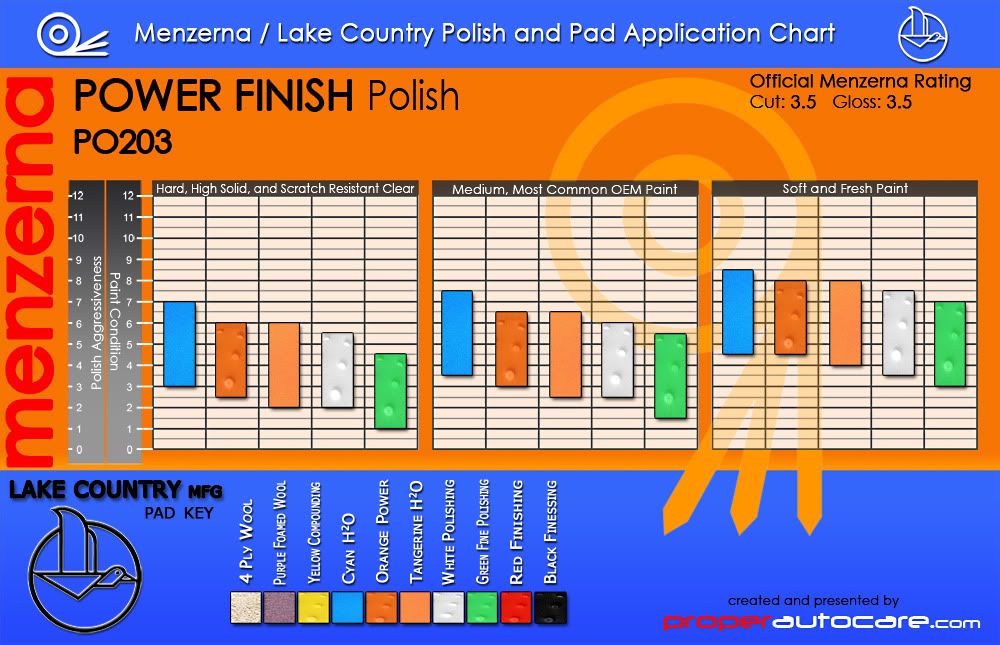
Power Finish is a great one step polish, particularly for light colored vehicles. It is a based on a hybrid formulation similar to Super Intensive Polish and PO106fa and creates a cut and finish in between those two. The thick carrier oils can be difficult to remove.
Cut: Moderate
Finish: Good
Dusting: Minimal
Filling Potential: Moderate
Ease of Use: Moderate
Intensive Polish is one of the original polishes introduced by Proper Auto Care in 2002. While no longer the class leader in cutting or finishing ability, Intensive Polish still has many desirable features. It will work well on all paint types, delivering consistent results with out any unwanted reactions. The dusting of the polish acts to keep spent paint from contaminating the pad, making Intensive Polish ideal for oxidized or heavily weathered paint, as well as single stage enamels and lacquers.
Cut: Moderate
Finish: Moderate-Good
Dusting: Moderate-High
Filling Potential: Low
Ease of Use: High
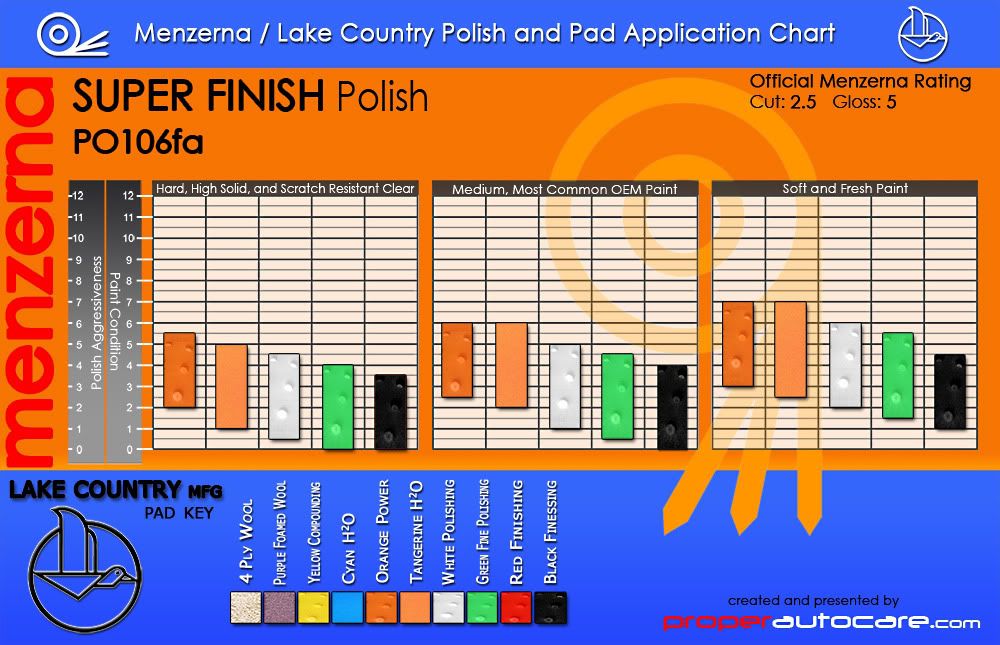
106ff was Menzerna's finishing polish answer to modern ceramic clear coats. This polish has enough cut to tackle light swirl marks and finish most paints to the highest level. The thicker lubricant system in 106ff can cause light filling and cause some issues on particularly soft paint systems. Menzerna tweaked the lubricant formula slightly to better hold the abrasives in the pad, reducing dusting, in 106fa. It should be noted that these polishes use the finest abrasive of any Menzerna polish.
Cut: Moderate-Light
Finish: Very Good
Dusting: Moderate(106ff) Light(106fa)
Filling Potential: Moderate-Low
Ease of Use: High
PO87mc Final Polish II is a great, easy to use polish that finishes exceptionally well on all paint systems and wipes off easily. Final Polish II breaks down quicker then the other Menzerna finishing polishes, making it an ideal choice when a time deadline is near.
Cut: Light
Finish: Very Good
Dusting: Low
Filling Potential: Low
Ease of Use: High
Even though PO85rd was replaced by 106ff/fa in European automobile factories, detailers and enthusiast found this polish to be one of the best final step polishes in existence. It is commonly used as a 'jeweling' polish to enhance the gloss of already great looking paint and create ultra sharp reflections and incredible gloss on all paint systems.
Cut: Light
Finish: Very Good
Dusting: Low
Filling Potential: Low
Ease of Use: High
The total amount of paint removed would be referred to as the cut. This is as also known as the Polish Aggressiveness. The higher the number at the top of the pad, the more aggressive the pad and polish combination.
The paint condition key works the same way. The higher the number, the more damaged the paint, in terms of the depth of the defects. This is allows theses charts to show which polish and pad should be capable of removing the defects (top of the bar) but also the resulting finish of using that combination.
EXAMPLE: The paint is in condition 10. This would be heavily scratched, with deep penetrating defects or even sanded with 2500 grit. These defects have serious depth. If we are working on medium paint we could use a Lake Country Purple Foamed wool pad in combination with Menzerna POS34a Power Gloss.
This would leave the paint in a condition of roughly 6. Menzerna PO203 Power Finish and a Tangerine H20 Pad should clean up the residual marks left behind from the first step while leaving the finish at roughly a 3. 3 would represent very very fine (sometimes invisible) marks that could benefit from a final polish.
From here we could choose Menzerna PO106fa and a Lake Country Black Finishing pad to bring the car to a perfect luster.
Power Gloss Compound
Power Gloss is a nice cutting compound that is recommended for use with a rotary polisher. Power Gloss is very effective at removing sanding scratches, deep swirl marks, and other extensive damage.
Cut: High
Finish: Moderate
Dusting: Moderate
Filling Potential: Low
Ease of Use: High
PO83q 'Super' Intensive Polish
New Label Chart
Old Label Chart
'Super' Intensive Polish is an amazing polish which can remove moderate to severe defects and finish out to super high gloss with very little swirl. 'Super' Intensive Polish features a super thick lubricant which can cause problems on certain paints or in certain climates. The lubricant can be difficult to remove fully as well, leading to unintentional filling.
Cut: Moderate-High
Finish: Good
Dusting: Minimal
Filling Potential: Moderate
Ease of Use: Moderate
PO203 Menzerna Power Finish
Power Finish is a great one step polish, particularly for light colored vehicles. It is a based on a hybrid formulation similar to Super Intensive Polish and PO106fa and creates a cut and finish in between those two. The thick carrier oils can be difficult to remove.
Cut: Moderate
Finish: Good
Dusting: Minimal
Filling Potential: Moderate
Ease of Use: Moderate
PO91e Intensive Polish
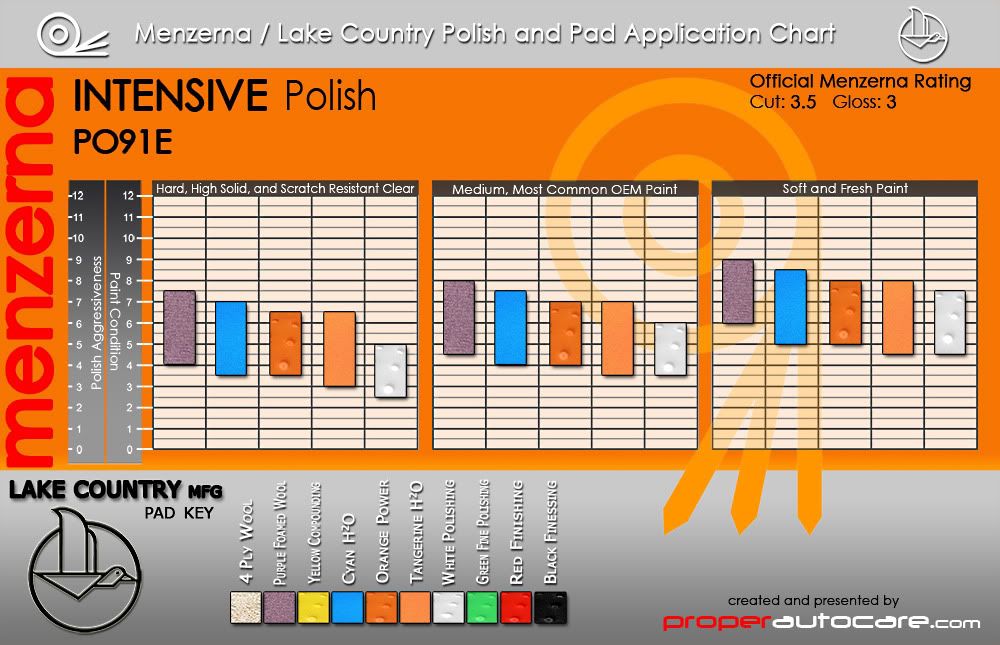
Intensive Polish is one of the original polishes introduced by Proper Auto Care in 2002. While no longer the class leader in cutting or finishing ability, Intensive Polish still has many desirable features. It will work well on all paint types, delivering consistent results with out any unwanted reactions. The dusting of the polish acts to keep spent paint from contaminating the pad, making Intensive Polish ideal for oxidized or heavily weathered paint, as well as single stage enamels and lacquers.
Cut: Moderate
Finish: Moderate-Good
Dusting: Moderate-High
Filling Potential: Low
Ease of Use: High
PO106ff/PO106fa
[/IMG]
[/IMG]
106ff was Menzerna's finishing polish answer to modern ceramic clear coats. This polish has enough cut to tackle light swirl marks and finish most paints to the highest level. The thicker lubricant system in 106ff can cause light filling and cause some issues on particularly soft paint systems. Menzerna tweaked the lubricant formula slightly to better hold the abrasives in the pad, reducing dusting, in 106fa. It should be noted that these polishes use the finest abrasive of any Menzerna polish.
Cut: Moderate-Light
Finish: Very Good
Dusting: Moderate(106ff) Light(106fa)
Filling Potential: Moderate-Low
Ease of Use: High
PO87mc Final Polish II
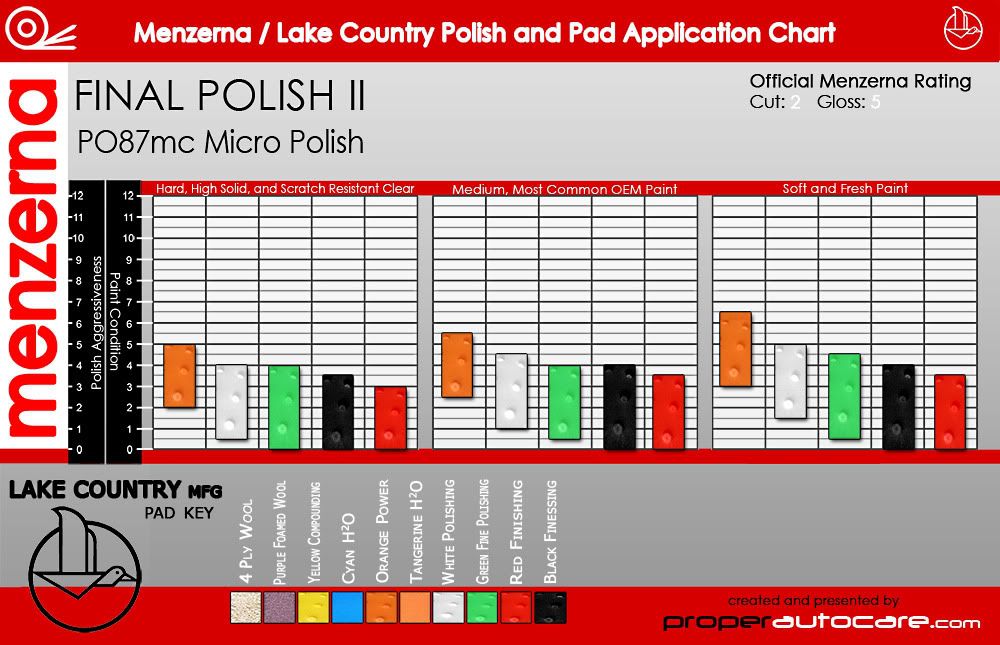
PO87mc Final Polish II is a great, easy to use polish that finishes exceptionally well on all paint systems and wipes off easily. Final Polish II breaks down quicker then the other Menzerna finishing polishes, making it an ideal choice when a time deadline is near.
Cut: Light
Finish: Very Good
Dusting: Low
Filling Potential: Low
Ease of Use: High
PO85rd Final Polish
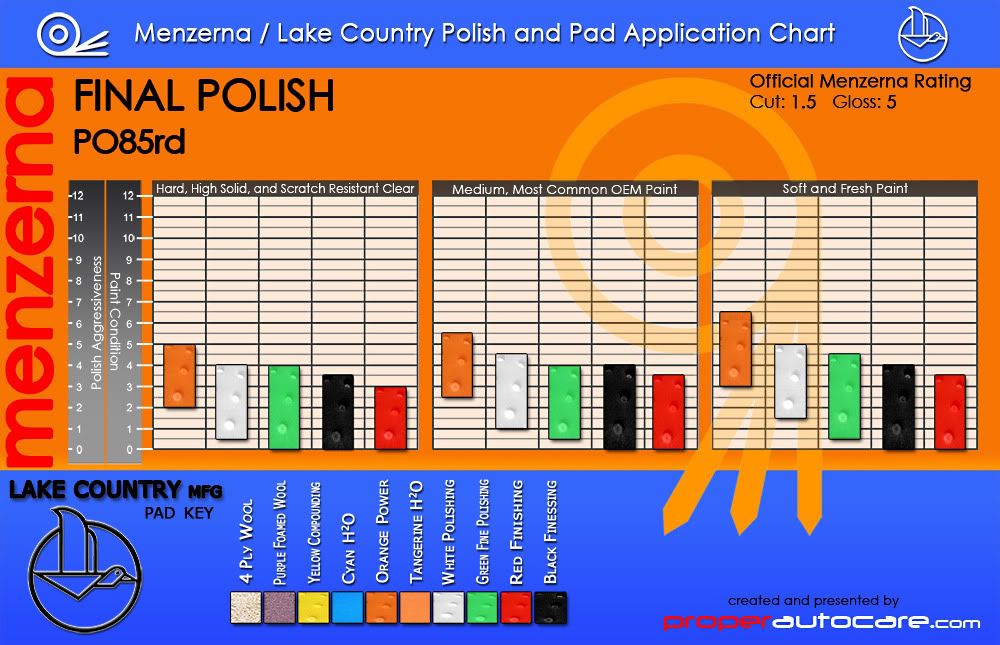
Even though PO85rd was replaced by 106ff/fa in European automobile factories, detailers and enthusiast found this polish to be one of the best final step polishes in existence. It is commonly used as a 'jeweling' polish to enhance the gloss of already great looking paint and create ultra sharp reflections and incredible gloss on all paint systems.
Cut: Light
Finish: Very Good
Dusting: Low
Filling Potential: Low
Ease of Use: High
Top notch Todd... the amount of work to construct these is very apparent
Justin Murphy
New member
Very darn nice there. A "wow" is in order.
Detailing Technology
New member
Great effort "T-money", thanks for making these.
Do you think there is any value in defining the cut levels with photos for each classification?
Whats a "7" on a Medium, Most Common OEM Paint look like?
Whats a "3" on Hard, High Solid, and Scratch Resistant Clear look like?
I know its a ton of work, but I think it will move product. Nobody has done it.
Todd@RUPES
Just a regular guy
Great effort "T-money", thanks for making these.
Do you think there is any value in defining the cut levels with photos for each classification?
Whats a "7" on a Medium, Most Common OEM Paint look like?
Whats a "3" on Hard, High Solid, and Scratch Resistant Clear look like?
I know its a ton of work, but I think it will move product. Nobody has done it.
Great point Justin and something I considered. On my previous attempts at these charts I used a grit level to help define what I would consider the paint condition. On these charts I purposefully left a direct reference off and hear is my thinking (always dangerous)...
When we talk about paint condition what we are really talking about is the depth of the defects. Visually it can be very hard to see the depth of the defects, sometimes it is impossible.
Let's define paint with a condition ten as paint that has defects that roughly equal to the marks that 2000 grit sandpaper would leave behind, thus requiring a pretty aggressive polish combination to remove.
These defects could be very infrequent tracer scratches or rids. They could just be very frequent, very deep swirl marks. They could be isolated spots of light water etching on an otherwise perfect surface. At another extreme they could super frequent sanding marks leaving the surface completely dull looking.
To make matters worse, the frequency of the defects will have some effect on the preceived aggressiveness of the process by directing the force of the polishing action over just the high points (frequent scratches or sanding marks) or across large flat surfaces (like chasing random scratches). This is why it often more difficult to remove RIDS then frequent sanding scratches, even if they are the same depth.
So in paint condition 10 alone we would have pictures ranging from perfect paint with water marks to completely sanded paint, and everything in between.
Let's say we have super swirly looking paint and we grab a meduim step polish and a moderate pad. We buff on the paint with a rotary, wipe away the residue, and see the surface hasn't changed much. Does this mean we have very hard paint (with shallow swirls) or meduim paint with very deep swirls?
Regardless, if you look at the chart (and the attention put into making it flow) you will know that you need a more aggressive step. When you find the combination that removes the defects (whether it be using worse paint damage and a softer paint chart or less damage and a harder chart) you will find the maps will mirror each other. I'm not sure if that make sense, but once you find the combination of product/pad required to get the defects out, you should be able to reference your way to perfection.
So whether you are using SIP/Purple Wool on hard paint (condition 7) or on more damaged soft paint (condition 11) you know the defects have come out. Following the recommendations (and overlapping your cut) on either chart should get you to perfection.
I hope that makes sense, but those are my thoughts on why it is slightly more generic but very thought out. Of course I am welcome to hearing why I am wrong.
imported_wfedwar
New member
Very nice. Good info and a nice way to present it. Definitely better than the abrasiveness charts that most places use (which are still better than nothing). One comment, though. In the legend at the bottom, red/black need to be switched.
ZL1Mark
Allergic to One Product
Todd, would BMW jet black paint fall under the "soft" category according to these charts?
Todd@RUPES
Just a regular guy
Todd, would BMW jet black paint fall under the "soft" category according to these charts?
it depends where it was painted at. Most JB BMWs are soft/very soft but some are very hard
Todd, would BMW jet black paint fall under the "soft" category according to these charts?
Let me offer my personal experience.
I've had a total of 4 Jet Black BMW's, all 3 series and all 07's or later. 3 were ridiculously soft (an 07, 08 and 09) and 1 was diamond hard (an 09). I am still perplexed about the discrepancy in paint hardness/softness with these late model JB's but Todd may be onto something i.e. paint location. The North American market gets 3 series from Dingolfing Germany and other countries get them from South Africa.
I like to always assume the BMW JB is soft and go from there. My personal favorite for the trashed, soft JB's has been Menzerna 203 with a green or sometimes black LC pad on my rotary at about 1100/1200. The next one I get I'm going to play with M205/black/DA.
Thanks, Todd, for the update to the pad/polish chart. Good info.
imported_wendell jarvis
New member
Awesome chart
imported_BobbyG
New member
All I can say is WOW! This is some great work and I wish it were available to download and print, a very handy chart on the wall!!
CEE DOG
New member
All I can say is WOW! This is some great work and I wish it were available to download and print, a very handy chart on the wall!!
Thats a good idea.
Thanks for the amazing work on those charts Todd!
imported_Bunky
New member
Thats a good idea.
Thanks for the amazing work on those charts Todd!
Yes, I wanted a version I can put in books along with your other charts.
bmw5541
New member
Yes, I wanted a version I can put in books along with your other charts.
Geez,
You guys are so organized!:biggrin:
All I can say is WOW! This is some great work and I wish it were available to download and print, a very handy chart on the wall!!
You can!
See up on the right side/top of the page...Thread Tools? Click on the, you'll see (as you scroll down) the charts listed as a JPEG, open that. There ya go, print away.
Bill
imported_Bunky
New member
You can!
See up on the right side/top of the page...Thread Tools? Click on the, you'll see (as you scroll down) the charts listed as a JPEG, open that. There ya go, print away.
Bill
You can do that just right click over image, save, then print.