Truck hood a mess

Sean1740

New member
Hello,

I have uploaded pictures of my truck hood / back bumper. The left side of my truck hood was not touched. I had like a haze / scratch type look which you can kinda see in the left side of the hood. So i appled meguiars compound and polish. Washed my truck , dryed it. Then applied compound with a applicator pad by hand and cleaned with a micro fibre towel. Then applied polish and same procedure as the compound but did more smaller circles. Also did let it dry and did not to all this in direct sunlight. Was not doing huge sections at a time.

Now I have this white glaze look and looks like a mess ? Any ideas how I can fix this ? I am woundering if Turtle Black Box finish kit would help this at all?

Also I was woundering how i could fix my back bumper paint? Would black automotive paint fix this doing cheap way and look okay?

Thanks for any input
 

Attachments

  • IMG_2242.jpg
    IMG_2242.jpg
    26.6 KB · Views: 46
  • IMG_2241.jpg
    IMG_2241.jpg
    22.8 KB · Views: 29
  • IMG_2240.jpg
    IMG_2240.jpg
    32.2 KB · Views: 39
  • IMG_2239.jpg
    IMG_2239.jpg
    33.2 KB · Views: 28
  • IMG_2238.jpg
    IMG_2238.jpg
    34.3 KB · Views: 34
  • IMG_2237.jpg
    IMG_2237.jpg
    32.8 KB · Views: 28
  • IMG_2236.jpg
    IMG_2236.jpg
    30.9 KB · Views: 24
  • IMG_2235.jpg
    IMG_2235.jpg
    24.5 KB · Views: 28
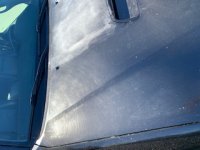
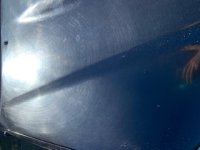
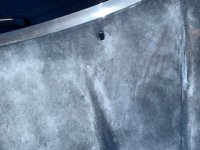
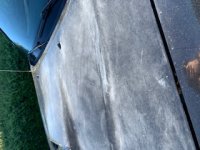
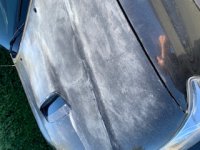
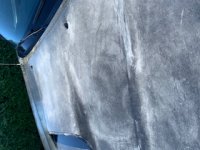
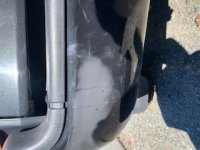
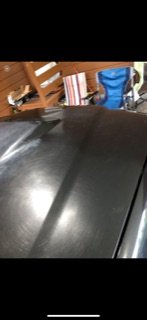
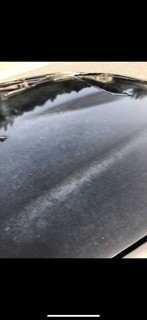
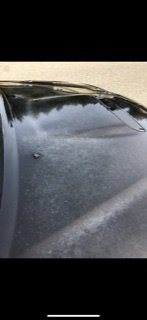
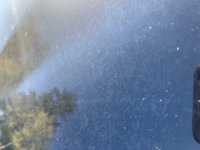
Letting the compound and the polish "dry" may be your mistake. It looks like polish residue that was not removed OR something from the applicator pad that was not washed or cleaned from it and you have previously used that applicator pad for applying a wax, and then used it for applying the compound and then the polish. I am guessing.

You could rewash the clouded/grey area and then try a smaller area , like a 18 by 18" square, first with a hand application of the compound and polish using two NEW foam applicators, one for the compound and one for the polish and view the results for yourself. Make sure you wipe it off immediately after your application. I doubt you have gone down to the primer using a compound and polish by hand, unless the base coat and clear coat substrate that are on top of the primer were "seriously" corrected (AKA, thinned) with a machine buffer before that you do not know about. Without a Paint Thickness Gauge (PTG) measurement to verify this, there is no way of knowing. Like you mentioned, I would not suggest doing this in the direct sun if it is hot, but either inside a garage or early in the morning or later afternoon when it is cooler and you could use the shade from a building if doing this outside. If the first test area looks satisfactory to you, then move on to the next small area and repeat the process. Just make sure to clean out the applicator pads after doing three or four small areas so you don`t overload the pad with compound/polish product OR if the pad looks dirty. You can use Dawn Dish Soap and HOT water if that is all you have for cleaning, but an automotive all-purpose cleaner and HOT water would be better. Just make sure to wring it out and wrist-snap it to try to remove as much water as possible before reusing it again.

If that FIRST small test area still looks terrible or even worse, you have much bigger "problems" that will require the services of a professional detailer or body shop. I say that because of the limited products you have (Meg`s Compound and Polish, and I assume they are the "Ultimate" consumer versions and not the Professional Mirror Glaze M105 and M205 or the newer Ultra-Pro M110 and M210) and the fact you are doing this by hand.

Also, the microfiber clothes you are using could make-or-break the end results. Some microfibers will lint like crazy and continuous wiping with them to try to remove that lint may mar or "scratch" the surface. Some cheaper microfibers tend to scratch the clear coat as well and others may not be absorbent enough to remove the compound or polish. AND, as with the applicators, if you re-use a microfiber clothe/towel that may not be clean and had been used previously for wiping off some other car-care product, like an interior dressing, you may be getting contamination/streaks from that. Again, I am guessing.

Sorry if I sound like a put-down and am so critical, but some detailing "problems" are self-inflicted simply because of ignorance and not knowing proper application and removal techniques and methodologies and having the right accessories/equipment for obtaining the desires results.

Just like removing a frozen hex-head bolt with an adjustable wrench and hammer may get the job done, but chances are you`ll round off the corners/flats, when using a penetrating oil first and then a hex socket and breaker-bar may have been a much better choice, but you have to have the latter two product and tools to do that to begin with. If all you have is the adjustable wrench and hammer, you use what you have and may suffer the consequences.
 
Yes using megs basic compound and polish. It seams it looks good once i applied but it’s the day after it comes off all white like my pictures show. I have been using separate pads and towels as well, doing it in a shaded area. Maybe i am using to much of each ?
 
Just had an out there thought. You do realize that the polish and compounds are intended to come off entirely within minutes of application right?
 
What was the condition of the paint before you started working on it ? Was it very dull and dead looking? Perhaps a little shiny but dull?? Pls advise..

What is the year, make, model, of the vehicle, and color of that paint??

Which Meguiars products did you use?? The name of it and the number of it please..

I think you did not work the product with pressure on the applicator, on one small spot, completely..

And, if you did this when the hood was hot to the touch, this was never going to work correctly, because the heat is causing the product to dry too quickly..

These products for correction especially, have to be worked down into the paint kind of hard at first to get them to break down to a certain degree, start cleaning the paint on that spot, and then continue to break down, to finish cleaning and leaving a nice smooth finish.

If the compound is allowed to dry too quickly, it cannot work as it is intended to work, so you have so sometimes spray a little moisture on it, if it is starting to dry too fast..

Then, the Polish product applied in the same manner, will continue to clean, and polish, and give a better quality clarity and gloss.

Dan F
 
Sean1714- Welcome to Autopia!

Let`s see if I have this right, I want to clarify the situation:

You use the Meguiar`s stuff, buffing it off before it flashes, and things seem fine. BUT...

The next day it`s white and chalky-looking again.

Is that right?
 
So I bought a dual action polisher, goes up to 6 speeds.. Used a hex design compound pad and a hex polish pad. Still using meguairs compound and polish. Serperate pads for each. The first 3 photos of me doing it on Saturday. The next 4 of is the next day. I wipe the compound and polish off with a micro fibre towl after completing each step. Should i be applying polish is this is why I am getting this white stuff? It looks fine when i am driving but when i put my head over the roof in front with my camera as shown, this is what it looks like the next day. Was doing this project in a garage, was not warm at all. Any suggestions ? Thanks


attachment.php
attachment.php
attachment.php
attachment.php
attachment.php
attachment.php
attachment.php
 

Attachments

  • IMG_2289.jpg
    IMG_2289.jpg
    14.2 KB · Views: 90
  • IMG_2291.jpg
    IMG_2291.jpg
    12.7 KB · Views: 86
  • IMG_2290.jpg
    IMG_2290.jpg
    11 KB · Views: 83
  • IMG_2287.jpg
    IMG_2287.jpg
    13.6 KB · Views: 85
  • IMG_2288.jpg
    IMG_2288.jpg
    13.3 KB · Views: 84
  • IMG_2286.jpg
    IMG_2286.jpg
    23.7 KB · Views: 87
  • IMG_2284.jpg
    IMG_2284.jpg
    32.5 KB · Views: 94
Sean1740- Correction via machine is a somewhat involved topic, kinda too much so for concise answers, at least for me. It`s something that I`d sure research and study for, oh...at least twenty-some hours...before actually trying to accomplish something as significant as what your pix show.

Eh, I fear that`s gonna sound like a blow-off and I *REALLY* don`t mean it to be. It`s just the sort of subject that I can`t boil down to a quick explanation.

Just "how to prime the pad" can be a topic for extended study as different products can call for *completely* different approaches.

here are some things to think about:

-How big an area are you working at a time?

-How often are you cleaning the pad (I *NEVER* do a whole panel without cleaning the pad, and often use multiple pads when compounding a panel that size)?

-How many section passes are you doing with the compound and what do you expect to accomplish with that before switching to the Polish?

-What are you using to clean the panel off after you buff off the residual product with your MF but before you inspect it?

-Are you getting *all* of the compound/polish off before they dry?

-When/why are you switching from compound to polish?

I dunno...I`d be pretty surprised if you could correct that kind of damage without removing so much clearcoat that what`s left fails with UV exposure, but maybe you can. *I* would plan on having it repainted, and approach the correction as "let`s just see, nothing left to lose at this point", but that`s just me and I hate to sound pessimistic.
 
small areas at a time. 6” x 6” it looks nice once the compound is applied and polish.. waited about hour or so after to
polish.. Yes wiping it clean.. it’s the next day where it just goes white
like shown in pictures.. would wax prevent this ? why would it go white the next day ?
 
do maybe 6 passes in my small area. When i buff with the compound the white goes away. Even wiping away with mf towel. But whatever reason as shown pics of next day looks like that
 
Machine polishing is hard to instruct in this environment. I`m a more visual learner and found YouTube videos to be pretty helpful when I first started machine polishing. I think Mike Phillips has at least one instruction video I watched which covers the basics. I also would look at product review videos where the reviewer was actually applying a polish. With those video`s I`d mute the audio so I didn`t have to listen to them talk about the product and I simply watched them work. I would focus on how fast they were moving their arms, the size of the work area, how they worked in a cross-hatch pattern, etc.

You did note working a 6" area...that`s too small. For a large panel I`d work an area about 24" or similar depending on the creases/seams in the sheet metal.

On to the hood in the in the picture.

I`ll start by saying the scratching/damage shown in the close-ups looks pretty bad. I`m not sure I`d even try to polish that out. Like Accumulator mentioned, you could easily remove an unhealthy amount of clear coat trying to remove them.

The hazing returning makes me wonder if the clear coat is already just about gone at this point. The polishes will have oils in them and even removing the polish some of the oils may be "moisturizing" the clear coat and making it look better. After a few hours go by, could those oils be evaporating which causes the hazy, oxidized appearance to return? Just a thought.
 
Is that an aftermarket hood? I wonder the quality of the clear used and if it`s just past the point of saving at this point.

From the pictures, to be honest I`d be really surprised if it could be saved. I`d consider just getting it vinyl wrapped or professionally repainted.
 
From the look of it, those scratches might be too deep to compound out with a PC. I`m not even sure that can be corrected with a rotary and wool pad.
 
Yeah...if it`s genuinely *oxidizing* quickly...if that`s the "whiteness"...then the paint is shot and you gotta reshoot it. Could well be that polishing oils making it temporarily look OK, especially with Meguiar`s stuff and all those TSO that drive me nuts. It sounds like you`re *NOT* stripping those oils off/out of the paint with a product that does that, but rather are merely buffing off the product residue...that could well explain it. (Some of us are fanatical about stripping those oils before even trying to evaluate how things are going...and yeah that adds a lot of time to the whole process compared to just buffing, but can add *less* time overall because there are fewer subsequent surprises when the oils dissipate by themselves.)

Heh heh...see how, even among us, something as fundamental as "what size area to work" can bring up different opinions!?! Yeah, 6"x6" is kinda small, but that didn`t bother me the way it did Desertnate! No right/wrong IMO..but at least we`re not talking areas of operation so big they`re obviously the problem.


OH, and that back bumper...sorry, slipped my mind earlier :o 
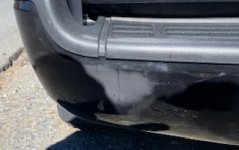
BumperCOVERS (I`m guessing that`s what it is, and not an actual, painted bumper like on my old Tahoe) are painted )while off the vehicle, both during initial manufacture and during any post-production painting like a repaint) with paint containing a "Flex-additive". Gotta have that in the mix or it`ll end up cracking as soon as anything flexes it..and something will.
 
Heh heh...see how, even among us, something as fundamental as "what size area to work" can bring up different opinions!?! Yeah, 6"x6" is kinda small, but that didn`t bother me the way it did Desertnate! No right/wrong IMO..but at least we`re not talking areas of operation so big they`re obviously the problem.

The good thing is we`re all of the same mind, but occasionally in disagreement to the approach! To be honest, the only time I do a honest 2`x2` is on a hood, roof or door where the contours of the panel allow for that much un-interrupted work space. The rest just comes down to the shape and size area being worked. I just try to keep the polisher moving so one area isn`t getting the brunt of the work for an extended period.


My only thought with a small work area, is if you`re only doing a 6"x6" square and that`s roughly the size of your polishing pad if using a 5.5" of 6.5" pad. With most basic polishers only have an 8-ish inch throw length, you essentially sitting still and just grinding away at the clear and generating heat. That was my only concern.
 
The good thing is we`re all of the same mind, but occasionally in disagreement to the approach!...My only thought with a small work area, is if you`re only doing a 6"x6" square and that`s roughly the size of your polishing pad if using a 5.5" of 6.5" pad. With most basic polishers only have an 8-ish inch throw length, you essentially sitting still and just grinding away at the clear and generating heat. That was my only concern.

That makes sense. Heh heh, it *has* been quite a while since I did significant correction on a whole panel, guess I`m getting used to the little areas I work with my 3". Plus, I knee-jerk towards "work a smaller area" whenever somebody has issues, better check myself on that and be a bit more situation-specific :o
 
yeah like i said i applied the compound and polish. looks great then next day it has this white haze type look when ya look over the top of the hood.. when i am in the drivers seat it looks completely normal. it’s the outside over top you can see the white haze.. which could be the oils as you said leaking through after ? Would wax stop this at all from happening ?
 
Back
Top