Navigation
Install the app
How to install the app on iOS
Follow along with the video below to see how to install our site as a web app on your home screen.
Note: This feature may not be available in some browsers.
More options
Style variation
You are using an out of date browser. It may not display this or other websites correctly.
You should upgrade or use an alternative browser.
You should upgrade or use an alternative browser.
Oxidized red Jetta
- Thread starter Josiah
- Start date
I have the same kit that short cut has...it comes with their QD (which doesnt impress me), cleaner wax, and clay.....all I really wanted was the clay too!
You can try places like Wal-mart, Target, car parts stores, etc. worse comes to worse you can buy it online and have it shipped to you.
You can try places like Wal-mart, Target, car parts stores, etc. worse comes to worse you can buy it online and have it shipped to you.
I'm totally new to detailing even though I'm an old man. I would like to purchase an orbital kit and product to restore the paint on a heavily oxidized red jetta. I've tried a couple spots by hand using Meguires COLORX and the paint still shines up nicely. It's just too much for me to do the vehicle by hand though. The paint on the hood is not so good. The clear coat is blistering off as if it were an aftermarket application so either it will need to be repainted or I'll just have to live with it. Same for the rear spoiler, but it has discolored as well.
I would appreciate some suggestions from you experienced folks as to which pads and products to use to polish away the oxidation and do what I can for the old girl. I'm not planning on keeping it more than a few more months, but would like to make it look nice for when we part company.
I would appreciate some suggestions from you experienced folks as to which pads and products to use to polish away the oxidation and do what I can for the old girl. I'm not planning on keeping it more than a few more months, but would like to make it look nice for when we part company.
Old Pirate
AMG Classic Car Detailing
Welcome to TID snowman, here are some reading material for you to get started:
Always remember most important thing is how to properly wash your ride.
Frequent and proper washing of your vehicle is necessary to preserving that show car shine. Classic Motoring Accessories and Proper Auto Care have been teaching proper cleaner techniques since 1988. Sadly, most swirl marks and light scratches are caused by the wash process, as grit and road grime are scrubbed against the surface. Over time these micro scratches reduce the gloss by diffusing reflected light and will thin the paint.
Products Needed For a Proper Auto Wash.
Wheel Cleaning Supplies
2 Five Gallon Wash Buckets with 2 Grit Guards
High Quality, Wax Friendly Car Soap
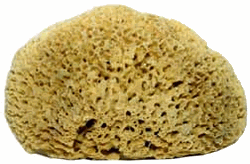
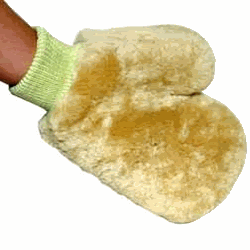
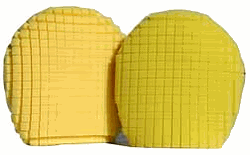
High Quality Wash Media such as Natural Sea Sponge, Lamb's Wool Mitt, or High Tech UltiMitt
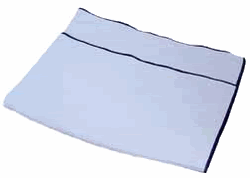
2 Big Blue Waffle Weave Microfiber Drying Towels
Optional: Quick Detailing Spray an Bug/Tar Remover
Basics
Proper Auto Care recommends washing the wheels, tires, and wheel wheels first. This prevents wheel cleaner from spraying on a clean surface. Properly cleaning the wheels is also time consuming can lead to water spots if the rinse water from washing the car is still on the paint. For proper wheel care please click here.
It is best to wash your vehicle in the shade when the surface is cool to the touch. A hot surface will dry up the water or soap solution, leading to water spots. If you have shade available take advantage of it. If you cannot find shade, try to limit your car washing to first thing in the morning or later in the evening when the sun is close to the horizon and sun's rays are much less direct. After washing and rinsing, the standing water needs to be removed as quickly as possible to avoid leaving mineral deposits that cause water spots, which will actually etch or 'eat into' the paint.
The Two Bucket Method
Most people wouldn't drive to the beach and fill their wash bucket with a shovel full of sand before adding soap and water. Sadly, most of the dirt removed during washing is released into the soap bucket each time the mitt or sponge is reloaded with soap. After washing a couple of sections the soap solution becomes gritty and contaminated, and that grit is scrubbed against the paint. Even rinsing out the wash media after effect section is ineffective. Flowing water may remove some of the grit, but most of it is pushed back into the mitt or sponge. It is much easier, and far more effective, to use a second bucket to rinse the wash media in prior to loading it with more soap solution. Two buckets: The soap bucket and the rinse bucket.
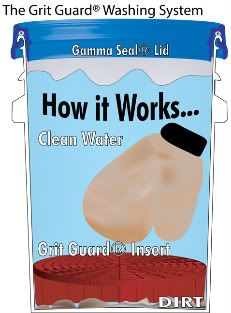
Grit Guards ? are an ingenious design that uses a grate and vane system to allow released dirt to sink to the bottom and prevents them from remixing into the water or soap solution. Proper Auto Care recommends using one Grit Guard ? per bucket to give the best possible protection against scratching the paint with contaminated soap solution. When rising the wash media out in the rinse bucket, you should lightly scrub it against the grating of the Grit Guard ? to help release grit.
Use a High Quality Car Soap Designed for Automotive Finishes.
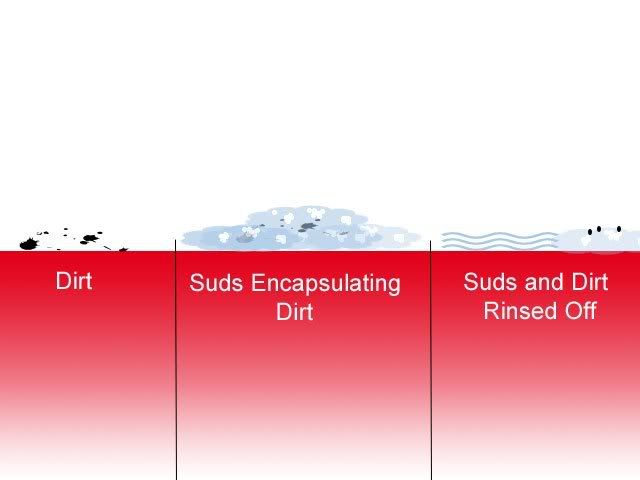
Automotive soap is designed to remove dirty and road grime safely from the paint, with stripping the existing wax or sealant and will out scratching. Automotive soaps use surfactants to break the surface tension of water, allowing the lubricated solution to penetrate and encapsulate the dirt, reducing the potential for marring. Soap's such as Eimann Fabrik's Auto Spa and Blackfire's Gloss Shampoo are gentle enough to use repeatedly without stripping wax.
Use 5 gallon wash buckets to ensure plenty of soap solution is available to flood the dirt safely off the car. Fill the soap bucket about 4/5th's or 80% full of water before adding the recommended amount of soap to the bucket. Adding soap first results in too many suds and not enough water! Finish filling the water bucket with a stream of water to mix the solution fully. Place a Grit Guard ? in the bottom of both the soap bucket and the rinse bucket.
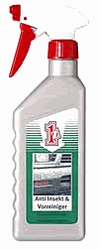
Before washing, pre-rinse your vehicle with a steady stream of water to float as much dirt away as possible before getting started. Pre-treat any bugs and tar with a light mist of 1Z einszett Ant Insekt and Pre-Cleaner.
Wash with a Clean High Quality Wash Media.
Classic Motoring Accessories offers several different types of wash media: Natural Sheep Skin Mitts, Natural Sea Spongers, and the ultra soft UltiMitt, as well as various microfiber sponges and boar's hair brushes. Three of the most popular:
Sheep Skin (Lamb's Wool) Mitts are extremely soft and provide a long nap that prevents removed dirt from scouring the paint. Sheep Skin mitts require a more thorough rinse because they are so effective at holding dirt. High quality Sheep Skin mitts last about 6-12 months on average. There ability to clean paint gently and prevent swirl marks has proven through out the years.
Sea Sponges are incredibly durable if washed out after each use. I personally know of several people who have been using the same natural sponge for over 3 years!! Sea Sponges are very soft and will not paint. They also hod a lot of solution, but can be bulky and difficult to get into tight spots.
UltiMitts are a synthetic foam wash mitt, and they are my personal favorite. They release dirty extremely easily and hold a HUGE amount of soap solution, ideal for flooding the paint with soap during the wash. Proper Auto Care's UltiMitt is made out select Lake Country Concours foam, which is the softest available
Wash your vehicle a section at at time, start with the highest areas. Wash in straight lines, from front to back on horizontal surfaces such as the hood, roof, and trunk, and up and down on vertical sections such as the doors, fenders, and rear bumper to minimize the appearance of any accidental marring that may occur. Flood the section with soap water squeezed from the wash media before lightly washing the section in straight lines, rinsing with water after each section. Rinse the wash media in the rinse bucket before reloading it with more soap solution from the soap bucket.
Make it wet to dry it faster!
After washing and rinsing your vehicle a section at a time, remove the nozzle from the hose and do a final rinse with a gentle stream of water. Water has a natural viscosity, and by flooding the paint, it is possible to sheet off a majority of the standing water.
Big Blue III Microfiber Waffle Weave Drying Towels.
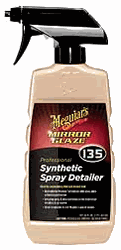
To remove the remaining water after flooding the paint toweling the surface is necessary. While a chamois or synthetic chamois do a great job of removing water, they lack a nap. Any dust or dirt that has settled on the paint will become trapped and rubbed against the surface. Big Blue III drying towels feature a woven microfiber that gives them the absorbency of a chamois while featuring a nap of fiber that hold any dust away from the paint. Although optional, using a detail spray such as Meguiar's M135 Synthetic Detail Spray offers many benefits during the final towel drying of the car. A light mist per panel (while it is still wet) will reintroduce some lubricity to the surface an prevent surface marring. The synthetic polymers will make the water easier to remove and clean any water spots. Wipe gently in the same directions as you washed, to minimize the appearance of any marring that may accidentally occur. Quality quick detailers will also boost the shine of the paint, helping to maintain that just waxed look!
CLIFF NOTES
Always wash when the vehicle is cool to the touch and avoid washing in direct sunlight if possible.
Pre-rinse your vehicle to remove loose soiling.
Pre-treat any bugs or tar with 1Z Anti Insekt and Pre-Cleaner
Wash, using the two bucket method with Grit Guards ?, a quality soap, an a high quality wash media. Wash in straight line motions a section at a time. Thoroughly rinse the section before moving on to the next section. Rinse the wash media in the rinse bucket often to prevent contaminating the soap solution.
After washing each section of the vehicle, do a final rinse with just a steady stream of water. This will cause the majority of the standing water to sheet off.
Dry remaining water with a Big Blue Microfiber and a detail spray such as Meguiar's M135 or Blackfire Deep Gloss Spray Sealant.
Always remember most important thing is how to properly wash your ride.
Frequent and proper washing of your vehicle is necessary to preserving that show car shine. Classic Motoring Accessories and Proper Auto Care have been teaching proper cleaner techniques since 1988. Sadly, most swirl marks and light scratches are caused by the wash process, as grit and road grime are scrubbed against the surface. Over time these micro scratches reduce the gloss by diffusing reflected light and will thin the paint.
Products Needed For a Proper Auto Wash.
Wheel Cleaning Supplies
2 Five Gallon Wash Buckets with 2 Grit Guards
High Quality, Wax Friendly Car Soap
High Quality Wash Media such as Natural Sea Sponge, Lamb's Wool Mitt, or High Tech UltiMitt
2 Big Blue Waffle Weave Microfiber Drying Towels
Optional: Quick Detailing Spray an Bug/Tar Remover
Basics
Proper Auto Care recommends washing the wheels, tires, and wheel wheels first. This prevents wheel cleaner from spraying on a clean surface. Properly cleaning the wheels is also time consuming can lead to water spots if the rinse water from washing the car is still on the paint. For proper wheel care please click here.
It is best to wash your vehicle in the shade when the surface is cool to the touch. A hot surface will dry up the water or soap solution, leading to water spots. If you have shade available take advantage of it. If you cannot find shade, try to limit your car washing to first thing in the morning or later in the evening when the sun is close to the horizon and sun's rays are much less direct. After washing and rinsing, the standing water needs to be removed as quickly as possible to avoid leaving mineral deposits that cause water spots, which will actually etch or 'eat into' the paint.
The Two Bucket Method
Most people wouldn't drive to the beach and fill their wash bucket with a shovel full of sand before adding soap and water. Sadly, most of the dirt removed during washing is released into the soap bucket each time the mitt or sponge is reloaded with soap. After washing a couple of sections the soap solution becomes gritty and contaminated, and that grit is scrubbed against the paint. Even rinsing out the wash media after effect section is ineffective. Flowing water may remove some of the grit, but most of it is pushed back into the mitt or sponge. It is much easier, and far more effective, to use a second bucket to rinse the wash media in prior to loading it with more soap solution. Two buckets: The soap bucket and the rinse bucket.
Grit Guards ? are an ingenious design that uses a grate and vane system to allow released dirt to sink to the bottom and prevents them from remixing into the water or soap solution. Proper Auto Care recommends using one Grit Guard ? per bucket to give the best possible protection against scratching the paint with contaminated soap solution. When rising the wash media out in the rinse bucket, you should lightly scrub it against the grating of the Grit Guard ? to help release grit.
Use a High Quality Car Soap Designed for Automotive Finishes.
Automotive soap is designed to remove dirty and road grime safely from the paint, with stripping the existing wax or sealant and will out scratching. Automotive soaps use surfactants to break the surface tension of water, allowing the lubricated solution to penetrate and encapsulate the dirt, reducing the potential for marring. Soap's such as Eimann Fabrik's Auto Spa and Blackfire's Gloss Shampoo are gentle enough to use repeatedly without stripping wax.
Use 5 gallon wash buckets to ensure plenty of soap solution is available to flood the dirt safely off the car. Fill the soap bucket about 4/5th's or 80% full of water before adding the recommended amount of soap to the bucket. Adding soap first results in too many suds and not enough water! Finish filling the water bucket with a stream of water to mix the solution fully. Place a Grit Guard ? in the bottom of both the soap bucket and the rinse bucket.
Before washing, pre-rinse your vehicle with a steady stream of water to float as much dirt away as possible before getting started. Pre-treat any bugs and tar with a light mist of 1Z einszett Ant Insekt and Pre-Cleaner.
Wash with a Clean High Quality Wash Media.
Classic Motoring Accessories offers several different types of wash media: Natural Sheep Skin Mitts, Natural Sea Spongers, and the ultra soft UltiMitt, as well as various microfiber sponges and boar's hair brushes. Three of the most popular:
Sheep Skin (Lamb's Wool) Mitts are extremely soft and provide a long nap that prevents removed dirt from scouring the paint. Sheep Skin mitts require a more thorough rinse because they are so effective at holding dirt. High quality Sheep Skin mitts last about 6-12 months on average. There ability to clean paint gently and prevent swirl marks has proven through out the years.
Sea Sponges are incredibly durable if washed out after each use. I personally know of several people who have been using the same natural sponge for over 3 years!! Sea Sponges are very soft and will not paint. They also hod a lot of solution, but can be bulky and difficult to get into tight spots.
UltiMitts are a synthetic foam wash mitt, and they are my personal favorite. They release dirty extremely easily and hold a HUGE amount of soap solution, ideal for flooding the paint with soap during the wash. Proper Auto Care's UltiMitt is made out select Lake Country Concours foam, which is the softest available
Wash your vehicle a section at at time, start with the highest areas. Wash in straight lines, from front to back on horizontal surfaces such as the hood, roof, and trunk, and up and down on vertical sections such as the doors, fenders, and rear bumper to minimize the appearance of any accidental marring that may occur. Flood the section with soap water squeezed from the wash media before lightly washing the section in straight lines, rinsing with water after each section. Rinse the wash media in the rinse bucket before reloading it with more soap solution from the soap bucket.
Make it wet to dry it faster!
After washing and rinsing your vehicle a section at a time, remove the nozzle from the hose and do a final rinse with a gentle stream of water. Water has a natural viscosity, and by flooding the paint, it is possible to sheet off a majority of the standing water.
Big Blue III Microfiber Waffle Weave Drying Towels.
To remove the remaining water after flooding the paint toweling the surface is necessary. While a chamois or synthetic chamois do a great job of removing water, they lack a nap. Any dust or dirt that has settled on the paint will become trapped and rubbed against the surface. Big Blue III drying towels feature a woven microfiber that gives them the absorbency of a chamois while featuring a nap of fiber that hold any dust away from the paint. Although optional, using a detail spray such as Meguiar's M135 Synthetic Detail Spray offers many benefits during the final towel drying of the car. A light mist per panel (while it is still wet) will reintroduce some lubricity to the surface an prevent surface marring. The synthetic polymers will make the water easier to remove and clean any water spots. Wipe gently in the same directions as you washed, to minimize the appearance of any marring that may accidentally occur. Quality quick detailers will also boost the shine of the paint, helping to maintain that just waxed look!
CLIFF NOTES
Always wash when the vehicle is cool to the touch and avoid washing in direct sunlight if possible.
Pre-rinse your vehicle to remove loose soiling.
Pre-treat any bugs or tar with 1Z Anti Insekt and Pre-Cleaner
Wash, using the two bucket method with Grit Guards ?, a quality soap, an a high quality wash media. Wash in straight line motions a section at a time. Thoroughly rinse the section before moving on to the next section. Rinse the wash media in the rinse bucket often to prevent contaminating the soap solution.
After washing each section of the vehicle, do a final rinse with just a steady stream of water. This will cause the majority of the standing water to sheet off.
Dry remaining water with a Big Blue Microfiber and a detail spray such as Meguiar's M135 or Blackfire Deep Gloss Spray Sealant.
Old Pirate
AMG Classic Car Detailing
Next is Claying:
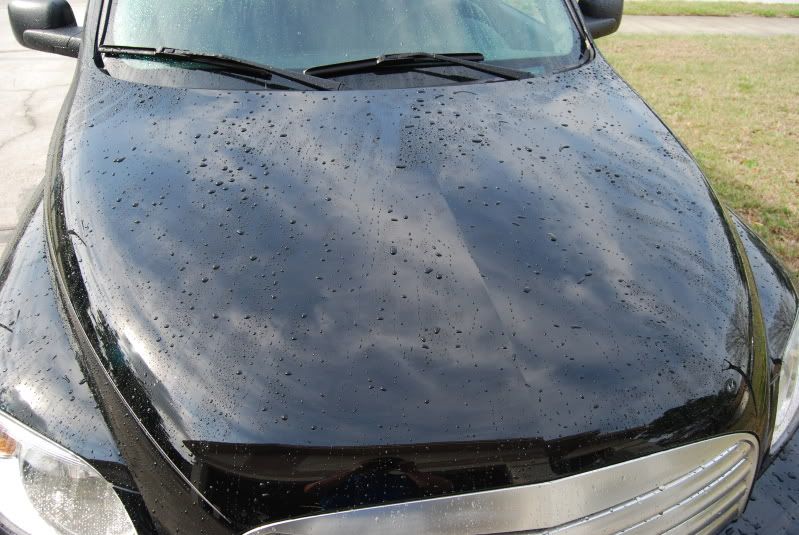
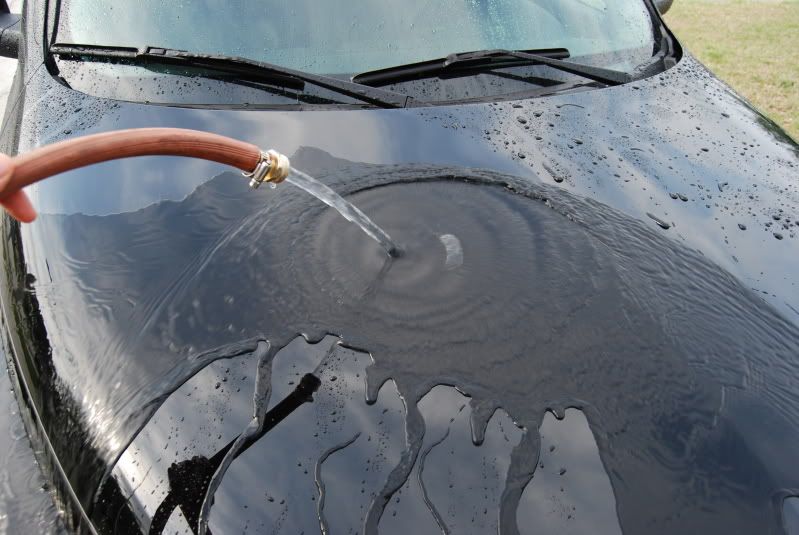
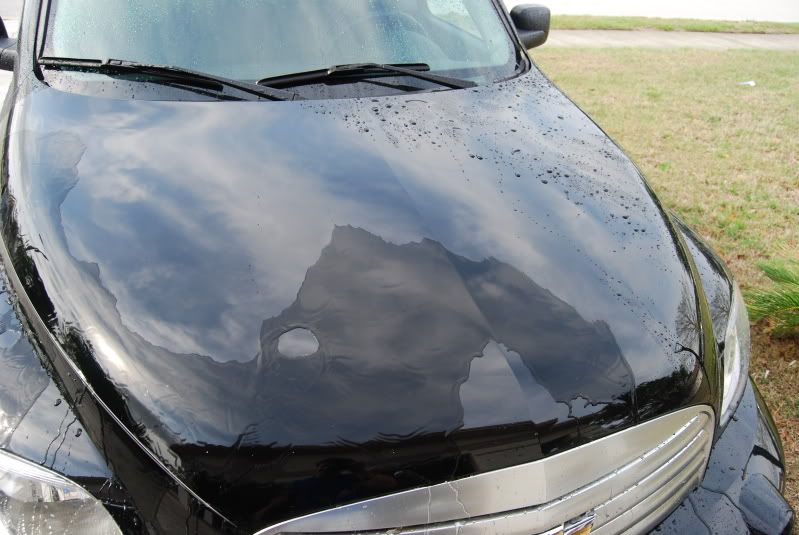
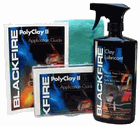
Every car finish shares a common enemy! junk from the road and pollution. When contaminants get a good grip on your car's paint washing alone may not be enough to remove them at all. Remember it's a tool for quickly and easily removing your surface contamination. Claying is also very effective on paint over-spray on your finish. How do you know if you need to use a clay bar? Good question, after thoroughly hand washing your car, feel the surface of your car's paint. Do you feel bumps and rough spots? if you do then these bumps are contaminants attacking the finish of your car. Removing these surface contaminants (road tar, acid rain spots, bug residue, paint over-spray, brake pad dust, hard water spots, junk etc.) will improve both the look and health of your car's paint. So before using detailing clay, you must thoroughly clean and dry your car to remove any loose dirt, Before using detailing clay, you must thoroughly clean and dry your car to remove any loose dirt. Clay is not a cure-all or a replacement for polishing, it's a tool for quickly and easily removing surface contamination. So a great clay is our Blackfire Poly Clay II Kit. PolyClay II detailing clay is the latest evolution in clay technology. These bars of entirely man-made polymers have a number of advantages over traditional clay bars:
* PolyClay doesn?t dry
* out with age or decompose with repeated applications. One, non-abrasive grade works on all paint finishes with or without
* clear coats. PolyClay has a unique elastic property that makes it easier to fold, stretch and apply.
* PolyClay leaves almost no residue on the surface making clean-up fast and easy.
Our kit contains:
* One 200g bar of PolyClay
* 16 oz. of Clay Lubricant
* Two (2) Microfiber
* Power Scrubber Cloths instructions.
Old Pirate
AMG Classic Car Detailing
Polishing and LSP.
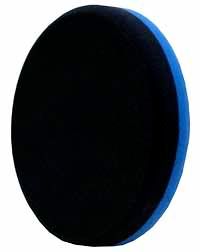
When it comes to using polishes such as Meguiar?s M105 Ultra Cut Compound and Meguiar?s M205 Ultra Finishing Polish, regardless of the machine you choose to use, ProperAutoCare.com recommends starting with the least aggressive method possible. This would be Meguiar's M205 with either a Lake Country Flat 6.5 inch Black Finessing Pad or Meguiar's Soft Buff 2.0 Black Finishing Pad. Meguiar's M205

If this combination does not provide the results necessary, increase the aggressiveness of the technique (longer working time, more pressure, more power) or increase the cut of the product and switch to a medium polishing pad. The next step up would be Meguiar?s M205 Ultra Finishing Polish used with a Lake Country Flat 6.5 inch White Polishing Pad or Meguiar's Soft Buff 2.0 Yellow Polishing Pad.
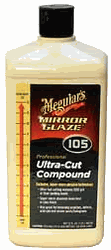
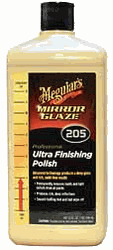
If this combination does not provide the desired results, increase the aggressiveness of the technique or product selection. The next step would be Meguiar's M105Meguiar's M105 Ultra Cut Compound on a Lake Country Flat 6.5 inch White Polishing Pad or Meguiar's Soft Buff 2.0 Yellow Polishing Pad. Note that polishing with M105 will often require a second, follow-up polishing step with M205 to achieve the highest gloss and clearest, swirl free finish. Never mix polishes on the same pad. Switch to a clean, fresh pad included in the kit. If this combination is still not garnering the results you are looking for, increase the aggressiveness of the technique or the product.
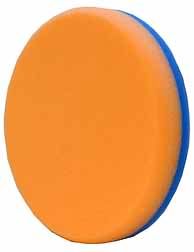
Meguiar's M105 Ultra Cut Compound used with a Lake Country Flat 6.5 inch Orange Power Pad or Meguiar's Soft Buff 2.0 Burgundy Cutting Pad is an aggressive combination and is capable of ?leveling out? most paint defects in one or two applications. If using Meguiar?s M105 Ultra Cut Compound is necessary, follow up with Meguiar?s M205 Ultra Finishing Polish to remove any light polishing haze and restore full clarity and a swirl free finish to the paint. Always test your combination on a test spot, and inspect in good lighting before proceeding to copy that combination over the entire vehicle.Lake Country 6.5 inch Black Finishing Pad
Least to most aggressive:
M205 used with a ?Finishing Pad?: Will remove very light defects and result in a high gloss, swirl free finish.
Lake Country 6.5 inch White Polishing PadM205 used with a ?Polishing Pad?: Will remove moderate to light defects and compounding marks, and results in a high gloss, swirl free finish on most paints.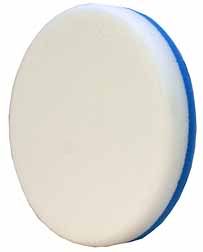
M105 used with a ?Polishing Pad?: Will remove moderate to heavy defects and will often require follow up polishing with M205.Lake Country 6.5 inch Orange Power Pad
M105 used with a ?Power? or ?Cutting Pad?: Will remove moderate to heavy defects on most paints and will often require follow up polishing with M205.
Pad Priming: The new micro non-diminishing abrasives from Meguiar's require that the pores of the pad are evenly primed with product for fastest cutting and highest gloss. It is recommended to "prime" a fresh, dry pad one of three ways:
1.
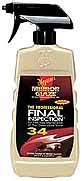
The Kevin Brown Method (KBM): Apply a liberal amount of polish on the surface of the pad and massage the product into the pores with your fingers until the surface is covered in a fine film of polish. Remove excess polish from the pad, so that it feels slightly damp, by lightly pressing a cotton terry or microfiber cloth against the pad while it spins. Meguiar's M34 Final Inspection
2.
Meguiar's M34: Meguiar's recommends misting the dry pad with M34 Final Inspection, then drawing two lines of product, in an X fashion, across the diameter of the pad. M34 will help the polish spread across the pad during the initial polishing application.
3.
Hybrid: ProperAutoCare.com recommends using a hybrid pad priming system to save on material costs and increase ease of use. Mist the dry pad with M34 Final Inspection then draw an X across the pad. Quickly massage the polishing with your fingers into the pad and cover as much surface as possible.
Regardless of the priming method you choose, once the pad has been primed, apply a small amount of polish to the pad between sections. Three ?dime sized? amounts, applied to the outer 1/3 of the pad are sufficient.
Polish one small section at a time, two feet by two feet, per application. Start by placing the pad on the paint and spreading the polish out, then turn the polisher on. Using firm pressure and overlapping left to right, right to left strokes cover the area to be polished.
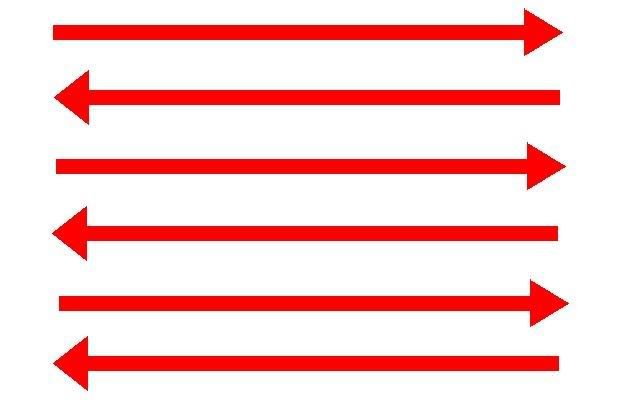
Polish first going left to right.
Make a second pass over the working area using overlapping ?up to down, down to up? strokes. M105 and M205 do not require a typical ?buffing cycle? to break down the abrasives. Repeat this cross hatch pattern until the defects are removed or the polish begins to dry. Then reduce pressure and make a few more passes over the area to ensure a high gloss finish.
Create cross-hatch pattern going up & down.
Machine speed has much to do with your confidence level as you learn to use these polishes. We recommend using speed 5 on the PC 7424 or Meguiar?s G-110 and a speed of 3.5-4 on the Flex XC3401VRG Dual-Action Polisher. Overlap your strokes, using a ?slow arm speed? while applying firm pressure. We have found success moving the polisher one to three inches per second allows the polish to correct most blemishes.
The amount of ?work? or ?cut? accomplished with a non-diminishing abrasive is dependent on the pressure applied to the polisher. For maximum cutting action with the Flex XC3401VRG Dual-Action Polisher, apply 15-20 pounds of pressure on the face of the machine. When using the Porter Cable 7424 or Meguiar?s G110 random orbital polishers, use enough pressure to slow, but not stall the rotation of the pad. On your final passes over the work area, reduce the pressure and lightly move the machine over the surface to allow the abrasives to jewel away any micro marring left from your polishing.
After polishing a section, remove residue immediately with a high quality microfiber cloth such as our Dragon Fiber Perfect Shine Buffing Cloth.
Because Meguiar's M105 Ultra Cut Compound and Meguiar's M205 Ultra Finishing Polishes' abrasives do not breakdown in the traditional sense, the polishes can be sensitive to contamination. During the polishing process, a trace amount of paint is removed, this can cause the non-diminishing abrasives to ?clump? together with the spent paint particles. This can increase the polishing haze left on the paint from heavy polishing, effecting the finish left behind.
ProperAutoCare.com recommends cleaning your pads often by pressing a cotton terry or microfiber cloth against the pad while it spins on the machine. To completely wash the pads use Snappy Clean Pad Cleaning Powder.
For a LSP that looks great and provide you with the protection then look no further, we got the one that will put your mind at ease and a shine like no other. If you're looking for a high-definition, laser-sharp shine guaranteed to turn heads, look no further. This is the current state-of-the-art in paint sealant technology. Wet Diamond, All Finish Paint Protection is the only domestic paint sealant I know of to use a revolutionary, crystal polymer recently released by Wacher- Chemie, Munich, Germany. This polymer has a crystal structure that refracts light, similar to a diamond, to create a vibrant, high-energy, super slippery, head-turning finish. It can be used by itself as the final sealant or as the foundation of BLACKFIRE's signature Wet-Ice over Fire shine.
Wet Diamond, All finish Paint Protection is a paint-friendly, oil-in-water, emulsion safe for all finishes with or without a clear coat. This emulsion contains a small amount of a very refined mineral spirit in a water base. Multiple coats can be layered to deepen the gloss without drying or weakening the paint.
BLACKFIRE Wet Diamond, All Finish Paint Protection can be applied by hand or dual-action, machine polisher. It applies easily and buffs off uniformly even in climates of high heat and high humidity. You simply walk around your car wiping on and buffing off as you go.
The incredible shine is resistant to detergent washings and ultraviolet radiation. This keeps your car?s finish protected month after month and wash after wash.

When it comes to using polishes such as Meguiar?s M105 Ultra Cut Compound and Meguiar?s M205 Ultra Finishing Polish, regardless of the machine you choose to use, ProperAutoCare.com recommends starting with the least aggressive method possible. This would be Meguiar's M205 with either a Lake Country Flat 6.5 inch Black Finessing Pad or Meguiar's Soft Buff 2.0 Black Finishing Pad. Meguiar's M205
If this combination does not provide the results necessary, increase the aggressiveness of the technique (longer working time, more pressure, more power) or increase the cut of the product and switch to a medium polishing pad. The next step up would be Meguiar?s M205 Ultra Finishing Polish used with a Lake Country Flat 6.5 inch White Polishing Pad or Meguiar's Soft Buff 2.0 Yellow Polishing Pad.
If this combination does not provide the desired results, increase the aggressiveness of the technique or product selection. The next step would be Meguiar's M105Meguiar's M105 Ultra Cut Compound on a Lake Country Flat 6.5 inch White Polishing Pad or Meguiar's Soft Buff 2.0 Yellow Polishing Pad. Note that polishing with M105 will often require a second, follow-up polishing step with M205 to achieve the highest gloss and clearest, swirl free finish. Never mix polishes on the same pad. Switch to a clean, fresh pad included in the kit. If this combination is still not garnering the results you are looking for, increase the aggressiveness of the technique or the product.
Meguiar's M105 Ultra Cut Compound used with a Lake Country Flat 6.5 inch Orange Power Pad or Meguiar's Soft Buff 2.0 Burgundy Cutting Pad is an aggressive combination and is capable of ?leveling out? most paint defects in one or two applications. If using Meguiar?s M105 Ultra Cut Compound is necessary, follow up with Meguiar?s M205 Ultra Finishing Polish to remove any light polishing haze and restore full clarity and a swirl free finish to the paint. Always test your combination on a test spot, and inspect in good lighting before proceeding to copy that combination over the entire vehicle.Lake Country 6.5 inch Black Finishing Pad
Least to most aggressive:
M205 used with a ?Finishing Pad?: Will remove very light defects and result in a high gloss, swirl free finish.
Lake Country 6.5 inch White Polishing PadM205 used with a ?Polishing Pad?: Will remove moderate to light defects and compounding marks, and results in a high gloss, swirl free finish on most paints.
M105 used with a ?Polishing Pad?: Will remove moderate to heavy defects and will often require follow up polishing with M205.Lake Country 6.5 inch Orange Power Pad
M105 used with a ?Power? or ?Cutting Pad?: Will remove moderate to heavy defects on most paints and will often require follow up polishing with M205.
Pad Priming: The new micro non-diminishing abrasives from Meguiar's require that the pores of the pad are evenly primed with product for fastest cutting and highest gloss. It is recommended to "prime" a fresh, dry pad one of three ways:
1.
The Kevin Brown Method (KBM): Apply a liberal amount of polish on the surface of the pad and massage the product into the pores with your fingers until the surface is covered in a fine film of polish. Remove excess polish from the pad, so that it feels slightly damp, by lightly pressing a cotton terry or microfiber cloth against the pad while it spins. Meguiar's M34 Final Inspection
2.
Meguiar's M34: Meguiar's recommends misting the dry pad with M34 Final Inspection, then drawing two lines of product, in an X fashion, across the diameter of the pad. M34 will help the polish spread across the pad during the initial polishing application.
3.
Hybrid: ProperAutoCare.com recommends using a hybrid pad priming system to save on material costs and increase ease of use. Mist the dry pad with M34 Final Inspection then draw an X across the pad. Quickly massage the polishing with your fingers into the pad and cover as much surface as possible.
Regardless of the priming method you choose, once the pad has been primed, apply a small amount of polish to the pad between sections. Three ?dime sized? amounts, applied to the outer 1/3 of the pad are sufficient.
Polish one small section at a time, two feet by two feet, per application. Start by placing the pad on the paint and spreading the polish out, then turn the polisher on. Using firm pressure and overlapping left to right, right to left strokes cover the area to be polished.
Polish first going left to right.
Make a second pass over the working area using overlapping ?up to down, down to up? strokes. M105 and M205 do not require a typical ?buffing cycle? to break down the abrasives. Repeat this cross hatch pattern until the defects are removed or the polish begins to dry. Then reduce pressure and make a few more passes over the area to ensure a high gloss finish.
Create cross-hatch pattern going up & down.
Machine speed has much to do with your confidence level as you learn to use these polishes. We recommend using speed 5 on the PC 7424 or Meguiar?s G-110 and a speed of 3.5-4 on the Flex XC3401VRG Dual-Action Polisher. Overlap your strokes, using a ?slow arm speed? while applying firm pressure. We have found success moving the polisher one to three inches per second allows the polish to correct most blemishes.
The amount of ?work? or ?cut? accomplished with a non-diminishing abrasive is dependent on the pressure applied to the polisher. For maximum cutting action with the Flex XC3401VRG Dual-Action Polisher, apply 15-20 pounds of pressure on the face of the machine. When using the Porter Cable 7424 or Meguiar?s G110 random orbital polishers, use enough pressure to slow, but not stall the rotation of the pad. On your final passes over the work area, reduce the pressure and lightly move the machine over the surface to allow the abrasives to jewel away any micro marring left from your polishing.
After polishing a section, remove residue immediately with a high quality microfiber cloth such as our Dragon Fiber Perfect Shine Buffing Cloth.
Because Meguiar's M105 Ultra Cut Compound and Meguiar's M205 Ultra Finishing Polishes' abrasives do not breakdown in the traditional sense, the polishes can be sensitive to contamination. During the polishing process, a trace amount of paint is removed, this can cause the non-diminishing abrasives to ?clump? together with the spent paint particles. This can increase the polishing haze left on the paint from heavy polishing, effecting the finish left behind.
ProperAutoCare.com recommends cleaning your pads often by pressing a cotton terry or microfiber cloth against the pad while it spins on the machine. To completely wash the pads use Snappy Clean Pad Cleaning Powder.
For a LSP that looks great and provide you with the protection then look no further, we got the one that will put your mind at ease and a shine like no other. If you're looking for a high-definition, laser-sharp shine guaranteed to turn heads, look no further. This is the current state-of-the-art in paint sealant technology. Wet Diamond, All Finish Paint Protection is the only domestic paint sealant I know of to use a revolutionary, crystal polymer recently released by Wacher- Chemie, Munich, Germany. This polymer has a crystal structure that refracts light, similar to a diamond, to create a vibrant, high-energy, super slippery, head-turning finish. It can be used by itself as the final sealant or as the foundation of BLACKFIRE's signature Wet-Ice over Fire shine.
Wet Diamond, All finish Paint Protection is a paint-friendly, oil-in-water, emulsion safe for all finishes with or without a clear coat. This emulsion contains a small amount of a very refined mineral spirit in a water base. Multiple coats can be layered to deepen the gloss without drying or weakening the paint.
BLACKFIRE Wet Diamond, All Finish Paint Protection can be applied by hand or dual-action, machine polisher. It applies easily and buffs off uniformly even in climates of high heat and high humidity. You simply walk around your car wiping on and buffing off as you go.
The incredible shine is resistant to detergent washings and ultraviolet radiation. This keeps your car?s finish protected month after month and wash after wash.
imported_Flash Gordon
New member
Welcome to Truth In Detailing Snowman :Snowman:
Looks like Angelo has coverd the whole gamut :Santa Smiley:
Hope to see you around :Christmas Hat:
Looks like Angelo has coverd the whole gamut :Santa Smiley:
Hope to see you around :Christmas Hat:
Welcome to to the detailing game and TID snowman.
A relatively moderate investment in a PC7424XP, 2 of each pads orange, white and black and M105 and M205 coupled with the wash, dry and clay tips above and you're looking at a brand new vehicle. As you can imagine, doing the buffing with a machine is a HUGE difference in results and reducing the fatigue factor.
Good luck and enjoy what a PC offers. You'll have a much better looking Jetta now and whatever your driving after will look outstanding.
T
TOGWT
Guest
Welcome to TID (from one 'old man' to another ")
Oxidation
Basically the chemical integrity of the paint has been degraded by ultra violet (UV) radiation, stress, environment fall out and etc. Oxidation really amounts to a weakening of the resins that bind paint, which results in the micro-pores becoming exposed and a larger area of paint becomes oxidized. The paint top surface loses its reflective ability and becomes ?chalky?; this is a sign that the structural integrity (mechanical strength) of the paints matrix has become compromised.
Once the paint has been breached in this manner, polishing may remove minor oxidation but use caution as you are further ?thinning? the paint, applying waxes and polishes temporarily wets the surface making it appear better. The oils and other components do not have the ability to repair the resin binders but rather cover up the problem for a short period of time.
WOW! What a tremendous response.
I really appreciate the help. Just one more quick question though. From what I read previously it didn't sound like an orbital was aggressive enough to remove oxidation and light swirls. Guess I'll try it to see.
I ordered the equipment yesterday so maybe by next week I'll have a decent ride again.:clap:
imported_Flash Gordon
New member
WOW! What a tremendous response.
I really appreciate the help. Just one more quick question though. From what I read previously it didn't sound like an orbital was aggressive enough to remove oxidation and light swirls. Guess I'll try it to see.
I ordered the equipment yesterday so maybe by next week I'll have a decent ride again.:clap:
You might wanna wash that bad boy with a APC/Dawn mix. That will help remove some of the oxidation. Also, be sure to clay the car. That will help also
Single stage paint.....Your going to flip out when you see the difference/progress being made once you start polishing :Frosty:
bmw5541
New member
WOW! What a tremendous response.
I really appreciate the help. Just one more quick question though. From what I read previously it didn't sound like an orbital was aggressive enough to remove oxidation and light swirls. Guess I'll try it to see.
I ordered the equipment yesterday so maybe by next week I'll have a decent ride again.:clap:
Welcome to TID snowman.
A RO or DA is very capable of taking care of swirl marks and minor oxidation. The key to success however is, Megs 105 and 205 using the KBM that Angelo spoke of above. These products were designed to work with a RO.
Good luck and be sure to post some pics when you work your magic.:clap:
I would agree with Barry. When 105 and 205 came onto the scene it changed the game to afford a RO more punch with refinement as well. Before the 2 Meg's products arrived it was much more difficult to get a PC to really "correct". Not true anymore. You can get huge improvements with oxidized paint with a couple flat orange pads and M105.
Good luck and share your results with us. I'm excited just anticipating what you have coming your way!
Good luck and share your results with us. I'm excited just anticipating what you have coming your way!