Need advice on scratch

Firescooby

New member
editPhotos.fcgi


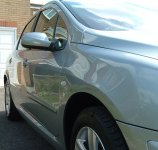
Hey guys, I hope the picture worked.


It is a picture of two scratches on my truck (2002 Toyota Lunar Mist). They both are about 3-4" long, with the one on the right being more severe and wider, maybe 1/8-1/4" wide. They are down to primer? (grey).


After reading a lot on this board this is what I am thinking of doing? Most of what I found says use this for dings/ rock chips, but didnt find a whole lot of info for long scratches.


1: Wash and remove wax

2: Use toothpick to check for paint chips

3: Use 1200 grit 3M sandpaper on pencil eraser

4: After clean apply touch-up paint

5: Do 2-3 coats

6: After touch-up is "raised up" use 1500 grit sandpaper (also have 2000 grit)

7: Use 3M perfect-it fine cut compound

8: Polish


QUESTIONS:

1) Planning on using paper match end to apply paint-OK?

2) Should I sand in between coats? And if so what grit?

3) What I have read says rotate pencil in fingers 8-10 times. But this was mostly for rock chips...How should I do it for this scratch?

4) When final wetsanding...what should I use for final prep...just sandpaper? I dont have any sanding blocks.

5) Should I soak sandpaper overnight THEN punch out and put on pencils, or just dab them with water while sanding?


ANY other tips would be greatly appreciated.


THANKS in advance.
 
It works for me. I wonder if you must be a member of Webshots to view?


92597383ymaEsd_fs.jpg


Well, I tried to put it in the post, but I cant...
 
Well guys, you cant see it, but give me your opinions.


Worst scratch is about 3-4" by 1/8-1/4" down to what I suspect is the primer (dull grey).


Tell me what you think of my plan and questions.
 

Attachments

  • nxt on silver.jpg
    nxt on silver.jpg
    117.9 KB · Views: 690
I hate to see anyone hanging for advice like you are for so long, so...here goes...


I have to be honest, IMO, even if you do everything right on touching those up, I will tell you it still won't look too great IMO. Better, and less obvious yes, but you'll still see them, but you probably already realize all this. They're pretty long and the width of the larger one is scary. I also understand most folks can't just run off to the body shop for everything either, so..that said;


QUESTIONS:

1) Planning on using paper match end to apply paint-OK?

If you've done it that way before and liked the way it worked, why not? I use a very thin fine point artist's brush, but I've also done oil- on -canvas paintings most of my life, so i'm more at home with a brush.


2) Should I sand in between coats? And if so what grit?

Not always necessary with touch up because the dab will bond to the previous dab of paint since even though it's dry to touch, it's still not real hard, so the next dab it will "bite" into it a bit. If you want to you can, just a light pass with your sanding pencil will suffice.


3) What I have read says rotate pencil in fingers 8-10 times. But this was mostly for rock chips...How should I do it for this scratch?

You will have to rake down the scratch with the pencil lengthwise.


4) When final wetsanding...what should I use for final prep...just sandpaper? I dont have any sanding blocks.

A sponge sanding block costs ~$4, you've gone this far with the process, don't skimp here. If you sand over those scratch touch ups with your hand behind the paper you WILL see a waver in the paint.


5) Should I soak sandpaper overnight THEN punch out and put on pencils, or just dab them with water while sanding?

For your purposes, just cut them and glue them, you're only sanding a damaged/scratched area anyway. Soaking wet sandpaper is to prevent surrounding paint from receiving possible side and wrinkling scratches from hard paper. You'll be in a channel with little to no paint, so it's not really an issue. Yes, keep it wet while sanding.


Hope this helps some. Dan H
 
For final wetsanding with the block, you WILL have to soak the paper for an hour before you proceed. The sanding pencil and how you're using it is different, that was my point.


Best of luck. :)
 
THANK YOU for your reply.


I was starting to think I was an outcasted stepchild. Any idea of any chain shops that carry the sanding blocks. I looked at my local Autozone, NAPA and Carquest to no avail. Where I live we have no body shop supply houses. There is a Pepboys within an hour drive.


Again, thanks.
 
Scoob, around here in my area, Advance Auto parts, as well as Pep Boys and AutoZone all sell them. The 3M sponge block is the one I see most commonly, and it's cheap. They typically come as abrasive blocks, meaning the exterior is coated with some grit of varying grades, but you can get them in non-abrasive exteriors too.


If they don't have the non-abrasive exterior sponge block, just get the finest grit one they sell.


Let us know how it goes. :)
 
I was able to find 3M wetdry sandpaper. Got a sheet of 1200, 1500, and 2000. The 2000 was the finest they had. DO I need to find 2500 as well?


Also, what is the best way to attach the paper to the block?


I plan on using the modeling glue for the pencil erasers.


ONE MORE: Do I need to buy a bottle of clearcoat or just the touch up paint? If I do, how do I do this as far as sadning it with the clearcoat.


Thanks
 
You don't need the 2500, what you have is perfect.


Cut the sandpaper so it's about 1 inch wider (1/4 inch is fine too)than the width of the block. Take those 1 inches on each side of the length of the paper and FOLD IT under the block. You want to have a FOLDED/ OVERLAPPED edge on the sides of the block, NOT a factory paper edge.


Then...Take the front and back ends and wrap them up around the top of the block where your hand is. You will grab the ends together under your hand to hold the paper tight around the block.


If that isn't clear enough let me know.


As far as the clearcoat, well...I always find topping a small chip with clear will leave a "halo" after wetsanding because where it's sanded at the periphery of the chip that "edge" will turn slightly white (all clears do this except special "melt-in" clears for spot work) whereas the basic car color touch up only blends in with the surrounding paint and doesn't leave an obvious delineation. So it's up to you on if you want to try. It may be fine to your eyes.


I just usually prefer to put paint color in a small chip or nick, but it will kind of depend on how big yours are. Good luck.
 
Ok...tried it today and screwed it up even more.


At some point with my 1500 or 2000 grit sandpaper I went throught the clear and started through the paint between the two scratches. Plus the touch-up paint looked like crap.


NOW, I have an idea of going to paintsccratch.com and getting a can of color matched spray paint and repainting that section.


Question: Can I repaint the area just above the handle (see picture) where the scratches are located, or do I need to tape off, sand and respray the entire "upper" panel above the handle and paint the entire width of that section?


Also, do I need to sand down to metal, or just "scuff" it up? What grit would you recommend?


QUESTION: Should I buy a can of the clearcoat?


Again...thanks!!
 
I was a bit afraid of that, but I was hoping for the best for you.


Here's the thing, you will have to make a decision;


You could ostensibly wetsand the area of the scratches and spot- in the basecolor etc. but you would have to reclear the entire panel ( or most of it if you have a dividing line or trimpiece that breaks it up-that would help) in order for it too look somewhat correct. If you just spray clearcoat over the area you are repairing, you will get a "halo" even after you wetsand it down even. you WILL see it. You are in essence seeing the shaker can paint (clear) film on top of the existing oem clearcoat. The way a shop would do it is blend the color at the repair , and reclear the entire panel or half if it's got some kind of delineation as mentioned.


Honestly Scoob, as I mentioned to you in my first reply about the scratch touch up probably not lookiing that great, and still being noticeable....well, I feel a novice trying to respray the area with Dupli-Color or similar (as you mentioned) would run into the same problem. Add to it, a shaker can will not have the gloss or durability( it's uncataylzed remember-no hardener) of a DuPont or PPG urethane enamel bought at an auto paint retailer in a can and sprayed with a gun and compressor. I just know from experience that most people would be better off going to a body shop and paying ~$150 to have it done right. No regrets that way.


That said, if you want to try it's your car. You have to block the scratched area flat with ~400 to 600 grit(try not to break through any more clear) , then use 800 grit to scuff the entire panel and surrounding clear (for the new clear to "bite") then spot -in your shaker can, allow it to flash the recommended time, and reclear the panel. If you can't block it flat enough, you would use a high-build primer surfacer and block it till that area is flat as possible. If your finger can feel paint edges and dips etc. your eye sure will after it's painted.


I guess you have to decide if it's time to cut-and-run (to a body shop) or gamble and hope you're happy with the results.


It all depends how picky you are, and how much $$$ you need to save in the process. I wish I had better news to tell you. Remember - it's just a car - and these things CAN be fixed good as new by pros even if you're not happy with the results should you attempt the repair.


I do wish you the best
 
First I want to say a BIG THANK YOU!!! You have been a HUGE help. Even if it didn't end up as "planned". I wanted to try it myself because I thought I could do it...hmmm.


I guess I will end up paying someone that knows what they are doing. It was gonna run about $65.00 for the paint and shipping from paintscratch.com. It will be worth the $150.00+ to make sure it is done right THIS time. I would REALLY be PO'd if I spent the money and did it myslef and STILL ended up having a shop do it.


AGAIN...thanks for your help. I have to admit I was expecting more replies and assistance from the forum. BUT, you have represented the forum well, and have provided the assistance I needed.
 
Don't hold me to the ~$150 though, may be more if it's a pearlescent (tri-coat) paint or other factors are involved. But I think that's a good general ballpark price , and you may even find a local shop to do it for a little less. Good luck, FWIW, I think you're making the right decision.
 
Back
Top