I apologize in Advance if pictures dont show up clear (uploading from my Iphone) and also Apologize if posted in wrong catagory.
This will be my 1st attempt at a write up so please bare with me")
Items needed:
1000 Grit wet/Dry Sand Paper
1500 Grit wet/dry Sand Paper
2000 Grit wet/dry Sand Paper
Painters tape/masking tape
rubbing compound (I use 3m for my headlight restorations)
Plast-X
a buffer/polisher (PC 7424XP with 4" pad for me)
some form of lubricant for sand paper (i use a spray bottle of water with a few drops of dish soap)
Step 1: You want to tape off ANY paint surrounding the headlights (i use 2" painters tape and works pretty good)
**if you have tight angles
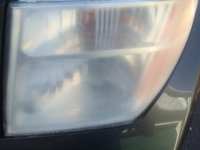
Step 2: spray the headlight with the lubricant and take the 1000 Grit Sand Paper and start working your way around the Headlight, as with buffing, go in a left to right, up and down motion until entire headlight has a nice even cloudyness effect to it. Every so often spray the headlight down with lubricant
After 1000 Grit sanding

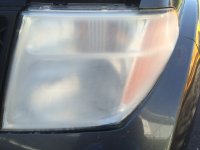
Step 3: Repeat Step 2 with the 1500 Grit and keeping to sand paper wet and continue the left/right, up/down motion.
After 1500 Grit Sanding

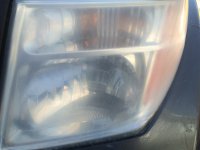
Step 4: You Guessed it Repeat Step 2 with the 2000 Grit Paper. I personally spend more time on this step making sure to get every little piece sanded evenly.
After 2000 Grit

Step 5: liberally spray your headlight and wipe with a clean towel. Excess residue is wiped away grab your pad and compound. I use Adams Polishes Green 4" focal pad for the compound. Put a few drops on your pad and begin working in the product. My PC i keep at setting 4 (works decent for me). Once you get product worked in and you do a few passes. You want to switch pads. I use Adams 4" White Focal pad for this step. Apply 5-6 pea size drops of the Plast-X to your pad and work product in, doing the same motion as before, left/right, up/down.
At this point you want to wipe off your headlight and you will beable to see if you need to work it a little work with the compound or Plast-X
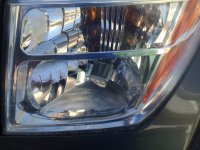
headlight After Final Step

As you can see the results are Night And Day. I`ve only done this once before on this vehicle 4yrs ago when i purchased it so it is a long lasting fix
Car was done this past Sunday And Took about an hr and a half
I apologize again if formatting is off or explination is confusing lack of sleep and also you will notice i did not tape off my headlight... My pathfinder needs a new front bumper so i wasnt worried about damaging the paint
if anyone has any questions feel free to PM/Email Me
email: [email protected]
This will be my 1st attempt at a write up so please bare with me
Items needed:
1000 Grit wet/Dry Sand Paper
1500 Grit wet/dry Sand Paper
2000 Grit wet/dry Sand Paper
Painters tape/masking tape
rubbing compound (I use 3m for my headlight restorations)
Plast-X
a buffer/polisher (PC 7424XP with 4" pad for me)
some form of lubricant for sand paper (i use a spray bottle of water with a few drops of dish soap)
Step 1: You want to tape off ANY paint surrounding the headlights (i use 2" painters tape and works pretty good)
**if you have tight angles
Step 2: spray the headlight with the lubricant and take the 1000 Grit Sand Paper and start working your way around the Headlight, as with buffing, go in a left to right, up and down motion until entire headlight has a nice even cloudyness effect to it. Every so often spray the headlight down with lubricant
After 1000 Grit sanding
Step 3: Repeat Step 2 with the 1500 Grit and keeping to sand paper wet and continue the left/right, up/down motion.
After 1500 Grit Sanding
Step 4: You Guessed it Repeat Step 2 with the 2000 Grit Paper. I personally spend more time on this step making sure to get every little piece sanded evenly.
After 2000 Grit
Step 5: liberally spray your headlight and wipe with a clean towel. Excess residue is wiped away grab your pad and compound. I use Adams Polishes Green 4" focal pad for the compound. Put a few drops on your pad and begin working in the product. My PC i keep at setting 4 (works decent for me). Once you get product worked in and you do a few passes. You want to switch pads. I use Adams 4" White Focal pad for this step. Apply 5-6 pea size drops of the Plast-X to your pad and work product in, doing the same motion as before, left/right, up/down.
At this point you want to wipe off your headlight and you will beable to see if you need to work it a little work with the compound or Plast-X
headlight After Final Step
As you can see the results are Night And Day. I`ve only done this once before on this vehicle 4yrs ago when i purchased it so it is a long lasting fix
Car was done this past Sunday And Took about an hr and a half
I apologize again if formatting is off or explination is confusing lack of sleep and also you will notice i did not tape off my headlight... My pathfinder needs a new front bumper so i wasnt worried about damaging the paint
if anyone has any questions feel free to PM/Email Me
email: [email protected]