First time Porter Cable experience

svtcobra

New member
Todd the moderator I went ahead with your suggestions(LC Pad white to apply blackfire enhancing polish)

I used my PC with BlackFire enhancing gloss for the first time last Friday. the results were a little bit better than what I saw by hand last year. swirl marks were being covered up and bought a good shine to car.

What I wasn't clear on was at what speed I should apply the polish and at what speed to continue buffing it. I started at 3 and rubbed it in for 3-5 minutes and then put it 5 speed and started buffing. at speed 5 it was very difficult. I felt almost scared to continue polishing it because I felt the layer was so small that I might end up doing harm.

the more I used the PC the more better I got and started to like it!

1) I only was able to apply one layer, but does anyone have any suggestions for what polish I should upgrade to? i want to get rid of the swirl marks. I can try to apply a second layer and see what happens.

2) What pressure should I apply on this second layer? how many pounds? During the first layer I applied little to no pressure.


** I have before and after pics but they for some reason save as 1mb jpeg files. Any suggestions to help me post these pics?**
 
I started at number 2, then like you said rubbed it in for about 1 minute then put it 5/6 speed with about 10-20 lbs of pressure when buffing. Just make should you put about 4-5 pea size drops of polish on your pad. Should be for about 4-5 minute's till it's almost transparent.
 
03 10th anniversary torch red vert...What do you got? I'm having a super hard time posting pics here because for some reason all my pics are 1mb on jpeg files.
 
Todd the moderator I went ahead with your suggestions(LC Pad white to apply blackfire enhancing polish)

I used my PC with BlackFire enhancing gloss for the first time last Friday. the results were a little bit better than what I saw by hand last year. swirl marks were being covered up and bought a good shine to car.

Hey buddy, sorry that the results weren't quite what you where looking for, but lets keep moving forward and keep you and the Mustang on the right track.

IRC, the reason I recommended using the White Pad with the Gloss Enhancing Polish is because you where primarily looking to remove swirl marks. The Gloss Enhancing Polish is a very fine polish and it is going to be difficult to remove swirl marks with something this fine. The White Pad will at least give you a fighting chance.


What I wasn't clear on was at what speed I should apply the polish and at what speed to continue buffing it. I started at 3 and rubbed it in for 3-5 minutes and then put it 5 speed and started buffing.

It sounds like you may have worked the polish in too long at speed three. Although the Porter Cable sounds aggressive and looks like its doing a lot of work, it really is pretty mild in paint polishing terms. Spread the polish on speed three until an even film exists over the working area.

Your working area should be about a 2x2 foot square. This should only take 15 to 20 seconds. Just a nice even film of fresh polish. Now increase the machine to speed five and apply some pressure. You want to slow the rotation of the pad but not stall it. In general about 15 pounds of down force is a good starting guideline.

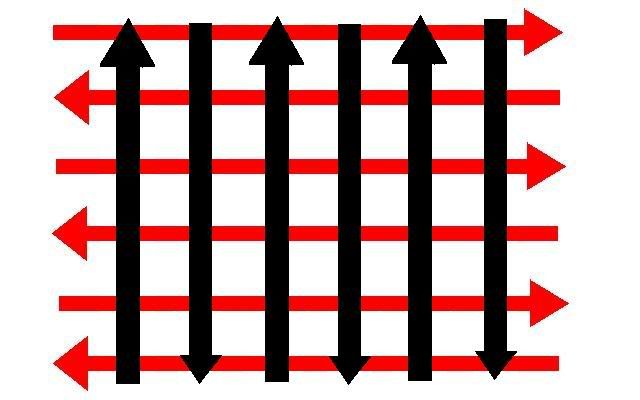
Now your pressing down and are on speed 5, what next? Starting in one corner of the 2x2 square, say the upper left, you are going to slowly move the machine in back and forth strokes until you cover the entire square. Make sure to overlap each stroke by about 50%. Covering the entire area with a series of strokes in the same direction constitutes a pass.

Your first pass should look like this...

onepass.jpg


After finishing your first pass, make second pass moving in a cross hatch pattern, so now going up and down instead of left to right. Keep your pressure steady and your arm speed slow. A big beginner mistake is to move the machine too quickly, either to avoid damaging the paint or to speed the process. The best results are generally obtained my moving the machine about 1 to 3 inches per second and using steady pressure. Because of the orbital motion, the Porter Cable needs time to work the polish in and break it down.

Your second complete pass will make look something like this...

twopass.jpg


Continue working in this manner, with overlapping left to right strokes covering the area for a pass, then overlapping up and down strokes covering the area for a pass until the polish begins to break down or turn opaque. Then reduce pressure and make a final pass in each direction, moving the machine quicker.

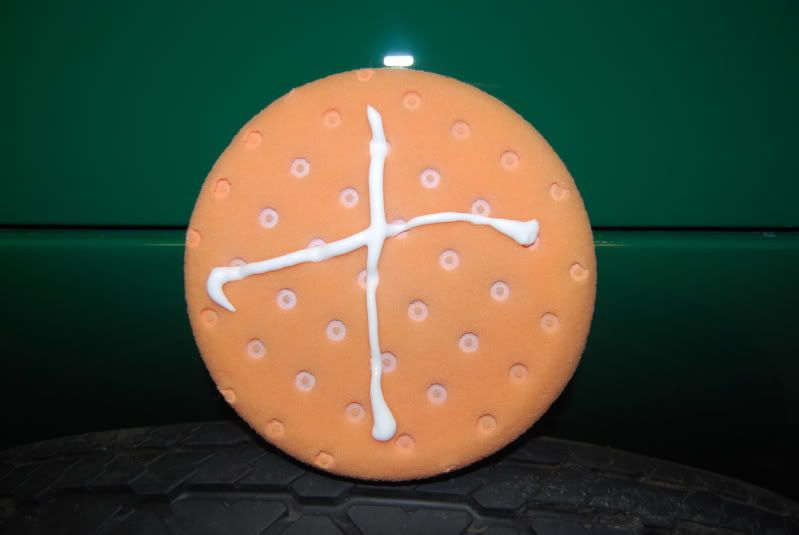
You want to make the polish look more opaque but you do not want to go to a dry buff. As a rule of thumb as how much polish to apply to the pad, for the first buff on a dry, clean pad, draw to thin lines across the face of the pad, to forum an X.

polishpics003.jpg


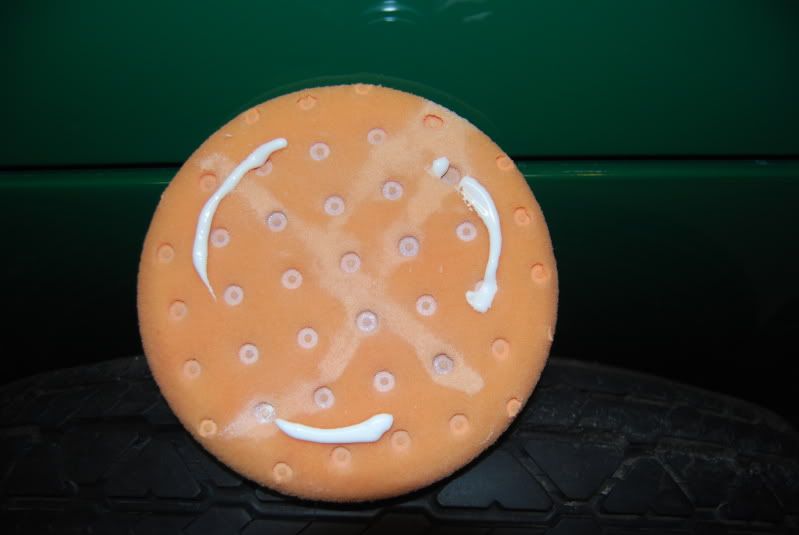
For subsequent steps, use either one line across the middle of the pad or three small dashes on the outer sides of the circle.

polishpics004.jpg


Always test your results by doing small test section (remember to work areas no larger then 2'x2') then inspecting the results in bright light to make sure you are happy with the results.


at speed 5 it was very difficult. I felt almost scared to continue polishing it because I felt the layer was so small that I might end up doing harm.

When you are machine polishing the paint to remove swirls, you want to have a wet film on the paint, but not a thick film, as this would impede the pad and abrasives from working. Work a small section at a time with a small amount of polish for the best results. Do not polish to a dry buff (no film remaining) but as long as the film is wet you are fine!

the more I used the PC the more better I got and started to like it!

That is good to hear and the most important part. This has to be fun!

1) I only was able to apply one layer, but does anyone have any suggestions for what polish I should upgrade to? i want to get rid of the swirl marks. I can try to apply a second layer and see what happens.

Just for clarification, we not really adding layers. Polishes, by definition, are very similar to liquid sandpaper. We apply the with a machine to remove small amounts (very trace) of uneven paint, so that we leave behind a flawless finish. When we are done polishing that section, we should remove the residue immediately so nothing is left behind on the paint.

The Gloss Enhancing Polish is a very light cut, so it might not have enough bite to remove the swirl marks. However I would still try a second application, using the techniques I listed above on a test section and see what happens. If this doesn't get you where you want to go I would suggest adding a few products to your arsenal.

First, I would pick Menzerna Power Finish PO203. It is now available in 16 oz bottles which would be perfect for you. This is a great choice for what you are going because it has enough omph to correct all but the deepest damage and finishing out to a pretty good shine. However, after using it and removing the swirls, applying the Gloss Enhancing Polish will further refine the surface and give you even more gloss! That is what an ultra fine polish is really designed for.

I would also pick up three new 6.5 Inch High Gloss Pads. An orange, another white, and a black pad.

First, try using the Menzerna PO203 on the white pad, using the techniques at the beginning on a test section and inspect it. If you still have some swirl marks, then step up to the orange pad and try again. You should really make a dent in them with this combo, but if they are really severe, then it might take a couple applications.

Keep in mind that polishing with an orange pad and PO203 might create some VERY faint swirling that may look like a very faint haze in the paint. This is normal and okay, just to make sure the swirling you where trying to remove is gone by comparing an area next to your test section with your test section. Once the swirls are completely gone, re polish using Gloss Enhancing Polish on a Black pad to remove any very light swirling and really amp up the gloss.


2) What pressure should I apply on this second layer? how many pounds? During the first layer I applied little to no pressure.

I explained it on this thread

but here is the quote.


"There is no set rule of thumb for the amount of pressure to use because there is a lot of variables to account for. A good rule of thumb to begin with is around 10 to 15 pounds of pressure. But it is far better to look at the rotation or spinning of the pad. You want to use enough pressure to cause the pad to slow, but not enough to stall it.

A random orbital polisher like the Porter Cable works by moving the pad in a tight orbital motion. If you think how the earth revolves around the sun, the center of the pad is revolving around the center of the machine. Only the the Earth's orbit is elliptical where as the PC is a perfect circle. The tight orbit of the pad causes it to spin do to centripetal force. There is no direct connection between the spinning of the pad and the motor.

Using a dry polish (less lubrication), a larger pad, or a softer,higher grip pad can all slow the rotation of the machine, as can buffing on a tight angle or high point. To get the best results you want to keep the pad rotating at least 3-5 times per second. How do you determine this? I like to take a marker and draw a line on the backing plate, so I can track the rotation.
"


** I have before and after pics but they for some reason save as 1mb jpeg files. Any suggestions to help me post these pics?**

Are you hosting them on photobucket?

Hope I helped and I'm sorry for the late response. I have to be up early tomorrow to detail a Lambo Gallardo that some cigar smoking detailing hack ruined a couple months ago, but if you have any questions, I will get to them when I return tomorrow. BOL!
 
Photobucket! please let me know if you can see my before and after pics of using the PC for the first time.

http://s937.photobucket.com/albums/ad215/Cobratron/

The link goes right into your PB account, but no pictures. (I assume you haven't loaded any yet!)

If you want to post pictures directly, rather than a link, you can simply copy the URL of the picture, then copy it into the window of the "Insert Image" icon.:D
 
Thx for the advice

Todd - the information you posted on here was followed to the tee....and wow did I see remarkable results.

Finally....Here are few pics!
 
dang it...no clue why the pics are so small!!

svtcobra,

First upload your pictures to photobucket. Then click on the picture you want to attach. On the left side of the screen you will see a box that says Share this Immage. Click on the box that says IMG Code. Copy that link. Then on your message box on TID, click on Insert Link. Then just copy the link into that box and you should be good to go.
 
thx for the instructions Barry! now I need to take better pics

BF clay bar, Menzerna power finish(1 coat), BF enhancing gloss(1 coat), and BFWD(2 coats) using a PC with LC pads

Hood


door panel
sidedoor.jpg


door panel in sunlight
sidedoorsun.jpg


sideangleresized.jpg


Rearnorthriverside2.jpg
 
Since this thread is about the PC in a sense I thought I would post here rather than start a new thread.

BTW, Cobra is looking killer.

I just ordered my PC from PAC, got the 'Ultimate Detail Kit', comes with a backing plate, LC Pad. I was wondering after doing some research, that the PC comes with a 5" pad counterweight, and the LC pads are 6.5". Does the kit come with this counterweight? Cause I didn't order it if it is in fact required.

Thanks.
 
Holy Moly Cobra!!! That's with a PC? You are a FAST learner dude! That came out phenomenal. You should feel very proud of that shine my friend. It feels good to get those results by yourself doesn't it?

I'd also like to thank Todd for his unselfish contributions here.

94Canuck, in my experience you'll feel a little more vibration using a 5" CW with a 6.5" pad but I've not been too bothered by it. You have 2 options if the vibration bugs you: you can order a 6" CW if you want to keep using 6.5" pads or you can get 5.5" or 5" pads with your current CW. If you have 6.5" pads right now you might want to give it a try and see how it feels to you.
 
Holy Moly Cobra!!! That's with a PC? You are a FAST learner dude! That came out phenomenal. You should feel very proud of that shine my friend. It feels good to get those results by yourself doesn't it?

I'd also like to thank Todd for his unselfish contributions here.


Thanks dude! It does feel great to get that BlackFire shine! Of course I'd want it to be even more shiner and crisp. Please check out these pictures AND NOTICE THE SMALL DOT'S to the right of the sunlight. These dot's came about after I used the blackfire enhancing gloss and put the car cover on. Left the car in the garage for about 3 days and noticed some swirls and these blasted dot's. there on the spoiler too. Sorry I know the pic is not the best.

Any idea what they are from?? thanks.

dotscloseup.jpg


dotscloseup2.jpg
 
Back
Top