Navigation
Install the app
How to install the app on iOS
Follow along with the video below to see how to install our site as a web app on your home screen.
Note: This feature may not be available in some browsers.
More options
Style variation
You are using an out of date browser. It may not display this or other websites correctly.
You should upgrade or use an alternative browser.
You should upgrade or use an alternative browser.
Cleaning the cowling
- Thread starter Bunky
- Start date
southerndetail
New member
Get it as clean during the wash with a paint brush, and then after its dried use a seperate brush with some megs back to black.
Beemerboy
Just One More Coat
Get it as clean during the wash with a paint brush, and then after its dried use a seperate brush with some megs back to black.
I agree get that thing as clean as possible during the wash stage..I spray the area with APC and use some long handled brushes to get into the cracks....then for me use Stoners Trim Shine for this area...get into the cracks fast and even...I always buff after to even out!
JaredPointer
COME AT ME BRO
Take it off. I do this with mine. It's only a couple of screws, and it only takes a few minutes. When I had one that "sort of" looked like that with the ribs, I would spray it down with Stoner's Trim Shine and buff the excess.
Troy@Protekt
a.k.a. Troy@DetailCity
A lot of times this area will have white residue from a buffer hitting it or an over enthusiastic hand waxer. That's when taking it off would be the way to go. Especially with the more intricate ones.
Spraying them with an aerosol dressing is a quick way to make them look good. You just have to deal with silicone over-spray on the windshield and paint. No biggy on the paint but getting it off the windshield isn't always easy.
Those of you who use aerosol dressings be careful. You might be doing more harm than good. I have used some that are terrible. They look great initially but they actually dry out your trim. Once the silicone washes off you will notice that your trim is dryer than it was before you treated it. I'm guessing it's because of the kind of solvent carrier they use. For the record. I have not noticed this with the Stoner's products.
BTW. This is also the case with the cheap solvent based tire dressings. They will dry out the tire because some solvents get trapped under the silicone and attack the tire.
Page
I made a Duck Fart
Bunky
Have you try Black Wow or Duragloss 271 they have work great for me. Troy sells both of them:dcrules
Have you try Black Wow or Duragloss 271 they have work great for me. Troy sells both of them:dcrules
Troy@Protekt
a.k.a. Troy@DetailCity
Bunky
Have you try Black Wow or Duragloss 271 they have work great for me. Troy sells both of them:dcrules
Thanks for the plug.:bigups
I gotta make sure you win our next giveaway. :notme: :crazy2:
Beemerboy
Just One More Coat
A lot of times this area will have white residue from a buffer hitting it or an over enthusiastic hand waxer. That's when taking it off would be the way to go. Especially with the more intricate ones.
Spraying them with an aerosol dressing is a quick way to make them look good. You just have to deal with silicone over-spray on the windshield and paint. No biggy on the paint but getting it off the windshield isn't always easy.
Those of you who use aerosol dressings be careful. You might be doing more harm than good. I have used some that are terrible. They look great initially but they actually dry out your trim. Once the silicone washes off you will notice that your trim is dryer than it was before you treated it. I'm guessing it's because of the kind of solvent carrier they use. For the record. I have not noticed this with the Stoner's products.
BTW. This is also the case with the cheap solvent based tire dressings. They will dry out the tire because some solvents get trapped under the silicone and attack the tire.
I hadn't noticed this...Troy...makes some sense...only thing that I like about it is the coverage into the tight areas...one of the products that I use on this beside Stoners is from P&S...aerosol no rub polish...great shine and coverage....the over spray is a hassle but I do this before removing the LSP and on the windows...some APC on a towel to wipe that area before I clean the windows
Bunky
Detailing Gnosis
Thanks for the posts.
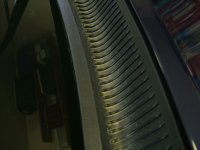
BTW, this pic got posted last night when I was trying to tell Angelo, AJ, and Steve about my cowling issue while chatting in the chatroom. We do talk about detailing at times. That is why my description was terse.
There are many recesses thanks to the concave design with all those ribs. The crud is a mixture of dried soap, pollen, wax residue, polish dust, hard water deposits, and anything else that can collect in a recess. As said above, I just really need to pay attention to it that it is clean and dried after each wash.
I first thought the plastic had just faded so used Mothers Back to Back first and PB Trim Restorer laster which only covers it up but does not really clean it.
I had tried APC (DG) at 10:1 but seemed to come back after I rinsed and dried it. I have to take a rubber tip of a detail brush to rub/scrub the textured surfaces to break loose the mixtur crud. This weekend I tried Meg's 4:1 on a small section but I was concerned about using any APC at that dilution since it could stain... I may end up taking it out to clean it better...
Steve (PB) recommended Bold n Bright (cleans, dresses, and safe on plastic) with a toothbrush. I need to find a routine to spray (safe around glass/paint) so I can maintain it and be sure I got all the soap/ONR residue out but with all the little ribs it takes a few minutes to actually get the towel into all the slots.
Page
I made a Duck Fart
Thanks for the plug.:bigups
I gotta make sure you win our next giveaway. :notme: :crazy2:
:thanks Troy you well know i need all the help i can get:crazy2:
Troy@Protekt
a.k.a. Troy@DetailCity
I need to find a routine to spray (safe around glass/paint) so I can maintain it and be sure I got all the soap/ONR residue out but with all the little ribs it takes a few minutes to actually get the towel into all the slots.
I use a varnish brush for treating intricate areas. Bristles hold up well and you can get tight spots.
As far as stubborn wax residue etc... I can usually get it with my vapor cleaner or some apc and a stiff detail brush or a combination of both.
blk45
It's all in the prep!
Take it off. I do this with mine. It's only a couple of screws, and it only takes a few minutes.
I would take JP's advice. Once it's off, try any of the recommendations of brushes or a Magic Eraser and your cleaner of choice. Then treat with PB's TR or Black Wow.
Beemerboy
Just One More Coat
I would take JP's advice. Once it's off, try any of the recommendations of brushes or a Magic Eraser and your cleaner of choice. Then treat with PB's TR or Black Wow.
When I read this I thought it seemed extreme...it still dose in most cases...If this is your own car and you want to get it back 100% or close then yea...but what I read into this was how to get it clean while in-tacked and conditioned...
JaredPointer
COME AT ME BRO
When I read this I thought it seemed extreme...it still dose in most cases...If this is your own car and you want to get it back 100% or close then yea...but what I read into this was how to get it clean while in-tacked and conditioned...
Don't know what seems so extreme about removing three screws.

You should only have to do it once a year or so during a yearly detail it's not too extreme to take an extra ten minutes to get at it properly I don't think. To each his own, though. On the previous trucks I have had, it was a very noticeable piece of black plastic, so maybe I did go to extremes to make it look good.
Beemerboy
Just One More Coat
Don't know what seems so extreme about removing three screws.
You should only have to do it once a year or so during a yearly detail it's not too extreme to take an extra ten minutes to get at it properly I don't think. To each his own, though. On the previous trucks I have had, it was a very noticeable piece of black plastic, so maybe I did go to extremes to make it look good.
I was referring to the average detail that you do for customers...on my own cars sure I would take it off if it wasn't to much trouble...but I was also answering what Bunky asked to start...how to clean that area...taking it off is definitely the best way...but in my answer and other how to do this without taking it off
JaredPointer
COME AT ME BRO
I must have missed the question then... :???
Beemerboy
Just One More Coat
I must have missed the question then... :???
This is a question that came up in chat and he posted the pic of show the area...I don't think you or I missed anything...just two ways of going about it..and thats what makes this place so good IMO
Bunky
Detailing Gnosis
I would need to pull the wiper arms off too.
JaredPointer
COME AT ME BRO
I would need to pull the wiper arms off too.
Ok.... Three screws and two half inch nuts. I believe one of my trucks had that thing made where it slipped by the metal post that the wiper arms attach to via slits in the cowling. Not 100% sure, but relatively certain.