Can this etching be cut down/improved?

Jacobpockros

New member
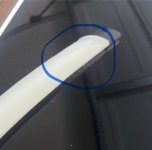
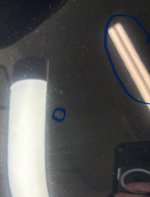
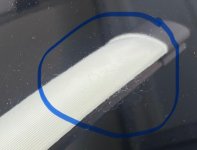
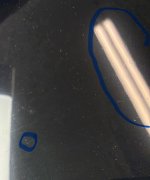
Several years back I was cleaning a plastic cover and didn’t let it dry. I left the cover on top of the car and trapped moisture created etching into the paint. I had a good paint correction done with a polisher years back, but now I’d like to go back and see if the rest of it can be improved. Could a light wet sanding make all of this less noticeable? I wouldn’t want to sand all the way down because it’s 30 year old original Single Stage paint. Very thin. I attached photos. The white marks inside the etching are light reflection. The etching appears to be black all the way through but I can’t tell for sure.
 

Attachments

  • IMG_9764.jpeg
    IMG_9764.jpeg
    362.7 KB · Views: 18
  • IMG_9765.jpeg
    IMG_9765.jpeg
    499 KB · Views: 16
  • IMG_9764.jpeg
    IMG_9764.jpeg
    194.8 KB · Views: 14
  • IMG_9765.jpeg
    IMG_9765.jpeg
    344.7 KB · Views: 15
I'd want to meter the paint to see what I'm working with. Some of the etching seems to be 'decently deep', so I would proceed with caution due to as you stated it is very thin.

A light sanding could potentially improve those areas, as could a machine correction. But I'm not sure the risk vs reward is there.

Keep us posted!
I told him essentially the same thing, so he deleted my post and started this new one.... :)
 
Last edited:
How do you know I didn't read it???? Same advice still applies... :)

Perhaps you can find a real Detailer that has a good, calibrated, paint thickness gauge, and measure all around that area, and tell you in Microns, how many are there...
Stokdgs
I do take your advice seriously. If there isn’t any paint left to cut like you’re suggesting, I wouldn’t want someone to risk bleeding through trying to fix it, and I would want a more cautious approach. I didn’t mention that the last people to correct it have said there’s more room to correct, but that certainly doesn’t say how much and doesn’t say whether these areas can be fixed or not.
 
I dealt with SS paint for ages before B/C became common, and most of my '85 jag is still OE SS (IOW, I know a bit about long term care of SS paint).

While I'd rather have thick-but-imperfect OE paint, the pix show some rather significant marring (and not just the etching), so since it's SS I would almost certainly do a bit of correction, aiming for "better" rather than "flawless". SS black is soft, so that correction shouldn't be too tough, but I'd be careful to not overdo it.

You can *theoretically* go down to the bottom of the etching since it's all one layer of paint and unlike B/C, SS doesn't rely on thickness of clearcoat to protect against UV damage/etc. Note that also means that SS is more fragile and prone to damage like oxidation from UV exposure. And a part of why it's *theoretically* OK rather than *definitely* OK is that the thinner that paint gets, the less it's able to protect the underlying metal. Autopaint is porous, SS generally more so than B/C, so the thinner it gets, the more important it is to keep it well-maintained (including a very protective LSP). It used to be common to see surface rust coming through SS paint from moisture penetration, and you sure don't want that.
 
I do take your advice seriously. If there isn’t any paint left to cut like you’re suggesting, I wouldn’t want someone to risk bleeding through trying to fix it, and I would want a more cautious approach. I didn’t mention that the last people to correct it have said there’s more room to correct, but that certainly doesn’t say how much and doesn’t say whether these areas can be fixed or not.
Did you ask the people how do they Know, there is more room to correct ? Did they Measure the total thickness ?

Perhaps you can find a real Detailer that has a good, calibrated, paint thickness gauge, and measure all around that area, and tell you in Microns, how much is there...

This alone is so important to me and my Clients, that with every pass I make, correcting the paintwork, I stop and Measure the thickness in Microns, with my good, reliable, calibrated, paint thickness meter...

I want to know how much was there Before I started, and then how much I am removing... I strive to remove as little as possible... Good luck with this...
Stokdgs
 
Last edited:
  • Like
Reactions: Dan
Two additional thoughts follow:

-Polishing with foam/wool might not be the best idea as those can "follow the topography of the paint", including the "low areas" where it's etched. That would result in paint being taken off without doing much for the etched spots. It would diminish the other marring (the scratches) and add gloss, so it wouldn't be a complete failure. In fact, it's probably what *I* would do.

-Wetsanding with the right abrasive medium(s) would more directly level the paint where it's etched because the firm, flat sanding medium will remove the "higher paint surrounding the etching" while not going down into the low areas. But the resulting sanding marks will require aggressive compounding and then finish polishing, and all of that is gonna take off a fair bit of paint.

So there's no free lunch and any attempt to fix the etching comes with downsides. I tend to err on the side of caution, since any "oops!" will require paintwork to fix and I try to avoid that.

I myself would give it a moderate polishing to reduce the marring and simply not address the etching. The scratches would bother me a lot more than the etching anyhow, and I'd be *VERY* leery of taking off enough paint (which I'd do via the wetsanding route, noting that I'm experienced in that) to correct that. And as Stokdgs noted, all such correction work oughta be done with constant referencing of a good ETG.

So I'd just make it a little better and live with what flaws are left.
 
Back
Top