Bumper paint repair, strange results (pic)

D. Tail

New member
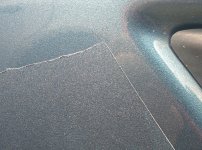
I have some pretty bad scratches on the right side of my bumper and back door. I got one of those paint repair kits from paintscratch.com, and last night I went to work on the bumper. I sanded, filled a few deeper scratches with bondo, applied primer. This morning base coat and clear coat. I fully expected to mess this up, but the results are a bit strange. It does look better than before. But a) there is very little shine even though I applied clear coat pretty generously, and b) after taking off the masking tape and paper, the area I painted looks like a film that's left on the car. The borders between new paint and rest of the car are super-obvious. Here is what it looks like:

attachment.php


My questions are:

1) Where did I mess up?
2) What do I do now?
3) I still need to apply the cutting cream that is in the kit. Will this help make the painted area more shiny?

Thanks so much for your time!
 

Attachments

  • IMG2.jpg
    IMG2.jpg
    619.2 KB · Views: 163
I would guess the cream would do the trick. But ck instructions on how long before you do it
 
Thanks for your quick reply! This sounds encouraging. I was half-expecting an "Oh, you'll need a lot of sandpaper" type of response. Do you think the cream will be able to smooth out those sharp borders as well?
 
Know nothing about this product but I do know it's easy to find professionals who will do this the right way for around $100. Sometimes that's the best option. The guy we use does great work on-site and is completely self contained. Most often you could never tell anything was done. It's cheap, it's easy, it's peace of mind, and it's guaranteed.
 
I'm no pro at painting, but I do know that you can't tape and not expect a line.

The only way other than painting and blending the whole panel is a technique known as back taping where you fold up 1/2 the tape at a 45 degree angle so the paint bounces back and does not create a line. Sometimes it is still obvious something was done but there is no sharp edges. Blending requires paint to be reduced 10:1 and the whole panel resprayed.
Just laying down tape and painting as you stated will leave an edge obviously.
Dave
 
Rsurfer, yeah, that's beginning to dawn on me. :D I guess I'll try wet sanding with a fine grit sandpaper to see if the lines come out. If not, I'll redo those parts.

Davidc, thanks! I think I've seen the back taping technique in a video on YouTube. What would happen if I just sanded a couple of inches around the spot I'm repairing and not mask around that area at all? In other words, what happens if base coat and clear coat hit areas where there's no sanding and no new primer?
 
If there is no prep paint will not stick. I have sanded with 600 and colored/cleared into that area and had no problems. Of course when your done compounding is necessary. You would probably know where the repair was made but most people probably not. The repair is 99% prior effort.

Dave
 
If you expect great results but you have to watch a video to learn how to do it first, your expectations will probably not be met. If you are ok with not great results, the video route is a decent option. Forget the headache and hire a guy that does this often.
 
Thanks again for all the answers!

No pros. I'm simply unwilling to drop a grand on this right now. If this were a new car or one that I'm planning to sell, things would be different. But this is just an everyday commuter that I am planning to keep another five years or so (bought it new in 2010). It needs to look decent, and it will be scratched again, so I need to learn how to do this myself.

The video makes a lot of sense. So how do I best proceed from my current situation? Can I just generously scuff up the area around the paint lines and apply base coat and clear coat (using the blending technique), or is it better to sand all the way down and do the whole primer>base>clear dance again? Again, not looking for perfect. Perfectly acceptable is fine.

I am going to try the back taping technique on another scratched part of the car. A different technique for every problem area! ;)
 
So, in this video... https://www.youtube.com/watch?v=2tfG7B7VAtA

...they have sanded/scuffed and area around the repaired scratch, but then they seem to go over quite a bit more area with the base coat and the clear coat. In other words, some of the base and clear coats seems to hit parts there were not prepared at all. Is that okay, or am I misunderstanding something?
 
Junk Products sand terrible Customer Service from AutomotiveTouchup.com

Especially their non-2K Clear

I didn't post the link for him to buy products from them lol.

I have nothing but good experiences with this place. Their paint matches the best out of all the one's that I have tried.
 
There is a way to get those product build up lines off and it would best if you could use a small rubber block, or something perfectly flat, to get the line of perfectly flat and even with the existing paint. Just dont rub too hard or you will make a slight dip there that will show up more or less depending on the color and the depth of the mistake..
If there is a curve involved, you have to mind that, and allow for the curve or any sharp edges in the panel, so you dont remove too much if they are in the line..

There is a way to tape off a section to touch up and get no lines from the tape and the subsequent build up of paint, clear, etc..

Have talked about it several times here and no one has ever said anything about it back..

Its called back taping..

I will try to explain it again here --

Stick the tape to the paper you have that is sized for one of the 4 spots that will go around the area to be painted.. North, South, East, West, for example..

Remember how you took your tape on the paper Im assuming and made a square with the tape around the area to be painted, with the paper on top and on the side, and on the bottom ?

You will do this again,but you will reverse the paper around the area to be painted, so that the tape is still placed say, on the top, but the paper is hanging down, over the area to be painted, yes, right over the area, the paper is hanging down..

Now, you lift the paper back up and gently pull the tape with it, just enough to give the tape a nice rounded "edge" with enough of the tape still stuck to the panel..

The rounded edge will want to be extending in front or over the taped edge, ok ?

Back tape this way all around the area to be painted.

When you spray in the area now, the paint will hit the rounded edge all around the area and dissipate enough so that there is no built up edge whatsoever around the area painted..

We did this in the Paint Shop for spot paint work forever and never had an issue...

You would do this when you Primed a spot as well..

A good Painter will never leave an edge anywhere.. He has to be able to feather-edge everything the Bodymen did so that there is no transition line/s anywhere, and then prime, block sand with a guide coat, then paint perfectly..

Does this help ?
Dan F
 
Hey Dan, this helps a lot! This is probably a really naive question (ties in with my posting above), but if I scuff up the area and then back tape, won't there be small parts that get scuffed up but that won't be reached by base coat and clear coat? I guess I am worried that I will either a) scuff up something that won't get paint or b) apply paint to an area that isn't scuffed up.

Edit: Oh, wait. Let me try to answer my own question. The scuffing only affects the surface of the clear coat. So what I do is I scuff up a generous area, but I only apply base coat to a smaller area within that (using the back taping or then blending technique). Then I apply clear coat to the whole area that I scuffed, so that everything is nice and shiny again. Did I get that right?
 
D. Tail,
I am glad to help !
To answer your question - You will want to to Back Tape far enough away so that everything that needs painting gets painted...
You will always want to keep the work as small as possible and dont go crazy scuffing everywhere when its not needed..

Just do all the Prep work first, then look at the panel, and plan on Back Taping far enough from the work so everything gets a nice, uniform, level, amount of paint.
Yes, some paint will land on good panel parts, but that's ok because you are going to lightly compound over the entire area when its all dried and cured, and that will remove any paint that landed where it didnt need to land..

You will always want to Back Tape around the area that needs that, and then if you want to mask further around the panel to keep any paint off say the glass, etc., go do those places too...
I would always Mask over any adjoining panels to insure they don't accidentally get hit with some overspray...

It's not as critical with a paint can as it was with a paint gun under pressure..

I think you are getting this and that is great !!
Good Luck !!!
Dan F
 
Fantastic, thanks so much! I am going to do this in the next problem area and once I have a good grasp of it go back and repair the area with the tape lines. The good news is that I have all the time in the world to play around. No major rush to get it done. If I end up using an extra can of paint or two, that's totally worth the learning experience. I will report back how it goes.
 
Hey Dan, this helps a lot! This is probably a really naive question (ties in with my posting above), but if I scuff up the area and then back tape, won't there be small parts that get scuffed up but that won't be reached by base coat and clear coat? I guess I am worried that I will either a) scuff up something that won't get paint or b) apply paint to an area that isn't scuffed up.

Sorry, I didnt answer all your questions --

There will always be an area around the spot you are painting that will get some paint, so just clean all the area around there really good, so that if it is needed to help Blend the new color with the old color, it might work ok..

The way we Painters used to do this was to get the color as close a match as humanly possible, then spray enough paint on the primed, spot, etc., then thin down the paint and start extending the spray pattern farther away from the now painted primed spot, so that the color was now mixing with an area farther out from the original spot, so that the color did not just all of a sudden, look a little different than the rest of the panel..

Now, when you come to the end of applying paint to the panel, stroke, you want to move the paint can or gun slightly away from the spot so that you dont leave a solid line of paint at the end of the stroke..
Its called Feathering the paint at the end of the stroke, and you need to do this in both directions left and right and if you paint up and down, then you need to Feather there too..

Dan F
 
Where do you find such a guy?

Know nothing about this product but I do know it's easy to find professionals who will do this the right way for around $100. Sometimes that's the best option. The guy we use does great work on-site and is completely self contained. Most often you could never tell anything was done. It's cheap, it's easy, it's peace of mind, and it's guaranteed.
 
Back
Top