1986 538e BMW Paint Restoration

Beemerboy

Just One More Coat
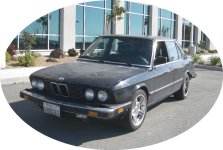
Had a good friend that picked this car up for $150 the car was running OK...since he works for Ford as a service writer he got a lot of the work on the motor done free or real cheaply.

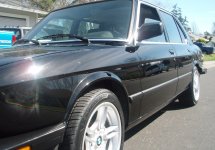
Inside the car needs some work...Various things need replacement..but as a whole the car is decent in and out.

He asked me to try and get the car back up to speed paint wise...he will be forwarding me some before pics, this car on the out side was trashed BIG TIME!!

I had two cars yesterday and I didn't slow down to take pics before wish I had this car had no wax or anything else for YEARS...he has some that he got and will be send across sometime soon I will post those to the thread then

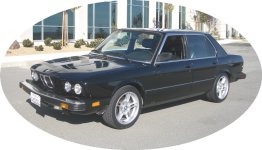
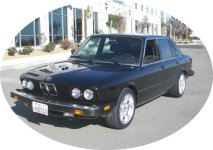
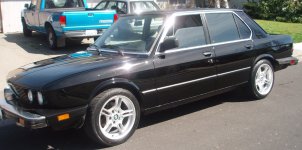
Here are some lame pics that I took...I was trying to capture the two cars together so that you can see the reflectivity of the older to the newer paints since they are both jet black.

The process was

Washed with FK1 decontamination kit...four step process...then clayed some areas that I wanted done better

Rotary buffer with an Edge cutting pad and Presta swirl remover

Rotary buffer with a light cut pad...Presta 1500 polish

Rotary with polishing pad Poorboys World polish with sealant added

This took all of the light to medium swirls out, and cleaned the finish up real nice

I added FK1 pink hand glaze next using my PC and a finishing pad

Topped with Natty's Red

Rubber was cleaned using APC then coated a few times with a heavy silicon dressing and buffed it came out OK...
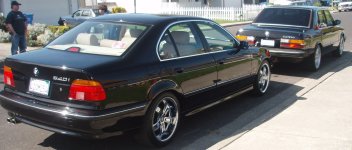
 

Attachments

  • Picture 001.jpg
    Picture 001.jpg
    343.2 KB · Views: 36
  • Picture 003.jpg
    Picture 003.jpg
    371.1 KB · Views: 37
  • Picture 004.jpg
    Picture 004.jpg
    220.3 KB · Views: 35
Excellent job Dave....nice way of making an older Beemer look great again. The black has some great depth, and the sun shots show the perfection...nice work!:bigups
 
holy - some before pics would be sweet, but that looks pretty darn good! Nice work man :cheers:
 
How was the FK1 Pink hand glaze to work with? I ask because I have found some glazes difficult to remove, meaning they are stubborn, and require alot or work and effort...
 
How was the FK1 Pink hand glaze to work with? I ask because I have found some glazes difficult to remove, meaning they are stubborn, and require alot or work and effort...

Its not hard at all as long as you don't do the whole car, then try removing it...I've found this true with every glaze that I have worked with...I do a panel at a time....then use some QD after to make sure that I have picked it all up
 
Its not hard at all as long as you don't do the whole car, then try removing it...I've found this true with every glaze that I have worked with...I do a panel at a time....then use some QD after to make sure that I have picked it all up

I made that mistake once, back in my earlier years of detailing, ugh that was rough...

how does it compare to some of the other glazes? Filling properties, shine enhancing and so on...
 
I made that mistake once, back in my earlier years of detailing, ugh that was rough...

how does it compare to some of the other glazes? Filling properties, shine enhancing and so on...

On the pop factor 10 on the filling capabilities 8...the 3M IHG was better at filling but not as good in the pop

The QD spray over the panel helps greatly to make sure that you pick it all up
 
On the pop factor 10 on the filling capabilities 8...the 3M IHG was better at filling but not as good in the pop

The QD spray over the panel helps greatly to make sure that you pick it all up

I will try that with the QD, it might help...I use IHG, and liked it, but I may try the FK1...or maybe I can mix the two...
 
OK here are the before the cool part is they where taken in the same place and about the same sun conditions...the hood was really oxidized from heat coming from the motor and sun / lack of protection
 

Attachments

  • B4-1-rs.jpg
    B4-1-rs.jpg
    169.3 KB · Views: 11
  • B4-2-rs.jpg
    B4-2-rs.jpg
    170.7 KB · Views: 12
  • After-2.jpg
    After-2.jpg
    169.9 KB · Views: 10
  • After-1.jpg
    After-1.jpg
    176.5 KB · Views: 6
Wow that looks like a wet sanding candidate after an aggressive claying...


Oh weeeeeee....

The hood could have used that and some areas on the body, but based on time and $$ it wasn't worth that much time...if I had this car as a project that would have been done panel by panel:D
 
This is exactly why you should post the before pictures, that thing was a disaster...makes the turnaound even that much more impressive...
 
This is exactly why you should post the before pictures, that thing was a disaster...makes the turnaound even that much more impressive...

An even better reason that I should have taken the befores myself..I had certain areas that where remarkable in the difference...the hood was one...no reflection to speak of in some areas...also the swirls and such where a lot more visible once I had it washed
 
was the paint SS or clear coat? just curious, I am not familiar enough with BMW paint...

I also like the sun shots, really show the work you did to remove the swirls...I have always said, the best swirl remover made is the shade.
 
was the paint SS or clear coat? just curious, I am not familiar enough with BMW paint...

I also like the sun shots, really show the work you did to remove the swirls...I have always said, the best swirl remover made is the shade.

Single stage every pad that I used was black big time!

In fast I let them soak for two days in water and dish soap changing the water twice...nasty stuff IMO

Thanks the whole car was really a 180 turn around
 
Back
Top