Garage door closed on tailgate - scratch repair suggestions?

tomas21

New member
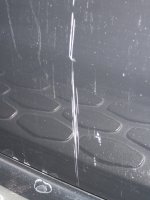
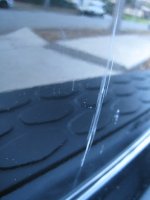
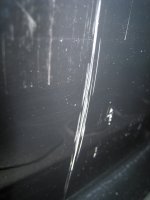
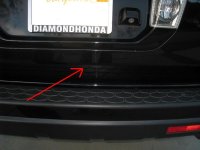
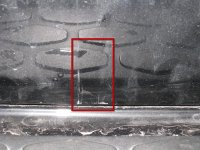
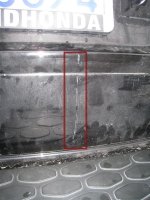
Last night I closed our garage door while the hatch was still opened on our Pilot. Unforunately it put some scratches in the tail gate and I'm trying to figure out the best approach to fixing it myself.

Some approaches that have been suggested but wanted others input

Option 1 Wash car, apply rubbing compound lightly

Option 2 Apply the touchup paint from dealer to the scratch with a fine artist brush, leave a little blob above the surface. let the paint cure for about an hour, then go over the area with detailing clay. It will generally take a while (couple of minutes) to get the touchup level with the clay. You may have to do it multiple times, depending on how much the paint shrinks after fully cured.
 

Attachments

  • Tailgate_Scratch.jpg
    Tailgate_Scratch.jpg
    86.4 KB · Views: 27
  • Tailgate_Scratch2.jpg
    Tailgate_Scratch2.jpg
    44.1 KB · Views: 22
:welcome: to DC ...

where did you get these suggestions :notme:
are those scratches finger nail deep?

we no longer use rubbing compounds on clear coats unless you want more damage .... a light abrasive polish with a cotton cloth (presuming you are working by hand)

you can touch it up after polishing ... who told you to use clay after touch up paint :wow: clay does not level surfaces, sand paper does ... and then you polish again, but i'd suggest using clear after the color and let it set for a day or so or you might remove all the paint you just applied.
 
two more questions ...


where are you located ... someone with experience might be in your area

and how old is the vehicle? you might just want to have it repaired correctly by a shop ;)
 
Steve has a good point.
First thing wash the back thoroughly, rinse all the crevices around and past the area. It's hard to tell if it is paint from the garage door or a scratch with all the dirt. Plus if you do clay the surface needs to be clean and any areas that might drop down dirt.

Then post some more pictures before you proceed.

Grabbing touch up before you know the extent of the damage will make things harder on yourself.
 
I'm based in SoCal and I take some better pics after I wash it today. Thanks for the feedback and I look forward to more guidance with my updated pics. Scratch seems to be somewhat deep as fingernail goes down if I brush across.

2007 Honda Pilot
 
On another note when you do take the pictures try to get more of a steep angle too. It is hard to tell if it dented the panel.

It is well worth the money to have a PDR guy come out and fix that if it does require painting.

With insurance and body shops involved it may just get filled and painted. You don't want that if you plan on keeping the car for a while.

Understand insurance doesn't always give a shop the time or money to do the job right. Unless they are willing to fight they need to make do with what they are given.

Just make sure the area is well lit to show any damage. When you take the picture.

Best of luck hope it's nothing like that.

pretty sure it's fiberglass not metal on those rear doors .. PDR is probably not an option ;)
 
I ran out of daylight tonight but I'll snap a bunch of shots from different angles tomorrow. There are no dent(s) whatsoever from the garage door coming down on the hatch, these are purely scratches. I appreciate all the feedback and input and hope that my pics will depict the scenario I'm in.... and hopefully a good resolution.
 
Hopefully these pictures give more detail for the scratch. Let me know if you need more. The area is metal however there is a tiny scratch on the fiberglass trim around the license plate.
 

Attachments

  • IMG_9385.JPG
    IMG_9385.JPG
    156.8 KB · Views: 15
  • IMG_9412.JPG
    IMG_9412.JPG
    110.9 KB · Views: 16
  • IMG_9431.JPG
    IMG_9431.JPG
    108.7 KB · Views: 15
  • IMG_9436.JPG
    IMG_9436.JPG
    47 KB · Views: 15
Just off hand, based on the pics, I'd say a lot of that is just transfer that will be removable. If you don't have something already, you might want to pick up a bottle of Meguiar's Ultimate Compound locally and go at it with that just to see how much improvement you get.

At least remove what portion of the scratches and transfer can be corrected easily before you go the touch-up route so you get a better idea of what does and doesn't actually need it. If nothing else you'll have less of a mess to deal with in the long haul and it will look far better.
 
The only thing I would add is pick up a clay bar kit. Follow the directions and go over the whole areas affected. The clay will also remove any contaminates on the paint.

If you need any tips there are threads on this subject. I'm sure also someone will give you any info you need.
Good luck keep us posted before you get to touch up.
 
Based on my list of 7 which should I employ in tackling this effort? I just picked up some UC.

1. Wash – ONR, Meg’s Gold Class Car Wash
2. Clay – Magic Clay Blue bar
3. Compound - Meg's Ultimate Compound
4. Polish - PB Polish w/ Carnauba –Blue (One step product)
5. Glaze – PB Black Hole (Fills in swirl marks)
6. Sealant – PB EX-P, PB EX (illuminates defects)
7. Wax – NXT 2.0, PB Natty Blue
 
Based on my list of 7 which should I employ in tackling this effort? I just picked up some UC.

1. Wash – ONR, Meg’s Gold Class Car Wash
2. Clay – Magic Clay Blue bar
3. Compound - Meg's Ultimate Compound
4. Polish - PB Polish w/ Carnauba –Blue (One step product)
5. Glaze – PB Black Hole (Fills in swirl marks)
6. Sealant – PB EX (hides defects)
7. Wax – PB Natty Blue

All of the above in that order ;)
 
Question Steve, why follow up the polish/ carnuba with black hole? I mean, i understand the reasoning, but wouldnt it be more cost effective to go with a regular polish, especially since you're glazing then sealing, then waxing behind the sealant?
 
Better late than never but I did try the following steps and products with a slight improvement. I may try the steps one more time but I think the scratch is down to the primer.

Thanks for the input.
 
Could you take photos of how it looks now? Perhaps some wetsanding may have to be done, then those steps repeated to get to look even better.
 
Back
Top