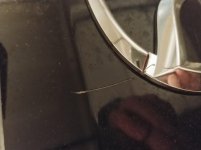
So in the first week of owning my new Mazda, although my cargo hatch opened fine in the garage what I didn`t realize is if you opened the hatch, before you opned the garage door, the connector bar wouldn`t clear. Ouch. Put about a 2" scratch just above the emblem on the hatch like as if someone would have taken a box cutter to the clear coat (I can see you all cringing.) It`s too deep to compound out. Got the factory touch up. It`s been SO long since I had to do anything like this, just need a sanity check.
I forget whether you need separate clear coat with factory touch up paint pen. I`m pretty sure you do.
Next question is, do you fill with paint then apply clear coat, then level, or do you fill with paint, level, then apply clear coat, then level again? Like I said scratch looks like it went all the way through clear coat but not to the metal. This is the plan I was going to follow:
Slightly wet sand scratch with 1500-2500 grit on the tip of pencil eraser
Clean with a little lacquer thinner (is that too strong?)
fill with paint using a super fine brush in stead of the touch up pen tip
Let dry
Apply clear, possibly more than one coat to get it to be slightly above level of surrounding clear coat
Let dry
Wet sand to level
Polish with Meguiars 105, then 205 (what I have on hand) using the felt polishing pad on my Dremmel being careful not to burn surrounding clear coat (due to it being right next to the emblem I really can`t get a full size polishing pat on it that well unless I temporarily remove the emblem I guess.
This ain`t a Ferrari and I`m not going to the car show. Just need a sanity check on my general process for any major mistakes since it`s been years since I`ve had to do this. I`m assuming, assuming you know how to wetsand, this is the preferred method over something like DrColorChips?