Navigation
Install the app
How to install the app on iOS
Follow along with the video below to see how to install our site as a web app on your home screen.
Note: This feature may not be available in some browsers.
More options
Style variation
You are using an out of date browser. It may not display this or other websites correctly.
You should upgrade or use an alternative browser.
You should upgrade or use an alternative browser.
created burn marks with 9227c
- Thread starter bud659
- Start date
bud659 said:I bought a used 9227c to since my PC wasnt correcting the deep scratches. I used a 3/M foam pad with their Perfect-IT Swirlmark remover. I kept the buffer moving and I still managed to burn the paint. Any suggestions?
What RPM were you using and did you tilt the pad and polish with the edge at all? May have been a very thin clear as well.
SuperBee364
New member
Pictures are going to be needed....
oneshare325
New member
DaGonz
Autopia fire/rescue.
It could have been many factors..
Too long on one spot with thin paint, catching a sharp edge with thin paint, too aggressive a pad for the polish being used, etc.
It is important to practice on a junker to get a feel for the rotary. :werd:
Too long on one spot with thin paint, catching a sharp edge with thin paint, too aggressive a pad for the polish being used, etc.
It is important to practice on a junker to get a feel for the rotary. :werd:
joyriiide1113
New member
You sure we're talking about buffer burn and not hologramming?
I dont understand how i created these marks. maybe its holograms :nixweiss?
The 9227c is on a setting #4, 2100 RPM and my arm speed covered 2 feet length in 10 seconds with medium pressure. I had a few problems with the buffer 'jumping' out of control so I put more pressure on behind the handle. It was as if it skipped out of my hands. The foam pad was flat on the surface and I am using 3/M Perfect 3000 06064 SM Remover. This is my first time with these products and buffer.
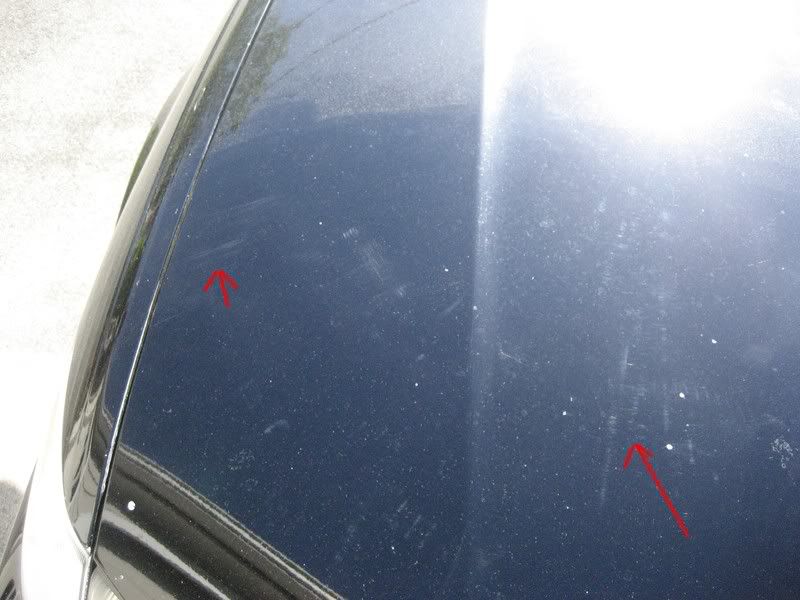
Here are some pics. Sorry for the bad red arrows.
The 9227c is on a setting #4, 2100 RPM and my arm speed covered 2 feet length in 10 seconds with medium pressure. I had a few problems with the buffer 'jumping' out of control so I put more pressure on behind the handle. It was as if it skipped out of my hands. The foam pad was flat on the surface and I am using 3/M Perfect 3000 06064 SM Remover. This is my first time with these products and buffer.
Here are some pics. Sorry for the bad red arrows.
dmw2692004
New member
those look like holograms?
bud659 said:I dont understand how i created these marks. maybe its holograms :nixweiss?
The 9227c is on a setting #4, 2100 RPM and my arm speed covered 2 feet length in 10 seconds with medium pressure. I had a few problems with the buffer 'jumping' out of control so I put more pressure on behind the handle. It was as if it skipped out of my hands. The foam pad was flat on the surface and I am using 3/M Perfect 3000 06064 SM Remover. This is my first time with these products and buffer.
Here are some pics. Sorry for the bad red arrows.
I cant really see a burn through, it looks more like buffer trails to me. A closer pic would help to see if you did in fact burn the paint IMO I think you probably did due to teh speed and pressure used. FYI 2100rpm is way to fast!!! You should not need to surpass about 1700rpm max. For correction normally I go at 1500rpm(speed 3). 2100rpm and lots of pressure will cause a ton of heat buildup and you are more likely to burn a clear.
dsms said:I cant really see a burn through, it looks more like buffer trails to me. A closer pic would help to see if you did in fact burn the paint IMO I think you probably did due to teh speed and pressure used. FYI 2100rpm is way to fast!!! You should not need to surpass about 1700rpm max. For correction normally I go at 1500rpm(speed 3). 2100rpm and lots of pressure will cause a ton of heat buildup and you are more likely to burn a clear.
+1 on the holograms. When compounding, this can be a normal occurrence, which is the reason why you follow up with a polish. 2100rpm and pressure can be a bad combination, but it does take quite a bit to burn paint though. In short, if you use high RPM lessen up on the pressure. The great news about the rotary is that pressure is usually not as much of a factor as it is with the PC, but it is important. This is a great reference article: Buffing a car | Using proper pressure when buffing autos | Removing Swirls.
SuperBee364
New member
Until you get very good with a rotary, try not to go over 1,000 RPM. It will give you *much* more margin of safety.
When the rotary feels like it's taking off in one direction all by itself, it usually means you have either too much pressure on the far side of the pad (or the top, depending on how you look at it), or too much pressure on the near side of the pad (or the bottom).
Try this: Using a very light finishing polish and finishing pad at 1k RPM: Put the polish on the pad, spread it through your work area. Now, just use the weight of the buffer. Start it up, and start moving the head through the work area. Now just raise the handle (the handle with the trigger) ever so slightly. The buffer will start moving by itself in one direction. To stop it, simply lower the handle. Then, lower it a little bit more. It'll start moving in the opposite direction by itself. It's important to keep the handle in a neutral position. This will keep the weight evenly distributed across the entire surface area of the pad. Proper balance is crucial to being able to control the rotary.
I would highly suggest using a very light polishing wool pad and a very light weight polish on your hood over and over again until you have the rotary figured out. Don't worry about actually performing any correction or polishing; just get the technique down.
Keeping the speed at 1k or less and using a wool pad will *greatly* increase your margin of safety.
Keep at it! The rotary is fun and rewarding.")
When the rotary feels like it's taking off in one direction all by itself, it usually means you have either too much pressure on the far side of the pad (or the top, depending on how you look at it), or too much pressure on the near side of the pad (or the bottom).
Try this: Using a very light finishing polish and finishing pad at 1k RPM: Put the polish on the pad, spread it through your work area. Now, just use the weight of the buffer. Start it up, and start moving the head through the work area. Now just raise the handle (the handle with the trigger) ever so slightly. The buffer will start moving by itself in one direction. To stop it, simply lower the handle. Then, lower it a little bit more. It'll start moving in the opposite direction by itself. It's important to keep the handle in a neutral position. This will keep the weight evenly distributed across the entire surface area of the pad. Proper balance is crucial to being able to control the rotary.
I would highly suggest using a very light polishing wool pad and a very light weight polish on your hood over and over again until you have the rotary figured out. Don't worry about actually performing any correction or polishing; just get the technique down.
Keeping the speed at 1k or less and using a wool pad will *greatly* increase your margin of safety.
Keep at it! The rotary is fun and rewarding.
Junebug
JAFO
Excellant article "howareb" ! Should be required reading for anybody using a rotary.
imported_Picus
New member
2100 rpm? Dizzam man.
imported_mystic04
New member
I just got my rotary last week de walt 849 for a good price.well last night was my first time trying it out with the edge waffle pads, on my red explore hood used a blue pad to start off with and some 106,. After hearing all the horror stories of rotary use. i found it's not the monster all have said it is . true it's only one hood on one car but it gave me the confidence to use one now It started off at 1000k for a few passes and 2 sections then moved up to 1400k on the second 2 sections and wow it turned out rather nice for first time use. Reading here has hepled a lot on which speeds to use where most have said no more than 1500 or under which i plan for now to stay at and just use the blue light cutting pad from edge.Till i can try out a few other pads and see how things work and which works best to get the resulted one is looking for.I think for now i will use the rotary for just the hood and roof and trunk lids to save time then use the flex and or Pc for the doors and smaller places till i become more use to the rotary.
mystic04 said:I just got my rotary last week de walt 849 for a good price.well last night was my first time trying it out with the edge waffle pads, on my red explore hood used a blue pad to start off with and some 106,. After hearing all the horror stories of rotary use. i found it's not the monster all have said it is . true it's only one hood on one car but it gave me the confidence to use one now It started off at 1000k for a few passes and 2 sections then moved up to 1400k on the second 2 sections and wow it turned out rather nice for first time use. Reading here has hepled a lot on which speeds to use where most have said no more than 1500 or under which i plan for now to stay at and just use the blue light cutting pad from edge.Till i can try out a few other pads and see how things work and which works best to get the resulted one is looking for.I think for now i will use the rotary for just the hood and roof and trunk lids to save time then use the flex and or Pc for the doors and smaller places till i become more use to the rotary.
I felt the same way. Fearful at first but then after using it the first time I felt very comfortable. The right knowledge beforehand makes using a rotary that much easier and less intimidating. If you want to use a rotary just buy one and practice on spare panels, play with speeds and different pads and learn the capabilities. People regard it as some ultra dangerous machine that only a skilled professionals should use when really its one of the best tools any detailer can utilize, with the right knowledge and caution of course.
JuneBug said:Excellant article "howareb" ! Should be required reading for anybody using a rotary.
+1! just got done reading that article and think im gonna read it over again. seeing how i just bought a Mak, its very informative for the rotary newbie like myself. thanks again for putting up that link howareb
Send me a note if you would like to come by and we can do a little QA with demo action at my house sometime. I am in Salem MA, and by no stretch an expert, but I certainly could help you with your problems, and identify what is going on with your paint. As for burn through, it should look almost dull compared to the clear coat around it, we can also swing by rick's place on 128 if you want to get a paint meter on the paint.
What have you done with the PC for correction, those swirls look almost untouched, and black BMW is supposed to be 'soft' so I am wondering whats going on?? :nervous2:
private message me through Autopia, I am in Salem MA.
What have you done with the PC for correction, those swirls look almost untouched, and black BMW is supposed to be 'soft' so I am wondering whats going on?? :nervous2:
private message me through Autopia, I am in Salem MA.
robert said:+1! just got done reading that article and think im gonna read it over again. seeing how i just bought a Mak, its very informative for the rotary newbie like myself. thanks again for putting up that link howareb
Junebug and Robert,
Your welcome. Pressure is usually one area that most struggle with on the rotary. It is another varible that plays into getting great results.
sorry for my late response. great feedback by all and wanted to share my progess with you
the buffer was jumping out of my hands on its own when i was applying about 5-10 lbs of pressure :sadpace:This is the same pressure I use with my PC 7424, but is it fair to say that with a rotary I should use less pressure than a PC for SM correction?
when I put a light pressure on the head of the buffer, I had full control but it was very little. It was just enough pressure to have control of pc. I would guess about 2-3lbs of pressure but I felt I wasnt getting the paint correction I needed at speed #3 . So for a noob, do i use more pressure and just live with the makita losing contol, more aggressive product than 3/m SM remover or increase speed to 3.5 or 4 ?
?
the buffer was jumping out of my hands on its own when i was applying about 5-10 lbs of pressure :sadpace:This is the same pressure I use with my PC 7424, but is it fair to say that with a rotary I should use less pressure than a PC for SM correction?
when I put a light pressure on the head of the buffer, I had full control but it was very little. It was just enough pressure to have control of pc. I would guess about 2-3lbs of pressure but I felt I wasnt getting the paint correction I needed at speed #3 . So for a noob, do i use more pressure and just live with the makita losing contol, more aggressive product than 3/m SM remover or increase speed to 3.5 or 4
?