Navigation
Install the app
How to install the app on iOS
Follow along with the video below to see how to install our site as a web app on your home screen.
Note: This feature may not be available in some browsers.
More options
Style variation
You are using an out of date browser. It may not display this or other websites correctly.
You should upgrade or use an alternative browser.
You should upgrade or use an alternative browser.
Bright Solutions Headlight restoration
- Thread starter Casebrius
- Start date
jvriii1942
New member
After buying the kit myself I realized that I just paid $80 for a plastic tool box. The only thing that is good is the shine restorer which doesn't restore shine it only offers protection which is needed to prevent hazing. There are other ways to protect a restored lense. I learned by trial and error how to realy restore headlights and have provided this service for since 2004. If you would like more info send me a pm and I will be happy to go into details on headlight restoration.
SpoiledMan
New member
Care to post it here so that we can all learn?
jvriii1942
New member
After buying the kit myself I realized that I just paid $80 for a plastic tool box. The only thing that is good is the shine restorer which doesn't restore shine it only offers protection which is needed to prevent hazing. There are other ways to protect a restored lense. I learned by trial and error how to realy restore headlights and have provided this service for since 2004. personly I could care less if I ever did another headlight again. If you would like more info send me a pm and I will be happy to go into details on headlight restoration
jvriii1942
New member
Usually it depends on the type of damage to the lense. I can describe three types of damage and how to repair them. Try to remove the lenses when possible and only if you have a way to secure them. If not pop the hood & use a durable masking tape 3/4in. & 2in. (auto paint and body tape) and apply atleast 3-4 layers so you dont sand the hood, bumper, & fender. Keep in mind when buffing headlights dont burn they melt so buff slow until you find a comfortable speed. In case they do melt don't worry try to wet sand then rebuff that area.
1. Just the yellow haze or film that has built up on the plastic. This is the easiest to repair
It is usually just a mild oxidation.
Such as the hazing on the Mercury.

Some times the haze will simply buff off with a heavy compound. If not wet sand it with 1500-2000 grit wet/dry paper. Followed by a heavy compound and polish. I like 3m perfect-it
any high speed buffer should work though I prefer 3in. wool and black waffle pads on a drill.
This should take about 1-1.5hrs. to complete
2. The second category is what I call pitted damage. This can be much more difficult to repair.
Note the Intrepid, 300M, Cherokee, & Mustang.

Alot of vehicles come with a claer sealer that is sometimes difficult to remove. Be sure to get it all off and sand deep enough to remove all of the pitts.
Begin wet sanding with 400 grit wet/dry paper
Next step up the sanding to 600 grit to remove the 400 grit marks
Continue this with 800- 1000- 1200- 1500- 2000 grit wet/dry sand paper
Now you can buff compound polish to remove swirls
This is where sealers come in but not an absolute necessity. Bright Solutions Shine Restorer will work or you can use Rustoleum clear spray paint ( not highly recomended) or clear coat ( expensive)
This usually takes 1.5-3hrs. maybe more in some cases
Tip for wet sanding. Alternate between grits with a vertical then horizontal motion so you can see that all marks from previous grit is completely gone
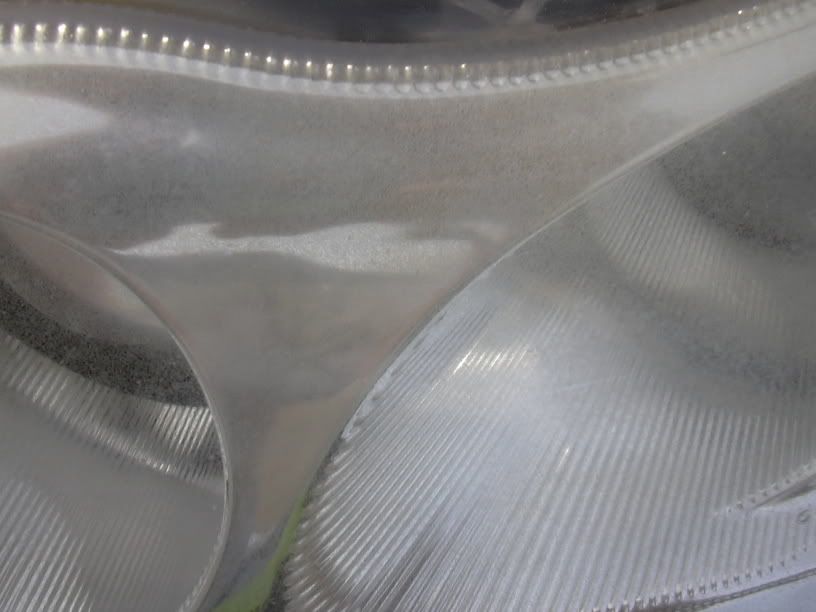
3. Water in the lense. This is usualy the result of an engine detail gone wrong.
The headlight must be removed. On the bottom near the back of the housing carefully drill a few holes with a 1/8in. drill bit. If water is in the housing pour a little bit of rubbing alchohol inside to help evaporate the h2o. Either vacuum or use compressed air to dry the lense. Seal the edge where the factory seal is with clear silicone from the hardware store. Do not seal the holes just drilled they will allow air to flow through and prevent more precipitaion build up. If silicone gets on the clear lense wipe it off with some rubbing alchohol.
Practice makes plastic lenses perfect
1. Just the yellow haze or film that has built up on the plastic. This is the easiest to repair
It is usually just a mild oxidation.
Such as the hazing on the Mercury.
Some times the haze will simply buff off with a heavy compound. If not wet sand it with 1500-2000 grit wet/dry paper. Followed by a heavy compound and polish. I like 3m perfect-it
any high speed buffer should work though I prefer 3in. wool and black waffle pads on a drill.
This should take about 1-1.5hrs. to complete
2. The second category is what I call pitted damage. This can be much more difficult to repair.
Note the Intrepid, 300M, Cherokee, & Mustang.
Alot of vehicles come with a claer sealer that is sometimes difficult to remove. Be sure to get it all off and sand deep enough to remove all of the pitts.
Begin wet sanding with 400 grit wet/dry paper
Next step up the sanding to 600 grit to remove the 400 grit marks
Continue this with 800- 1000- 1200- 1500- 2000 grit wet/dry sand paper
Now you can buff compound polish to remove swirls
This is where sealers come in but not an absolute necessity. Bright Solutions Shine Restorer will work or you can use Rustoleum clear spray paint ( not highly recomended) or clear coat ( expensive)
This usually takes 1.5-3hrs. maybe more in some cases
Tip for wet sanding. Alternate between grits with a vertical then horizontal motion so you can see that all marks from previous grit is completely gone
3. Water in the lense. This is usualy the result of an engine detail gone wrong.
The headlight must be removed. On the bottom near the back of the housing carefully drill a few holes with a 1/8in. drill bit. If water is in the housing pour a little bit of rubbing alchohol inside to help evaporate the h2o. Either vacuum or use compressed air to dry the lense. Seal the edge where the factory seal is with clear silicone from the hardware store. Do not seal the holes just drilled they will allow air to flow through and prevent more precipitaion build up. If silicone gets on the clear lense wipe it off with some rubbing alchohol.
Practice makes plastic lenses perfect
imported_cj99si
New member
^nice post!
SpoiledMan
New member
JVR, what does the Shine Restorer cost from them? They don't show the prices for individual product refills.
jvriii1942
New member
I am not exactly sure of the price. I think it is $18 or $28 for a 8 ounce bottle. When i was die hard about keeping headlight restoration a secret in my area I would tell onlookers it came from NASA and that it was about $280 a bottle. I wasn't trying to be rood but wanted to protect a trade secret. Bright Solutions should be able to give an exact price if you give them a call. I ordered mine on the east coast from Supieror Restorations out of Florida. Keep in mind that not all lights need to be sealed. Some lights will take longer to oxidize again ( about as long as it took the first time )
jvriii1942
New member
I no longer use any of the products from the kit. Usualy I would use 3m compound and polish I also used some stuff called true-grit compound made by Presta follwoed by their polish. Megs clear plastic polish would help it shine a little but it gums up alot.
I began charging $35 a car as the kit recomended not a good idea. Now $75 a car is my minimum for the lights with just the yellow film and no damage (1500- buff- polish). For the cars that are pitted heavily it's about $150 a car.
A good rule of thumb is to have a price book from a local after market store or call the dealer. Take the price of one lense from the dealer there could be your price. From the after market you could still charge the price of one light if it is in a range you like or meet in the middle. Sounds easy right.
Good luck to all headlight restorers. :2thumbs:
imported_mrecktid
New member
Will SSR2.5 or Optimum Compound with an orange sonus das pad take out the 2000grit marks?
wannafbody
wannafbody
Try the Nicsand sanding discs from WalMart only about $9
jvriii1942
New member
3 inch buffing pads are what I used on a 3 inch 3M hook-it backing plate with a 5/16 threaded shank. If the shank is to long it would drive through the backing into the pad when under pressure. Luckily it never caused any damage. Keep some spare pads and backing plates they are pretty cheap.
The pads and backing plate came from Sherwin Williams auto body store.
I got the threaded shank at home depot.
The pads and backing plate came from Sherwin Williams auto body store.
I got the threaded shank at home depot.
jvriii1942 said:I am not exactly sure of the price. I think it is $18 or $28 for a 8 ounce bottle. When i was die hard about keeping headlight restoration a secret in my area I would tell onlookers it came from NASA and that it was about $280 a bottle. I wasn't trying to be rood but wanted to protect a trade secret. Bright Solutions should be able to give an exact price if you give them a call. I ordered mine on the east coast from Supieror Restorations out of Florida. Keep in mind that not all lights need to be sealed. Some lights will take longer to oxidize again ( about as long as it took the first time )
wow that's extremely lame. anytime I see on the product's label that it's "space age" or anything to do with "NASA" I know it's BS. buffing your headlights will produce the same results.... not much of a secret there.
jvriii1942
New member
Hood Rich? :chuckle:. Have you ever restored a set of lights or just shined them? As I mentioned only buffing will produce results in minor cases. Sometimes more aggressive steps are needed. As far as being lame learn from this post instead of acting like you know something about it.
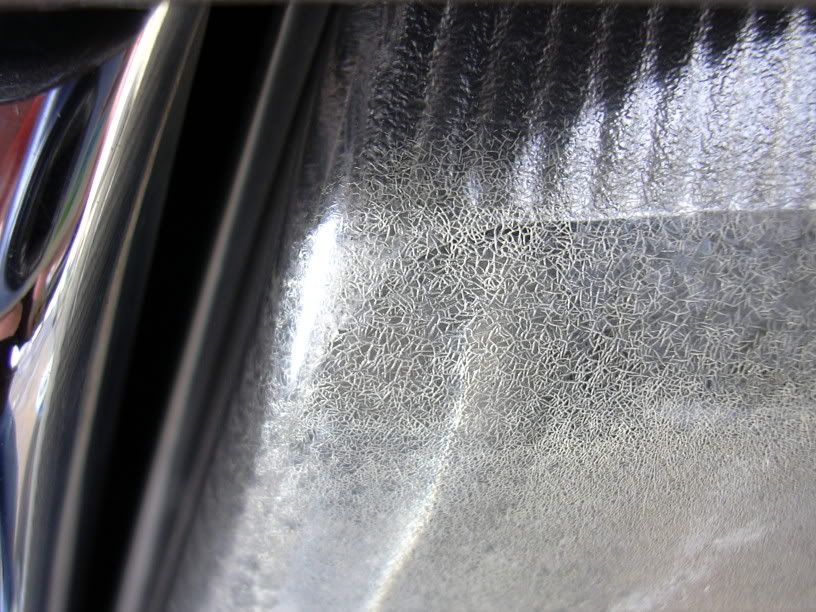
Try buffing out the cracks and pits such as these.
Here is a Jeep Grand Cherokee before & after
 :
:
 :
:
Here is a Chrysler 300M before & after
Try buffing out the cracks and pits such as these.
Here is a Jeep Grand Cherokee before & after
Here is a Chrysler 300M before & after
jvriii1942
New member
For the Jeep I started with 320grit, the 300M 400grit. The first step is what takes the longest it also uses the most paper because the grit wears down fast. Always be sure to remove all the lense damage in the first step. Changing directions when stepping up each grit makes it easier to see when the previous grit has been completely removed.
The Jeep took about 2.5 hours to sand and 20-30 minutes to buff. I don't remember how much time I spent on the 300M.
The Jeep took about 2.5 hours to sand and 20-30 minutes to buff. I don't remember how much time I spent on the 300M.