'01 Accord - Nighthawk Black Pearl

mose

New member
Hey there fellow Autopians!!


I have been taking really great care of my cars for years and am just now understanding what I have been missing in the detail arena! The stuff I have been doing to cars all these is really nothing more than washing and waxing...LOL!! I have done it consistently on all my cars without fail but never to the degree that it is done by people such as yourself.


I have recently purchased a PC, LC pads, duragloss products along with some detailing tools that will help me better my skills. I have done my '02 Tundra (by hand) and it turned out really good. It kicked my butt...but it was worth it!! The only way I was able to tackle it was with a lot of help adn advice from the people here. With enough practice I hope to start doing some side jobs and can only hope to come close to the quality of vehicles you people here have turned out. Now that I have buttered you all up here's my question!!


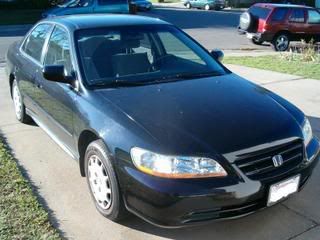
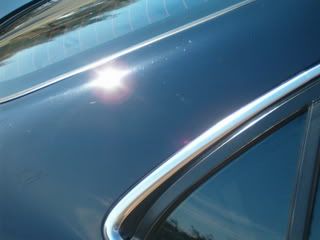
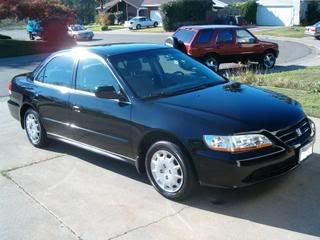
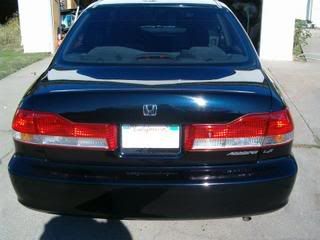
I am doing my fiance's Accord over the Thanksgiving holiday. She will be gone for five days and I will have it all to myself. I will be using the PC with the duragloss product and was wondering if there is anything you could tell me about dealing with the Nighthawk Black Pearl paint.


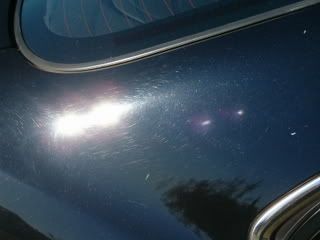
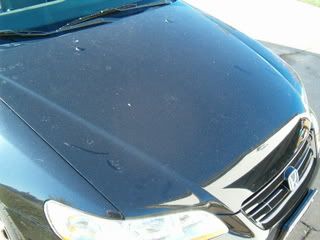
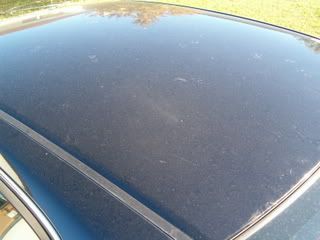
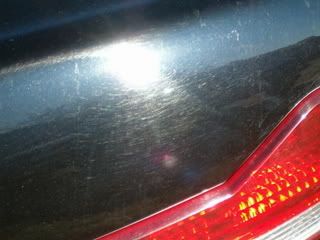
My plan is to wash it and clay it while I wash it. I was planning on using Meguiar's ScratchX to get rid of the swirls. (anything better to use for a first timer?) I wasn't sure if I should use a paint cleaner next. (Please advise if I even need to use a paint cleaner after claying and using the ScratchX) But I was going to mimic the same procedure that I used on the Tundra. One coat of DG bonding agent, then three coats of DG #105 over the next four days. In a week or so I will wash it and hit it with a coat of DG Aquawax to give it a wetter, deeper finish. I did this on the Tundra and it looks really great! I've got the interior part already figured out but was really curious about the paint.


Any help you could give my would be deeply appreciated!


Thank you!!


Mike
 
If you don’t get the results you’re looking for from the ScratchX, you can pick up some Mother’s Power Polish OTC….shake it well before each application to your choice of pad, then go at it.

RET
 
It's funny that you responded to my post Scottwax. I tried to PM you to ask you about this and found that you don't accept PM's. I am glad you were on and saw this! Thanks! Can Optimum Polish be found OTC anywhere?
 
Also, will using a PC be good enough to do what the Optimum needs to do? What speed and pad do I use?
 
RET: Good thinking!! Thanks!! I will head over to like Pep Boys or something and get some!! Of course......I could pay $30 in overnight sharges for a $15 bottle of polish!! :rolleyes: :lol
 
I get my Duragloss at Car Quest, they also sell 3M products, depending on the swirls, you could go with Perfect-IT Swirl Mark Remover, dark cars #39009 or step it up to Perfect - IT III Machine Glaze # 05937, OR go up to Finesse -IT II Machine Polish # 39003. IF it's really bad - Perfect-IT II Rubbing Compound Fine Cut # 39002.
 
So...if anyone could give me some advice about what pad(s) and what speed to use on my PC that would really be helpful!!:xyxthumbs
 
Go to Autogeek.net, they have 2 really good videos you can watch in a few mintues on your computer - all about the PC.
 
So instead of spending time with friends and family on Turkey Day I decided to detail my fiance’s Accord. Actually she is out of town and I opted to stay here due to financial reasons. So, as I go along I will write up what I have done.


I started with the wheels and wells. I used engine degreaser for the wells and a Mothers Wheel Well brush for scrubbing. I used a Mothers Tire Brush on the tires and scrubbed away all the road grime and old dressing. I used DG All Wheel Cleaner on the hubcaps (yes…..hubcaps) scrubbed everything and rinsed.


Next was washing it with Meg’s GC and a lambswool mitt. Drying was done with the “Ultimate Guzzlerâ€� from Autogeek. It seemed to push the water around instead of drying the car but the water all came off and it was fine. When I wash the towel I will try putting a tblspn of vinegar in with the soap. So I wiped down the car and pulled it into the garage to blow it dry. I got that all done and realized that I still needed to clay the car….damn. I did the same thing when I did my Tundra. So I used Megs Detail Spray for lubrication and clayed the whole car including the glass. Pulled it back outside to wash it again. Dried it, blew it dry, treated the wheel wells with Meguiar’s Hot Shine and left it to dry.


I need to prepare the turkey for BBQ’ing so I thought this would be a good time for an update. I have been using Mother’s Power Polish to get rid of the swirl marks. It’s not doing a perfect job but I can definitely tell the difference. I am also using Meg’s ScratchX in the tougher places. I am not getting all of the swirl marks off. I have tried more product, different speeds (even up to 6). Not sure what else I can do but I will keep trying!! Using the PC is really different than doing it by hand. It gets a lot more done with a lot less effort! I can only imagine how good a rotary works! I just did the top parts of the car and as soon as I get the turkey cooking I will start on the sides.


Started the sides. The PC seems to working differently. It almost feels like the pad isn’t spinning. The product is staying in the same pattern that I applied it to the pad and it’s not spreading. I bumped it from speed 5 to 6 and it seems to be working better. Everyone says not to use 6. I guess if I wake up in the morning and the paint is ruined then I will know why!! I am also throwing a lot of pads. It seems like the pad isn’t apinning and when I back away from the car a little the pad comes flying off. This ismaking me sorry that I didn’t go with the EDGE pads. I don’t think I would have this problem with those. . It’s getting dark so I guess I am done for the night. My garage lights suck so I am at the mercy of sunlight. Oh well…..time to try out the Turkey!!


Okie doke….turkey was boomin’ and it’s Friday morning and it’s time to get back to work!!


I applied DG PBA to the car and while I was waiting for it to haze over I worked on the interior. I cleaned it with DP Interior Cleaner and dressed it with DP Interior Proctector. I vacuumed and did the glass with Stoners. Wiped down the door jams with QD and applied a coat of DG105. I applied DG Vinyl Dressing to the rubber and then started to apply DG105 over the PBA. I applied it using a gray pad on speed 3. It went on really easily but I could never tell (and this was a theme throughout the detail) if I was using enough product. Just buffed off the 105 and the car looks really, really good! There are a lot more scratches in the paint then I thought there were. But it looks completely different and I am happy with the results. I topped it with DG AW this morning (Saturday) and really like the way the car instantly looks wetter! It really looks a ton different than it did yesterday!


I know that the car took me a lot longer than it would have with a “professional� doing it but I had three days to do it and I wanted to make sure I took my time and learned everything I could from the experience. So here’s what I learned:


1. Clay the car while I am washing it.

2. I would probably go slower with the PC next time. I found myself rushing, thinking that it would/should work faster. I remember about halfway through that it takes a certain amount of heat to break down the swirl marks.

3. I couldn’t have done this without all the people on Autopia.

4. That I enjoy doing this more than I thought I did!!


I am sure that more will come to me later but I need to prepare for my fiance’s return home and hope that she notices the difference!!


Thanks again to everyone that helped! You guys made this a lot easier!!


Befores:


sidebefore.jpg


tirebefore.jpg


pillarbefore.jpg


hoodbefore.jpg


frontbefore.jpg


topbefore.jpg


trunkbefore.jpg


Afters:


tireafter.jpg


pillarafter.jpg


hoodafter.jpg


frontafter.jpg


topafter.jpg


trunkafter.jpg


I resized these photos on photobucket.com and they seem to be smaller than others I have posted. Hope you get the idea!


Thanks again!!
 
Nice job..looks like a differant car, man it did have a lot of swirls, looks the Mothers worked pretty well.

A note on the #6 speed for the PC.....you can use it, with that polish I probably would have gone over the whole car with a yellow or orange LC pad on speed 6 and with a good amount of pressure.


Good Job!

RET
 
The car looks 100% better! As you are learning, one key to using the PC to polish out defects is to take your time. Oh, and when you wash that towel put the vinegar in the rinse cycle.
 
Thanks guys!


As I said I didn't get all of the swirl out but I got the majority of them. My fiance came home Saturday night and was genuinely happy with the results. She said the car looked like a different color. In person you can tell that a lot more of the blue comes out...mainly in direct sunlight.


Ness: I think you are right. I was finding myself wanting the PC to work faster than it did and I guess that it just means that I have to make slower passes with it.


RET: I used an orange pad for the pokishing. I seemed to have better luck with a 4" pad as opposed to a 6" pad though. Does that make sense? I didn't have a yellow pad or I would have tried that. I though I got on with the kit I bought.....but I guess I was wrong. I will definetly have to pick a couple up.


Obviously it took longer than it should have but I had plenty of time to do it. I am curious though as to how a detailer would get all of that work done in one day? Any tips on shaving time off? I started at 9AM Thursday, finished polishing the top of the car by 5PM, started again on Friday at 9AM and was done with the car by 1PM. That's a long time to do a detail. I know that I couldn't be at a clients house for that long.....help!!
 
mose said:
....... I seemed to have better luck with a 4" pad as opposed to a 6" pad though. Does that make sense? ........
It makes a lot of sense. The 4" pads work better on a PC because they don't bog down as much as the larger pads do. You do have to be more careful when using a 4" pad when removing defects..... it is possible to burn or polish through the paint. I haven't had any problems, but some have:


http://autopia.org/forum/machine-polishing/80280-4-orange-pad-burnt-my-trim.html
 
As you are learning, one key to using the PC to polish out defects is to take your time


I tried to move the PC at about an "inch every second" pace. That was fine for the top but the sides were different due to the weight of the PC but I did the best that I could do. More experience and more practice!!!


I also had a question about throwing pads and how much pressure to put on the PC. It seemed as though when I was putting a little pressure on the PC it would almost stop spinning. It was still going back and forth but no spinning. When I would back away from the car a little I seemes to be throwing pads across the garage. Which, of course, meant I had to stop, clean the pad and start over. That might have been what took so long as well! Never thought of that....:wall
 
:cool: 
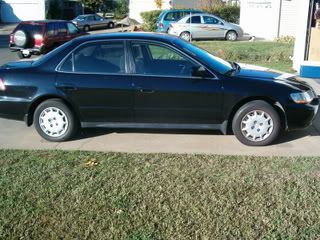
Mose, your car looks just as good as your tundra did at ts.com!!!!


Very nice work! Tell your wife I am sorry for making you spend so much money on detailing items.
 
Brandon,


Thanks a lot!! I am really happy with the way it came out. It proves that you guys know what you are talking about with all of the advice!!


She isn't too mad about the money spent. She is driving around in a very clean car now and I have actually picked up three details through friends that have seen my work! I have one guy that wants me to do his '06 Dodge Ram150 (or something like that.......it's a full size truck) and his wifes '05 Aviator. Then there's another guy who wants me to do his wifes '03 Lexus SC430.....very sweet car AND it's black!! I can't wait for that one!!


I am actually thinking about trying some other product on her Lexus. Maybe go with some Optimum Polish, not sure what dealer and then top it with some S100. What do you think? Or should I just stick with the DG products?
 
mose said:
Brandon,


Thanks a lot!! I am really happy with the way it came out. It proves that you guys know what you are talking about with all of the advice!!


She isn't too mad about the money spent. She is driving around in a very clean car now and I have actually picked up three details through friends that have seen my work! I have one guy that wants me to do his '06 Dodge Ram150 (or something like that.......it's a full size truck) and his wifes '05 Aviator. Then there's another guy who wants me to do his wifes '03 Lexus SC430.....very sweet car AND it's black!! I can't wait for that one!!


I am actually thinking about trying some other product on her Lexus. Maybe go with some Optimum Polish, not sure what dealer and then top it with some S100. What do you think? Or should I just stick with the DG products?


Yeah, trying optimum polish would be great. As far as the s100, it is a great carnuba for topping over the #105, but you really have the best of the best as far as paint sealants go.
 
Yeah, trying optimum polish would be great. As far as the s100, it is a great carnuba for topping over the #105, but you really have the best of the best as far as paint sealants go.


I agree about the #105. I am very happy with it. I just wasnt sure how the two (S100 and #105) would mix. If I do that could I still use the AW for upkeep on the shine?
 
Back
Top