

How to maximize the ability of your DA Polisher for show car results!
I originally wrote this to help the hundreds of thousands of people that own first generation Porter Cable DA Polishers get the best use out of their tool when it comes to removing swirls, scratches and water spots out of modern factory baked-on clear coat paints.
Truth is...
The below tips will help you get the best results out of ANY DA style polisher including,
- Griot`s Garage 6" Random Orbital Polisher
- PC7424XP
- PC 7336
- PC 7424
- Shurhold DA Polisher
- DAS-6 PRO Dual Action Polisher
- Meguiar`s G100
- Meguiar`s G110
- Meguiar`s G110v2
- Meguiar`s G220
So no matter which make and model of DA Polisher you own, the tips shared in this article will help you to get the best use out of your DA Polisher.
The first generation Porter Cable units were sold for a time span of over 25 years, which means there are a millions of these tools in shops and garages across the world, then here`s how to maximize their ability,
--> Use thin, small diameter buffing pads <--
First the reason for this article. The reason for this article is because the problem with these types of tools, that is tools that use a Free Floating Spindle Assembly, is that they have a hard time keeping foam buffing pads rotating under pressure.
It is even more difficult for these first generation PC units to keep a foam pad rotating under pressure as the pads become wet with product. The reason for this is because the wet foam acts to absorb and dissipate the power supplied via the Free Floating Spindle Assemble and the result is the pad will stop rotating and simply vibrate or jiggle against the paint.
Now here`s why this is a problem...
Most people that get into machine polishing are doing so because they, like millions of other people, have discovered that removing below surface defects out of clear coat finishes is difficult and time consuming to do by hand. For more information on why it`s hard to remove swirls, scratches and water spots out of clear coat paints by hand read these two articles,
Primarily due to the ability of "Discussion Forums" to disseminate information to large demographic and targeted groups of people, over the last 10 years more and more people have learned about the Porter Cable Dual Action Polisher and moved up from working by hand to working with an electric polisher.
Now this is key...
There are 4 primary things you can do with a Porter Cable Dual Action Polisher or similar knock-offs of this tool...
Correction Work - Removing swirls, scratches and water spots or etchings.
Polishing Work - Polishing the paint to a higher level of gloss and clarity after the correction step.
Waxing by Machine - Applying either a wax or a paint sealant by machine because it`s faster and the machine is superior as compared to working by hand and working by hand is actually your 4 fingers pushing down on a wax pad.
Removing Wax by Machine - Not everyone goes this far but some people do prefer to remove dried wax or paint sealant by machine.
Now follow me on this... for the first two procedures, that is Correction Work, (removing defects), and Polishing Work, (that is refining the results of the correction step and maximizing clarity and gloss), you need the tool to maintain pad rotation while downward pressure is applied to the head of the tool.
Here`s why this is important...
The way you remove swirls, scratches and etchings like water spots, also called "Below Surface Defects", is to remove the paint surrounding these types of defects until the highest points of the surface are level with the lowest points of the defects you`re trying to remove.
In other words, the way you remove below surface defects is to abrade the paint until it is flat or level.
Paint is removed best, or if you like the fluffy way of saying this, swirls, scratches and water spots are removed best, when the face of the buffing pad is rotating over the surface, not just jiggling or vibrating.
When it comes to applying a wax or paint sealant, it`s not important because at this stage of the game you`re not trying to remove paint, (remove defects), you`re just trying to spread-out a layer of wax or paint sealant and work it into the paint to whatever level is possible and jiggling or vibrating is perfect for this step.
Then if you want to remove dried wax or paint sealant by machine, then you do want the pad rotating again as that is how a microfiber bonnet around a buffing pad works best for removing a thin film of dried wax or paint sealant.
Back to the problem...
The first generation Porter Cable Dual Action Polishers are not very effective at keeping a pad rotating under pressure, especially pads that are thick and larger.
Thick foam acts to absorber and dissipate the power from the tool and we see this as no or reduced pad rotation. When a pad is dry, it rotates best, at least best to whatever its ability is for the size pad. As you work around a car and continually add more product to work over the paint, some of this product or liquid penetrates into the foam and the combination of foam and liquid acts to absorb the power even more than just dry foam alone.
Large foam pads mean more surface area in contact with the paint and the more surface area in contact with the paint the more power is necessary to rotating the face of the pad over the paint.
When everything is working against you, that is when the pad is large, the pad is thick and the pad is wet or saturated with product, the end results is very slow pad rotation and even no pad rotation.
How to maximize pad rotation for the correction and polishing step for ALL DA Polishers
In a nutshell...
- Small Diameter Pads - 5.5" diameter pads are the best balance of size and effectiveness.
- Thin Pads - The thinner the pad, the less foam there is to absorb and dissipate energy.
- Clean Dry Pads - Being able to switch to a clean, dry pad maintains tool efficiency for maximum pad rotation.
In detail...
Small Diameter Pads - 5.5" diameter pads are the best balance of size and effectiveness.
This is not a recommendation in concrete, just a good general size recommendation because pad thickness and type are HUGE factors. For example, there are other pads for buffing besides the traditional foam buffing pads. One example is the Surbuf MicroFinger Buffing Pads which are very thin and for this reason you can maintain pad rotating fairly well with a 7" pad on a 1st Generation PC.
Generally speaking however, the 5.5" diameter pad is a good balance between too large and too small. It`s true that a 1st Generation PC can easily maintain pad rotation with 4" diameter Spot Repair Pads but this is to small of a size to realistically buff out all the major panels of the average vehicle in a timely manner.
Thin Pads - The thinner the pad, the less foam there is to absorb and dissipate energy.
The thicker the foam the more the cushion and this might be good for a bed, or a couch or a chair, but when trying to maintain pad rotation with a tool that uses a Free Rotating Spindle Assembly, it`s a negative feature.
"Thin is in..."
(Yes, you can quote me on that)
You don`t want the pad too thin or there will not be enough material to conform to the shapes and contours common to the panels that make up a vehicle. For a really thin pad, you can use an Interface Pad which becomes the cushion for the thin pad and provides the safety margin needed for machine polishing delicate clear coat finishes.
Clean Dry Pads - Being able to switch to a clean, dry pad maintains tool efficiency for maximum pad rotation.
In a perfect world anyone buffing out an entire car would have a collection of clean, dry pads available for their project and after buffing out a single panel, remove the used pad and switch to a clean, dry pad. A clean, dry pad can be a new pad or a used pad, but it`s important that it`s clean and dry.
Switching to a new pad for each panel of a car also prevents accidental swirls and scratches should a pad become contaminated from the previous panel. For large panels like the hood or roof of larger cars, trucks and s.u.v.`s, this it`s completely acceptable and beneficial to use more than one pad per panel. Divide the panel into two sections and use a separate pad for each section of the panel.
Panel = A single door, hood, fender, etc.
Section - A portion of a panel
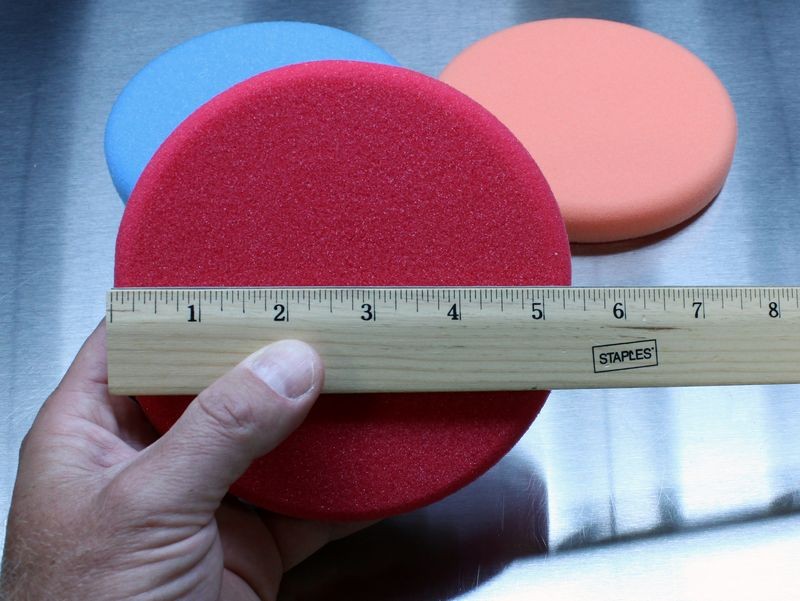
Here are my recommendations for 5.5" pads for ALL Dual Action Polishers.
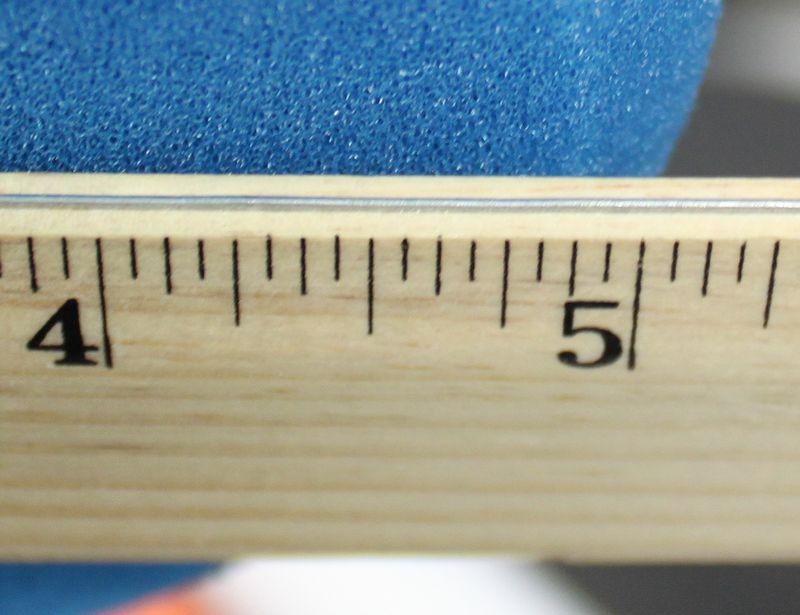
Lake Country 5.5" Flat Pads
The outer edge of the face of these pads is tapered so they are actually a little under 5" in diameter
Approximately 7/8" thick
Lake Country 5.5" CCS Pads
5.5" CCS Pad is right at 5.5" in diameter

Approximately 7/8" thick
5.5" Hydro-Tech Thin Pads
Approximately 7/8" thick
Approximately 5 1/2" thick
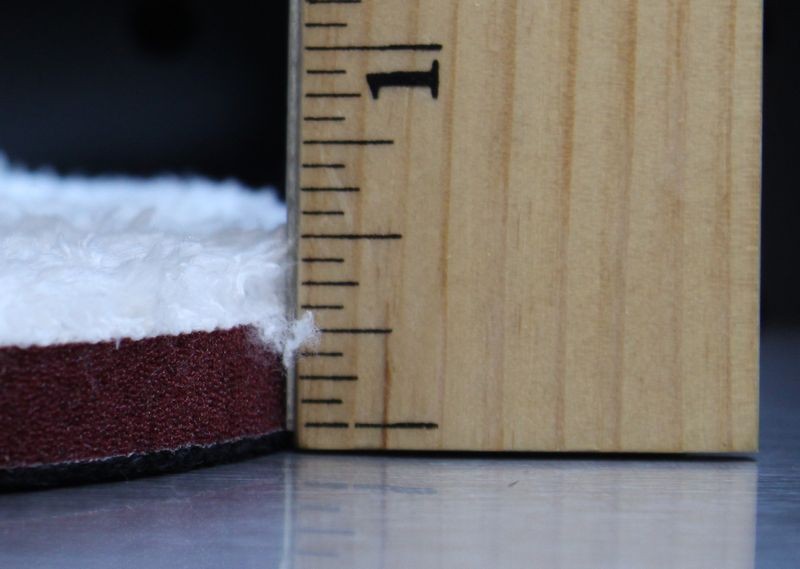
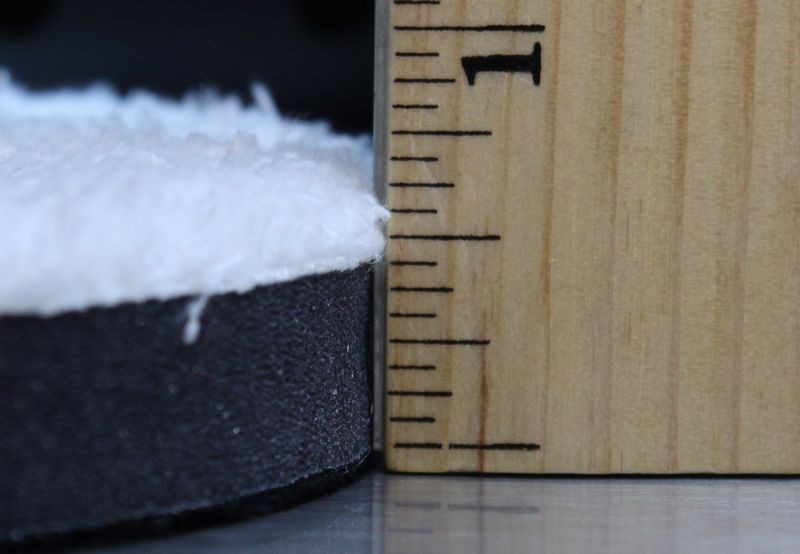
Meguiar`s 6" and 5" Microfiber DA Pads technically referred to as
discs
(Note how thin these are by design...)
The cutting pad is approximately 1/2" thick before fibers matte down
The polishing pad is approximately 3/4" thick before fibers matte down
The 6" pads are actually about 6 1/4" in diameter
The 5" pads are actually closer to 5 1/2" in diameter
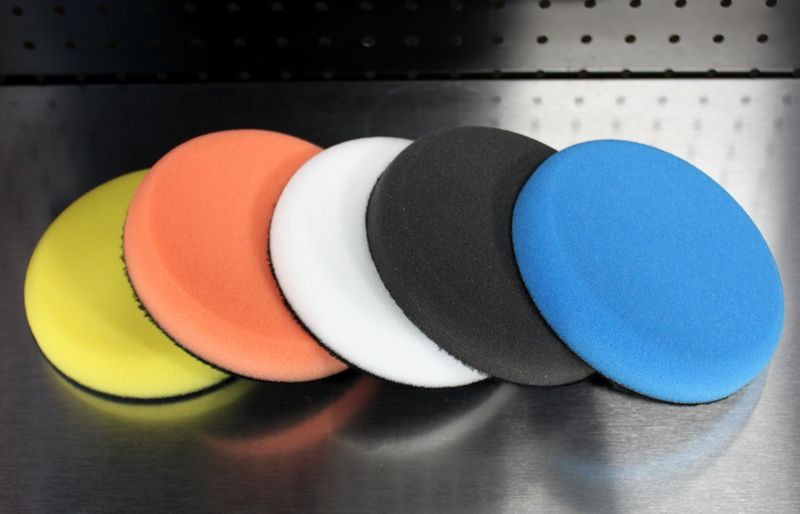
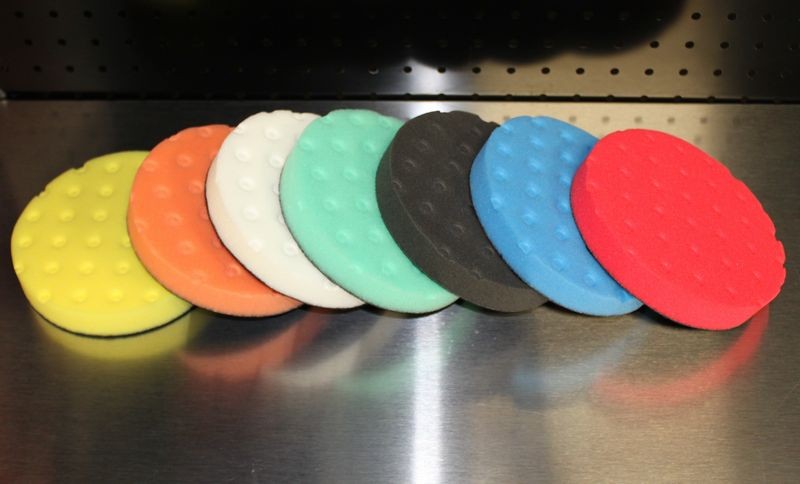
Products shown
5.5" Flat Pads
5.5" CCS Pads
5.5" Hydro-Tech Pads
5" Microfiber DA Cutting Pads
5" Microfiber DA Finishing Discs
6" Microfiber DA Cutting Discs
6" Microfiber DA Finishing Discs
Summary
- To get the best, fastest and most effective correction power out of any dual action polisher, stick with thin, small diameter pads like shown above.
- Use the 5.0 to 6.0 Speed setting for correction work, in most cases you`ll want to be on the 6.0 Speed Setting as this will work best to maintain pad rotation when you apply pressure and when buffing on any type of uneven body panels.
Clean your pad often either with a nylon pad conditioning brush or with a terry cloth towel using the clean your pad on the fly technique
- When the pad becomes wet or saturated with product, switch to a clean, dry pad, this will instantly show up as better rotation ability and that`s what you want when you`re removing swirls, scratches and water spots.
- Mark your backing plate to make it easy to see and maintain pad rotation.
- Keep your pad flat to the surface whenever you can.
- Work a small area at a time - 2` by 2` is too large, shrink your work area downward.
- For correction steps, use firm downward pressure but don`t stop the pad from rotating.
- Use a slow "Arm Speed", that is move the tool slowly over the surface, not quickly.
- Prime new or clean used pads before starting.
- Use an ample amount of product, don`t under-use product and don`t overuse product.
- Work one section at a time by using multiple section passes.
- After you finish one section, move on to a new section but overlap a little into the previous section.
- Wipe off all product residue before moving on to a new section or before re-buffing a section a second, or third time. Don`t mix spent product with fresh product.
- Before starting, do a Test Spot, make sure your choice of pads, products and your proficiency with your technique all work together to get you the results you want and expect before buffing out the rest of the car.

Results 1 to 6 of 6
Threaded View
-
04-13-2011, 10:20 AM #1Administrator


- Join Date
- Aug 2003
- Location
- Stuart, Florida
- Posts
- 332
- Post Thanks / Like

How to maximize the ability of your DA Polisher for show car results!
Mike Phillips
Host - Competition Ready on Velocity Channel
Director of Training Autogeek & Marine 31
Competition Ready Facebook Page
Mike Phillips Facebook Page
Twitter
Instagram
Click on a book to get your own copy.


 Reply With Quote
Thread Information
Users Browsing this Thread
There are currently 1 users browsing this thread. (0 members and 1 guests)
Similar Threads
-
Could a pro detailer use a DA polisher and get good results?
By Toy_Cam_Ed in forum Car DetailingReplies: 23Last Post: 06-20-2012, 01:03 PM -
MAXIMIZE your REFERRALS
By buda in forum Detailing Business Management & MarketingReplies: 0Last Post: 06-24-2011, 07:36 PM -
Anything to use between WG twins to maximize look?
By Spilchy in forum Car DetailingReplies: 3Last Post: 08-13-2004, 10:34 AM -
Results of Vector circular polisher
By JHowell1976 in forum Machine Polishing & SandingReplies: 17Last Post: 12-25-2003, 01:26 PM -
Best Results with PG RO Polisher (SMR Sucks)
By highspeeddata in forum Car Detailing Product DiscussionReplies: 13Last Post: 04-04-2002, 12:44 PM
Bookmarks