

Hey guys, this will be a pretty comprehensive thread for my gloss-based testing. I`ll give a rather lengthy introduction to the concept of gloss measuring as it relates to detailing, give a breakdown of some of the tools and products that I`m working with, and then I`ll continue to post updates for my results of testing individual abrasives, paint prep products, and waxes/sealants/coatings. Feel free to leave your feedback at any time, ask me any questions, or leave requests for products that you would like for me to get results for!
I`ve worked with my main glossmeter for around 4 years now, but understand that the results of my tests may be unique to my meters, my calibration tiles, my paint, my environment, technique, towels, etc. These results should not necessarily be taken as fact, use them as a guide for one individual`s experience and quest.
Introduction
Gloss measuring as it relates to detailing can be a very tricky topic to navigate through. Although one may assume that the glossmeter would be one of the most valuable types of tools for an industry that is significantly centered around gloss enhancement, the results of measurements can be easily misconstrued. It truly requires a lecture to understand the reason for why the numbers are coming out the way that they are when we`re measuring paint. All of the features of the paint that we collectively regard to as "gloss", the majority of glossmeters out there only capture one of those features, which is purely how shiny the paint is at that given point in time. It won`t necessarily capture paint depth, wetness, warmth. It`s not going to tell us how good the paint looks to our eyes. This concept becomes more important to note as your paint approaches the maximum amount of gloss achieved through abrasive polishing, in many cases the waxes/sealants/coatings applied on top after this point will reduce gloss with immediate post-application measurements, for reasons which I will explain further along below. For now, I`ll jump into the components of the meter and its basic function.
How the Glossmeter Works
The glossmeter shines a fixed amount of light from its lamp onto the surface at a specific angle, the light is reflected off the surface into a receptor lens, and a detector then captures how much light was reflected into it. Rhopoint has very good articles explaining the concept of how their meters work with great visuals that I will leave as a reference for those more interested in the topic, I definitely recommend it:
https://www.rhopointinstruments.com/...loss-measured/
This is their picture that covers the components, the light is sourced from the lamp, sent off at a set angle, bounces off the surface that we`re measuring into the receptor lens and it`s funneled into the detector. The measurement is calculated in gloss units (GU):
Here`s the underbody of my meter that shows the base, the two lamps on the left half and the two receptor lenses on the right:
Measurement Angles
My main Rhopoint Novo-Gloss Trio unit can measure by beaming the light source at three different angles: 20°, 60°, and 85°. The 60° angle is the universal measurement angle, the majority of meters out there measure only at 60° but this is still a fine measurement angle for low and high gloss surfaces. Anything over 70GU when measured at the 60° angle is technically more suited to be measured at the 20° angle for better resolution. Anything under 10GU at the 60° angle is more suited to be measured at the 85° angle. With my specific meter, I measure at the 60° angle because it`s more consistent when moving from section to section on the paint compared to the 20° angle. My meter is also less impacted by tilt/pressure bias when measuring at 60°, which is very important when I`m working on uneven painted surfaces. More gloss = more GU`s. My clearcoat on the main test panel will be around the 90-98GU range. My bathroom mirror is around 2000GU as a reference.
Standardized Calibration Tile
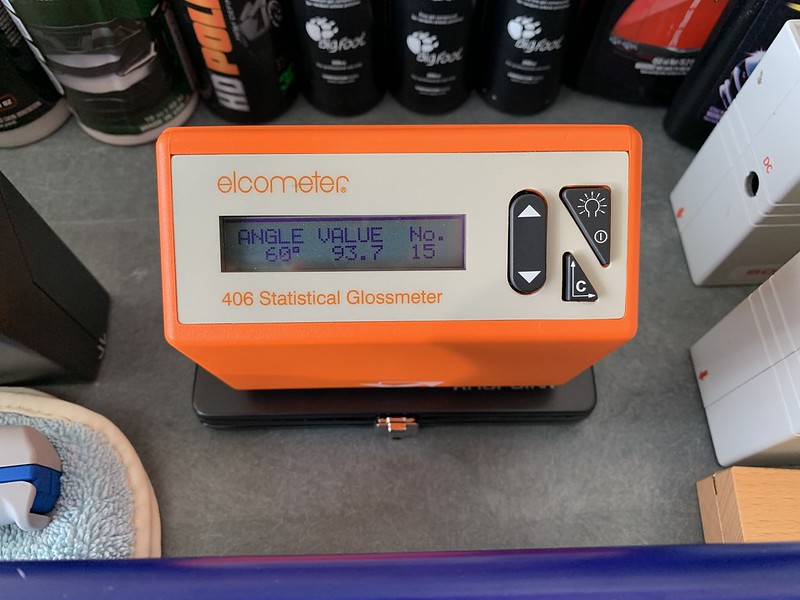
The gloss unit (GU) is based around a standardized scale. The meters that I`m working with are consistently tested against a calibration tile, this was certified from the factory to give off a specific GU measurement when measured at a specific angle from the meter. Measuring at the 20°/60°/85° angles will give you different GU results, so it`s important that the viewer understands the angle that the meter is measuring from. The calibration tile is also certified with the meter, recertification to meet ASTM spec is recommended I believe on a yearly basis, and they verify or replace the calibration tile and make sure that the meter is recalibrated and certified to that tile. My meter was last certified in 2007, it`s an expensive process for individual testers when you don`t have the budget of a manufacturing plant to consistently certify your testing equipment to abide by ASTM standards.
Thus the results of my testing are relative to whatever the condition of my calibration tile is. I routinely clean the tile, lenses of the lamps and receptors with isopropyl alcohol. Even though the tile is set to 93.7GU as certified from the factory, it`s very possible it`s no longer actually producing that amount of gloss. However, the glossmeters themselves still need to be routinely calibrated and checked against the calibration tile on a very regular basis, and this is done by the user. I check the meter`s calibration against the tile every single time I turn it on, and before and after each new product is applied to the paint. If I`m reading at 93.6-93.8, this is an acceptable range of the tile to continue measuring against the paint. If I`m at 93.5 or below, or 93.9 and above on the calibration tile, I`ll likely recalibrate the meter and rerun an application of the polish that I`m testing. Largely, the actual gloss reading of my tile is irrelevant, because all products are tested relative against each other, and relative against a calibrated meter to that specific tile. It just means someone else out there with the same Rhopoint model and different calibration tile could come to measure my test panel and receive different total gloss readings, but our overall results relative to each other should net the same comprehensive results.
The calibration tiles are not painted, they are either glass or acrylic I believe, translucent except for the sides and bottom which are blackened, so the tile does not oxidize like paint would and I believe it`s able to obtain a much more consistent gloss reading as a result over the years.
The Problems
One main problem I face when measuring the paint is our vehicle panels are not perfectly flat. This creates a vast fluctuation of measurement angles and this means I`m very likely to have a large difference in gloss measurements just moving away to another area on the paint. Any angle concave to the surface of the base of the glossmeter will present much lower readings, the lamp is positioned further away from the paint compared to a flat or convex surface, and you also have the potential for ambient lighting to creep through that can also skew your results. I`ve mapped out my measurement area on my test panel in a way to really reduce the inconsistency of measurement results. Any slight pressure bias in the glossmeter when hitting the read button can also introduce different angles that can lead to inconsistent results.
Product Wipeability Has a Major Impact in Gloss Results
Another main problem has to do with the wipeability of the products we`re working with. Compounds, polishes, waxes, sealants, coatings - we apply these to the paint and we buff them off with a microfiber towel. These all contain carriers that can prevent you from achieving a super clean wipeoff. Any of those carriers or "residuals" that are left behind can easily skew measurement results, leading to lower than expected readings. Even if it looks like you`re getting a clean wipeoff, the residuals can still be left behind which will diffuse the light from the meter, any diffusion of the light source reduces how much it`s reflected off of the surface. A consistent panel wipe product is imperative when working with compounds and polishes in order to more accurately determine the amount of true gloss enhancement.
This poses a significant problem when working with waxes/sealants/coatings. How much gloss your meter is able to read can be entirely based on just how good of a wipeoff you achieved when buffing the paint with your microfibers. Some microfibers may be more absorbent than others, or maybe you wiped off a certain area much more than a different area. The post-application gloss measurements for last step protectants (LSP) can be a highly irrelevant statistic in terms of the product`s actual gloss rating. In most cases where a product is perhaps poor in its wipeability, a single post-application wash and rinse can immediately jump gloss measurements up to match other products that perhaps gave a cleaner wipeoff and thus higher post-application readings. At what point in the test is it appropriate to record the gloss rating of an LSP?
Ever heard of guys talking about the warmth and depth of a carnauba wax, which one might find leaves behind a better looking finish? It`s very possible that the diffusion of the light created by those oils and residuals in the wax, that are not captured by the microfiber during wipeoff, can create that warmth or deep looking finish, while at the same time reducing the actual gloss readings. We`re in a situation here where the glossmeter isn`t necessarily correlating a higher GU reading as determining a better finish. It would be inappropriate for me as a tester, in my opinion, to create a scale where the highest GU of an LSP on the post-application phase of measuring is the be-all end-all of statistics. More variables are at play when it comes to the overall look of the paint rather than just how reflective the paint is.
Not being able to maintain a consistent measurement environment can lead to a drastic difference in results. I cannot measure the test panel outside of the garage with any degree of consistency. Whether it`s temperature, or an influx of ambient lighting, the meter does not like it when I reposition the paint or panel to other areas beyond its main testing location that`s in a much more controllable environment. The meter also has a metal base, if you try sliding this around on your paint you`re going to seriously scratch it, and it`s likely I`m making slight marks as I`m picking it up and putting it down on the surface. I`d be seriously careful when using a glossmeter on your paint after polishing.
And finally, I`m hovering around a low to high range of 93.0-97.4 on the main test panel factoring in LSP`s and polishes. Maybe some outliers with regards to products with even worse wipeability, but the high and low range of about 4GU. My eyes aren`t going to notice 4GU`s of GU mining out in the wild. These meters are extremely accurate, and I can really knock down differences in actual gloss measurements between different products in many cases. One of the things to attempt to answer is just at what point can our eyes really notice a difference, and whether or not spending the time GU mining or trying to jewel out the finish is even worth it if our LSP on top is just going to negate any potential jeweling benefit.
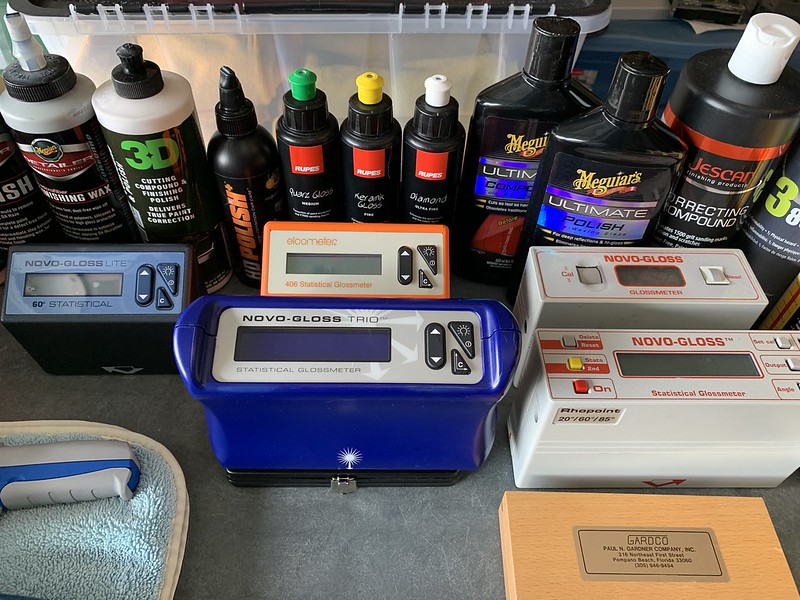
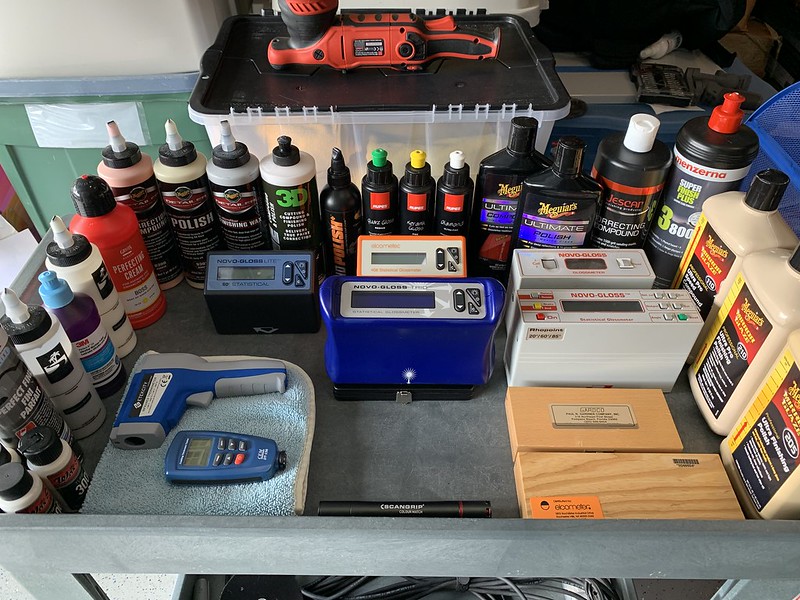
Test Equipment
Glossmeters
My main Rhopoint is the Novo-Gloss Trio, it`s incredibly consistent when I`ve mapped the test surface out properly, and it has one of the highest rates of reproducibility and repeatability for any glossmeter. It has a nice backlight on the unit, only holds about 200 results before I have to delete them which is a nuisance but I`m loving it. The Elcometer 406L is a Rhopoint model branded to Elcometer, almost identical to the Rhopoint Novo-Gloss Lite, but the 406L measures in 20° and 60° so I use this to confirm accuracy and the results of the Novo-Gloss Trio. The Lite only measures in the 60° angle. The others are some older models that I`m working on bringing back to life. Back in 2007 I believe the Trio, 406L, and Lite were around $1700-$2800 per unit, insanely expensive but Rhopoint definitely had some of the best consistency, accuracy, and statistical based software, and Rhopoint is still at the top of the game with today`s meters.
Polishes/Compounds
This is the bulk of what I`m currently working with. With the polishes and compounds, since their designed performance is not dictated by their residuals, these will perhaps give us the most relevant form of gloss results. The difficult part is perhaps narrowing down and pairing them with the best pads, polishers, running speed, arm speed, # of passes, etc. This is where I would love feedback from you guys working with a particular type of process that you use that perhaps gives you the best results when working with that particular type of abrasive. However, much of this could also be substrate dependent, different clearcoats used in the manufacturing process, hardness/softness, etc. Best measured gloss can potentially only be relevant to this Nissan hood.
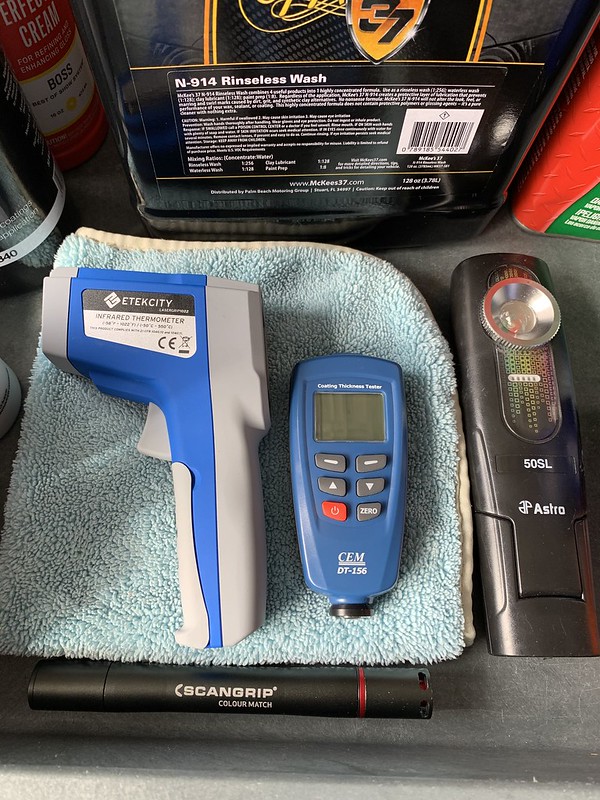
Temperature Gauge, PTG, Lights
Panel Wipes/Paint Preps
Prep-All is my main post-polishing panel wipe, but I`ll be running tests using the others as well and this will be documented which one is used when I post results. The N-914 I actually have this in a waterless wash style dilution as a substitute to a CarPro Reset wash. Sometimes if I`m doing short term based testing where I`m running LSP`s without a curing session, I like to grab N-914 out and run a quick spray and wipedown to capture the improvement in gloss measurements from doing this. I like doing this to get my head around how a product applies and removes in the short term using a few different methods, but I can capture gloss as well while doing this.
Pads
Pads will be mainly a mix of Rupes and Buff and Shine foam pads, the ones above are from the last batch of tests. I`ve got Meguiar`s DMC pads, few different types of wool pads but likely I`ll fetch a different test panel for compound related tests in the future to try and conserve clearcoat as much as possible on this test panel.
Polishers
With the polishers I can attempt to capture any advantage with a particular type for gloss enhancement. A lot of guys say nothing beats a rotary for jeweling, others say the long-throws are the best. Let me just tell you guys that I`ve done an EXCESSIVE amount of finishing polishing on this test panel in the process of removing and reapplying different LSP`s. Has to be 100s of individual polishing sessions. I`ve been maxed between 96-98GU after polishing for a very long time now, using my range of polishers with all sorts of different pads and polishes. But I`ll focus down and we`ll see if we can pinpoint a consistent jeweling advantage with a particular system.
Test Panel
Nissan hood, factory paint.
Conclusions
That`s going to be it for the intro, at this point I`ll jump on releasing updates on a regular basis in subsequent posts for some of the abrasives and LSP`s that I`m working with. The glossmeter has been a fun tool to work with, much more fun now that I believe I have a pretty firm grasp of how to decipher its results compared to when I just picked them up. The jump in gloss on a vehicle that hasn`t been polished is massive after you perform that multi-step polishing session, and this highlights perhaps the largest benefit in a real world situation for the glossmeter as a tool that you can present to a client. My hunt right now is to try and find any unicorn products that are giving an unusually large increase in readings on heavily polished paint, and to be honest I haven`t found this yet on this paint. I have found polishes that are consistently giving me marginally higher readings so I`ll post those results. Eventually I`ll get to sanding on another panel and I will really dive into aggressive compound testing and GU mining, but also test the impact of just how much the products can enhance the gloss when the paint is not already close to its maximum gloss limit.
Also, here`s a video I did that dives into the topic. This gives you a visual reference to some important gloss-based topics that I referenced above, so check it out let me know what you guys think, I appreciate your feedback:
Hopefully this will be a way that I can contribute to the board with a fun topic, I`ve always appreciated the knowledge I`ve soaked up from you guys over the many years I`ve been lurking. Stay tuned for the results that I`ll be posting as I get around to organizing it!
Results 61 to 75 of 95
Threaded View
-
02-10-2020, 10:45 PM #1


- Join Date
- Jun 2014
- Posts
- 271
- Post Thanks / Like

Comprehensive Gloss Measurement Thread - WaxMode Testing


 Reply With Quote
Thread Information
Users Browsing this Thread
There are currently 1 users browsing this thread. (0 members and 1 guests)
Similar Threads
-
Sio2 (hydro2 type) testing thread
By MattPersman in forum Car DetailingReplies: 25Last Post: 04-16-2017, 12:16 PM -
Adam`s H2O Guard and Gloss Durability Thread
By SYMAWD in forum Detailing Product ReviewsReplies: 12Last Post: 07-09-2015, 04:55 PM -
3 Machines, same pads, same compounds, gloss testing.
By JohnKleven in forum Machine Polishing & SandingReplies: 33Last Post: 11-30-2010, 09:01 AM -
Comprehensive Leather Care Thread
By imported_Megafast13 in forum Interior Car CareReplies: 36Last Post: 10-20-2010, 01:21 PM -
Medical Question (cholesterol measurement)
By Dave N in forum Hot TubReplies: 14Last Post: 12-18-2005, 04:21 PM
Bookmarks