

Did you know a detailed engine increases the resale value of your car?` It`s a well-known fact that people who take the time and effort to detail their engines also take better care of their cars.` Mechanics, too, realize that a clean engine belongs to someone who cares for his or her car, and they will take the time to do the repair or service work correctly.
Engine detailing is nothing more than cleaning the exterior of the engine and the engine compartment, and applying dressing to protect and beautify the engine.` It`s very easy to do, and requires no more than 45 minutes to an hour every couple of months.
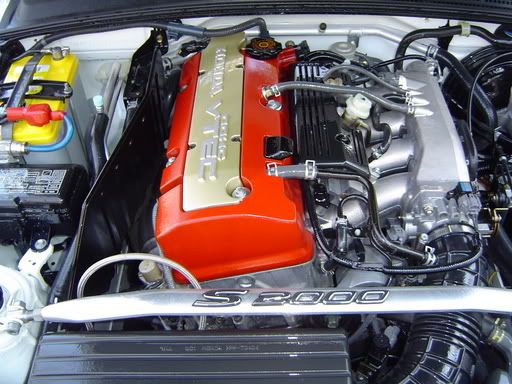
<table border="0" cellpadding="3" cellspacing="3" style="border-collapse: collapse" bordercolor="#111111" width="100%" bgcolor="#CCCCCC"><tr><td width="100%" valign="top" align="center">
</td></tr><tr><td width="100%" valign="top">A beautifully detailed engine, like this one, is crisp, sharp and neat.` This engine compartment is as tidy as the rest of the car.` The attention to detail is excellent, and it shows.</td></tr></table>
<h3>ENGINE DETAILING</h3>The first step in cleaning your engine is to remove the excess debris that gets trapped in your hood, grille and vent openings.` This is particularly true if you live in an area with four seasons.` If you have compressed air available, this is the best way to remove old leaves, dead cats and such.` If you don`t, a simple hand brush will suffice.
<table border="0" cellpadding="3" cellspacing="3" style="border-collapse: collapse" bordercolor="#111111" width="100%" bgcolor="#CCCCCC"><tr><td width="100%" valign="top" align="center">
</td></tr><tr><td width="100%" valign="top"> Notice the use of a rag on the intake of this 911 engine to protect from water flooding.</td></tr></table>
The next very important step is to prepare your engine for getting wet.` You must cover all sensors, the distributor, spark plug openings and any electrical devices that have the potential for water accumulation (which could cause a short).` Use plastic baggies to cover these items.` Be sure to use tape or rubber bands to hold the plastic bags in place.` You`re only trying to prevent the majority of the water from getting in; it does not need to be watertight.` The engine environment should already be waterproof.` The baggies are just a precaution.
To loosen the grease accumulated on your engine and the engine compartment, start your engine and allow it to warm for a few minutes.` The best temperature for cleaning your engine is warm to the touch, but not hot.` If you`re able to hold your hand to the engine without saying "Ouch," then the temperature is just about right.
<table border="0" cellpadding="3" cellspacing="3" style="border-collapse: collapse" bordercolor="#111111" width="100%" bgcolor="#CCCCCC"><tr><td width="100%" valign="top"><p align="center">
</td></tr><tr><td width="100%" valign="top"> Aluminum foil is an excellent wrap to protect engine components. This works for spray-cleaning, painting and washing. The aluminum foil is easily molded around parts to keep them masked.` Since the foil fits tightly, it doesn`t hamper your view or make it hard to get into tight spots.` It`s faster and cheaper to use than tape and fits around odd shapes better than rags or paper.` Tip and photo by Brad Bloomquist.</td></tr></table>
<h3>Applying Degreaser</h3> After warming the engine and protecting sensitive areas, you`re ready to apply your engine degreaser.` Although they are quick and easy, I warn people against the use of harsh petroleum-based cleaners in the engine compartment.` They quickly cut through grease and grime, but they also deteriorate your rubber and vinyl components (not to mention what they do to our environment!).` As an alternative, use a citrus- or water-based cleaner.` My` favorite is Autoglym Engine & Machine Cleaner.
<table border="0" cellpadding="3" cellspacing="3" style="border-collapse: collapse" bordercolor="#111111" width="100%" bgcolor="#CCCCCC"><tr><td width="100%" valign="top" align="center">
</td></tr><tr><td width="100%" valign="top"> Use a degreaser on the top side of your engine.` Good degreasers are strong enough to cut through the heavy grease and dirt, but some scrubbing is necessary to remove the remaining dirt film.</td></tr></table>
When applying your engine degreaser, it`s best to start from the lower areas and work your way up.` This prevents the degreaser from dripping on you as you clean the underside areas.` One important thing to remember: the engine degreaser will remove the wax from the painted surfaces of your car.` If you get degreaser overspray on your fenders, plan on re-waxing these areas.
When you have applied your engine degreaser, be sure to wash any excess cleaner from the exterior painted surfaces of the fenders, hood and grille.` I like to spray these areas with water first.
Depending on the amount of accumulated grease, allow the degreaser to soak on the engine for 3 to 5 minutes.` Do not allow the degreaser to dry on your engine.` For light to mild levels of grease, you will not need to use a brush on the engine and other surfaces.` For heavy soil, you can use a long-handled brush (parts brush) and car wash solution to provide additional cleaning action prior to hosing off the degreaser.
<table border="0" cellpadding="3" cellspacing="3" style="border-collapse: collapse" bordercolor="#111111" width="100%" bgcolor="#CCCCCC"><tr><td width="100%" valign="top" align="center">
</td></tr><tr><td width="100%" valign="top"> Use a soft parts cleaning brush get into cracks and around parts.` If your engine compartment has a heavy accumulation of dirt, you may need to spray with cleaner, brush, and rinse several times.</td></tr><tr><td width="100%" valign="top" align="center">
</td></tr><tr><td width="100%" valign="top"> An old toothbrush works great in tight areas that other brushes can`t reach. </td></tr></table>
<h3>Hosing Off</h3> When you are ready to remove the degreaser, hose down the entire engine compartment and surrounding surfaces with plenty of water.` If you`re using a high-pressure nozzle, be careful that you don`t get the nozzle too close to the covered electrical connectors.` Allow your engine to air dry for several minutes before using a towel to wipe down all accessible parts.` Remove the plastic bags.` The heat from the engine will assist in the drying process; however, do not allow the engine to air dry, as this will result in water spots.` When dry, start your engine and allow it to run for a few minutes.
<table border="0" cellpadding="3" cellspacing="3" style="border-collapse: collapse" bordercolor="#111111" width="100%" bgcolor="#CCCCCC"><tr><td width="100%" valign="top" align="center">
</td></tr><tr><td width="100%" valign="top"> Rinse with a stiff stream of water to remove as much of the grease and grime as possible.` Be sure to avoid electrical connections and other sensitive areas.` After rinsing, start the engine immediately.` Allow it to run for about 5 minutes to help dry things out.</td></tr><tr><td width="100%" valign="top" align="center">
</td></tr><tr><td width="100%" valign="top"> Here`s a handy tip for you.` After your final rinse use your vacuum (if it can blow forced air) or an air compressor to blow water off the engine for a spot-free finish.` This Vac B` Blow vacuum makes quick work of the job.</td></tr></table>
<h3>Protect & Beautify</h3> When everything is dry, and your engine has cooled, you should apply a coating of engine protectant.` If you don`t have an engine protectant, use your rubber and vinyl protectant to coat your hoses, wires, and plastic shields.` To add a quick shine and protection to the painted surfaces in the engine compartment, use a high-quality detailing spray.` Just spray it on all surfaces, and wipe off the excess with a clean terry cloth towel.
<table border="0" cellpadding="3" cellspacing="3" style="border-collapse: collapse" bordercolor="#111111" width="100%" bgcolor="#CCCCCC"><tr><td width="100%" valign="top" align="center">
</td></tr><tr><td width="100%" valign="top"> After drying the engine, spray all of the rubber hoses and plastic parts with a rubber and vinyl protectant, like Sonus Total Eclipse.` Wipe off excess protectant and buff to a nice satin finish.` NOTE: This is only short-term protection.` For long-term protection, you will need to apply a coating of Sonus Trim and Motor Kote (shown below) of the latest sealant product, Ultima Tire & Trim Guard Plus.` </td></tr></table>
Don`t underestimate the need to protect your engine after detailing.` The factory applies a heavy coating of high temperature wax that protects for several years.` When you remove this coating corrosion will begin.` One of the few products available to do a proper job is Sonus Trim and Motor Kote.` It is a spray on and walk away product.
<table border="0" cellpadding="3" cellspacing="3" style="border-collapse: collapse" bordercolor="#111111" width="100%" bgcolor="#CCCCCC"><tr><td width="100%" valign="top" align="center">
</td></tr><tr><td width="100%" valign="top"> Before using a product like Sonus Trim & Motor Kote mask off with plastic or large detailing towels.` This will help avoid a big clean up mess.</td></tr><tr><td width="100%" valign="top" align="center">
</td></tr><tr><td width="100%" valign="top"> Apply Motor Kote liberally.` Make sure it reaches every surface that received degreaser.` Use a damp sponge to dab up puddles.` Do not wipe!` Allow the product to dry.` A heavy coating is necessary for proper protection.</td></tr><tr><td width="100%" valign="top" align="center">
</td></tr><tr><td width="100%" valign="top"> Here`s the engine after just 30 minutes.` The Sonus Trim & Motor Kote is nearly dry and the finish is perfect.</td></tr></table>
<h3>CAR ENGINE DETAILING SUMMARY</h3>Many car enthusiasts find that detailing their engine is just the beginning of a long road toward engine beautification.` Other embellishments include polishing aluminum parts, painting key parts with bright colors, and adding chrome.` Whatever you choose, make it your style, and have fun.
Results 1 to 15 of 33
-
11-10-2006, 04:11 PM #1


- Join Date
- Mar 2009
- Posts
- 6,727
- Post Thanks / Like

-
10-22-2009, 01:48 PM #2
- Join Date
- Aug 2009
- Location
- Cincinnati
- Posts
- 1,254
- Post Thanks / Like
Great write up, thanks!
<span style="color:#000000;">jaison tortorea, ts</span><span style="color:#ff33cc;">|</span><span style="color:#000000;">s Detailing</span>
<span style="font-size:12px;">Cincinnati Car Detailing
Cincinnati Clear Bra</span></p>
<span style="font-size:12px;">Northern KY Car Detailing</span></p>
<span style="font-size:12px;">Northern KY Clear Bra</span>
-
11-02-2009, 07:57 PM #3
- Join Date
- Mar 2010
- Posts
- 476
- Post Thanks / Like
Very nice write up David B.:thx
-
12-01-2009, 11:01 AM #4
- Join Date
- Feb 2009
- Posts
- 2
- Post Thanks / Like
Such a great write up. Crucial to properly maintaining any car!
-
03-18-2010, 09:53 AM #5
- Join Date
- Jul 2009
- Posts
- 30
- Post Thanks / Like
Great write up.
Brian
Age: 21
2001 Mustang Bullitt
Color: True Blue (1 of 723 made)
Built rear-end and bolt on`s
-
03-18-2010, 10:23 AM #6

- Join Date
- Aug 2007
- Location
- Willow Grove Pa
- Posts
- 2,117
- Post Thanks / Like
Thanks David. Very good write up.
-
03-18-2010, 11:50 AM #7
- Join Date
- Nov 2009
- Posts
- 442
- Post Thanks / Like
Seems like a life time ago but when I was in a mechanics shop we steamed every engine that we worked on. Customers loved it.
-
03-19-2010, 08:47 AM #8
- Join Date
- Dec 2009
- Posts
- 27
- Post Thanks / Like
Very good write up! Taught me alot!
Thanks
-
05-05-2010, 12:08 PM #9
- Join Date
- May 2010
- Posts
- 16
- Post Thanks / Like
oh wow... jeez i dont have the balls to just hose my engine like that lol
as you can see too many exposed wires... or am i just paranoid lol?
-
05-05-2010, 08:12 PM #10
- Join Date
- Mar 2008
- Location
- whittier
- Posts
- 618
- Post Thanks / Like
i dunno, i havent done many engines. most people around here dont car and i dont want to deal with the hazards of oils, chemicals and such hitting the ground. i have done some engine details but seems like at least 2 years ago.
i do have some one who is booking for next week that wants it done. i`m a little concerned about getting water in an electrical connection or part. probably use foil for the alternator and other big electrical things. some one said the engine should be running to help avoid problems. is that something others do or is that an urban detailing myth?
-
05-06-2010, 11:17 AM #11

- Join Date
- Sep 2002
- Location
- NE Ohio
- Posts
- 86,984
- Post Thanks / Like
 Originally Posted by advs1
I guess different engines call for different approaches, and that there are a whole lot of "gee, it just depends.." factors. But here`s my take:
Most stuff isn`t all that water sensitive, and many (most?) of the things that *are* sensitive are OK once they dry out again. E.g., I don`t worry about alternators but I don`t blast `em with the hose either.
COVER or otherwise protect Coil-On-Plug/distributor/ECU stuff. Don`t get that kind of thing wet. I guess "if in doubt, cover it" would be good advice. It sounds to me like you`re gonna be sufficiently paranoid that you`re unlikely to get into much trouble...bet you cover stuff that doesn`t need it, along with stuff that does Nothing wrong with that!
You can clean a lot of things without any water at all if you use a solvent, but don`t catch things on fire with brake cleaner either (happened to an Autopian a few years back).
Steamers are nice as they don`t get stuff as wet as regular water.
NO WAY I`d work on one that`s running. It`d throw stuff everywhere and with belts/fans/stuff moving around it`d be too easy to loose a finger if you got careless.
-
05-06-2010, 05:07 PM #12
- Join Date
- Aug 2002
- Location
- Franklin MA
- Posts
- 90
- Post Thanks / Like
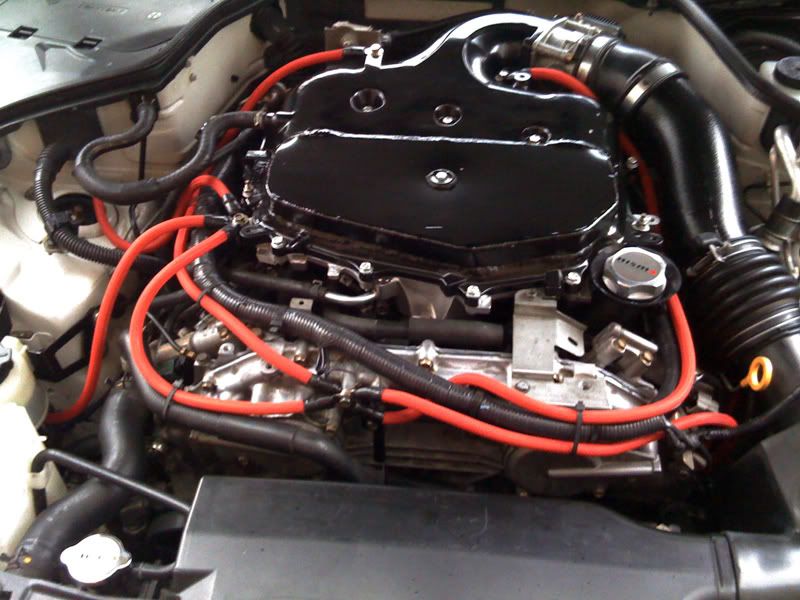
looks sharp - here`s my how to
PLEASE NOTE ENGINE SHOULD NOT BE HOT WHILE CLEANING
Tools needed
1) old towel
2) a hose
3) one SOFT brush
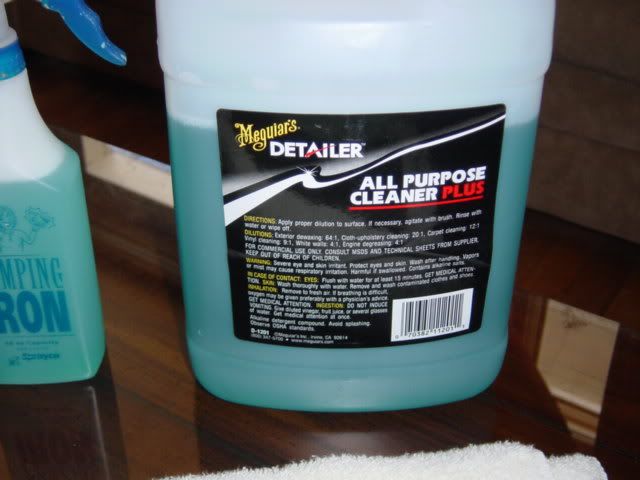
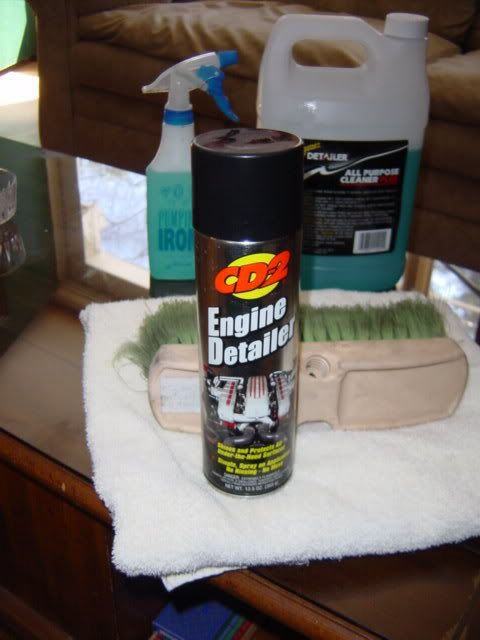
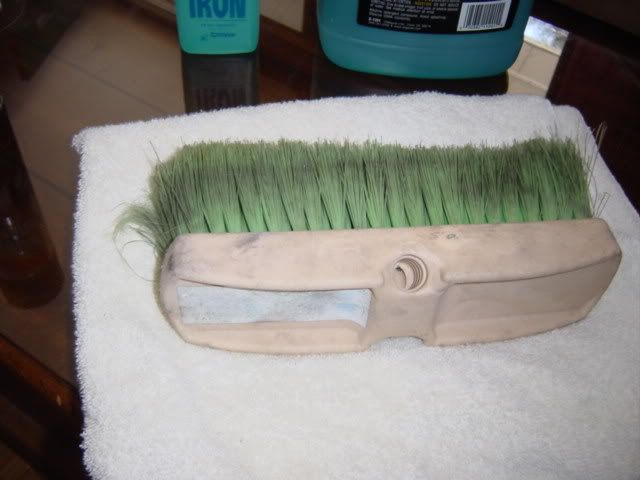
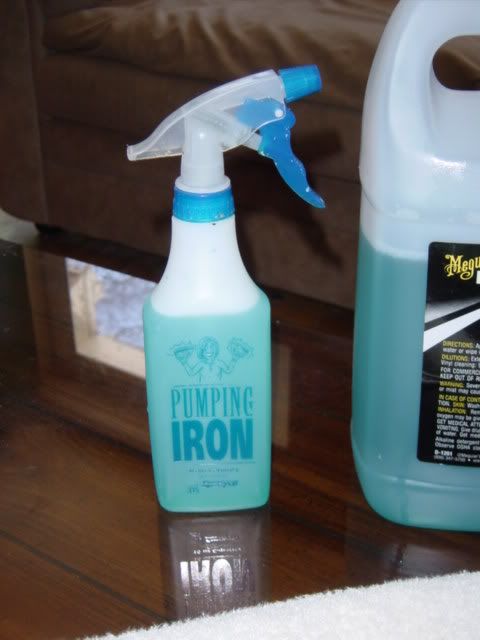
here are the products i use
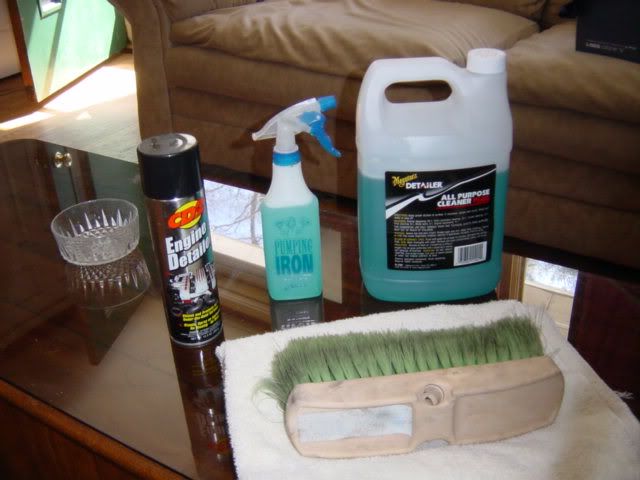
here is a picture of the cleaner i use
a picture of the Engine Dressing - CD2 (can be found at AutoZone)
a picture of the soft brush i use
start by mixing 50/50 water and APC in a spray bottle
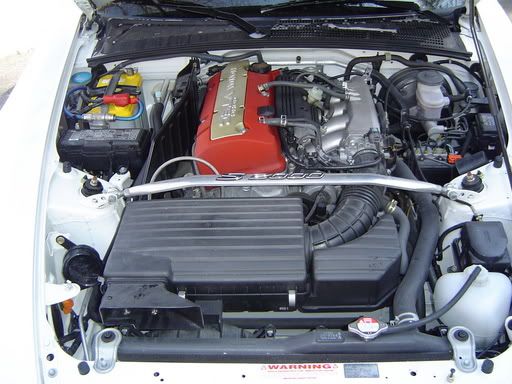
ok time to open your hood (before pic)
next please note where your alternator is - you do not want to blast this with water
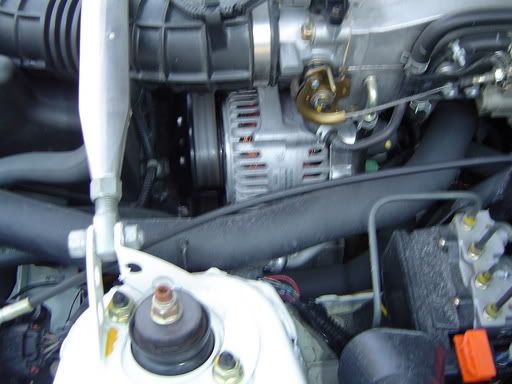
now take your spray bottle mixed with 50/50 APC and water and soak all the parts you wish to clean (not the alternator) - -
One Note - APC will remove wax so take care not to spray your fenders or nose
next take your SOFT brush and agitate the areas where you sprayed
wait a minute or two
and then use a garden hose to remove the cleaner and the grime (make sure the hose is not at full force but rather very low pressure)
and then take an old towel and dry of the excess water
now you can spray CD-2 engine dressing over everything (i use a good coating)
[PHOTO=215954]
wait ten minutes - (top speed up the drying process you can start the engine and close the hood for a few minutes )
[PHOTO=215957]
if you have excess engine detail - simply take a rag and wipe the excess off
-
05-07-2010, 09:04 AM #13
- Join Date
- Jul 2003
- Location
- Fairfax, VA
- Posts
- 92
- Post Thanks / Like
Thanks for the great write up!
I don`t have any fear hosing off my Jaguar engine bay, but the Merc is a different story. I got the car pre-owned last winter and will be doing the full detail this week. The engine bay is in "ok" shape, and I can tackle that easily. However, the engine itself is very dusty (for lack of better words). It`s wire galore though...so it`ll be fun covering them all. I`ll post my work when I get it done.2007 Silver Mercedes-Benz ML350
2006 Ebony Jaguar X-Type Sport
-
07-09-2010, 11:51 AM #14
- Join Date
- Jul 2010
- Location
- Millersburg, OH
- Posts
- 6
- Post Thanks / Like
A product I use for degreasing is Simple Green. It works well with a little bit of elbow grease, can be bought buy the gallon at numerous stores (WalMart, TSC), pretty cheap and it`s actually a household product so it`s very mild to work with.
Like Accumulator said watch out for COP (coil-on-plugs). Many times they are over looked and there is no a good way to seal them. Most will hold up to some water as long as it not to much pressure. Ford Modular engines COPs seem to like to suck in water so be a little more careful with them.
If you do happen to get water in a COP the best thing to do is remove it and blow the plug hole out with compressed air and remove the boot from the coil (if possible) and let everything dry. Reassembly with dielectric grease in the boot.
-
07-09-2010, 12:08 PM #15
- Join Date
- Sep 2002
- Location
- NE Ohio
- Posts
- 86,984
- Post Thanks / Like
Originally Posted by Monster-4
Yeah, it`s my newly-acquired 4.6-powered car that has me concerned about such stuff
Welcome to Autopia, Monster-4!

 Reply With Quote
Thread Information
Users Browsing this Thread
There are currently 1 users browsing this thread. (0 members and 1 guests)
Similar Threads
-
Autopia Guide to Detailing: Detailing Automotive Glass & Plastic
By Bobby G in forum Guide to DetailingReplies: 2Last Post: 03-15-2011, 05:57 PM -
Autopia Guide to Detailing: Introduction to Detailing
By Bobby G in forum Guide to DetailingReplies: 3Last Post: 05-30-2010, 11:48 PM -
Hlp Pls- Password for the Autopia guide to detailing guide?
By frazman in forum Machine Polishing & SandingReplies: 4Last Post: 08-03-2006, 03:08 PM -
Autopia Guide to Detailing, V2.00
By goixiz in forum Car DetailingReplies: 0Last Post: 06-06-2003, 07:34 AM
Bookmarks