

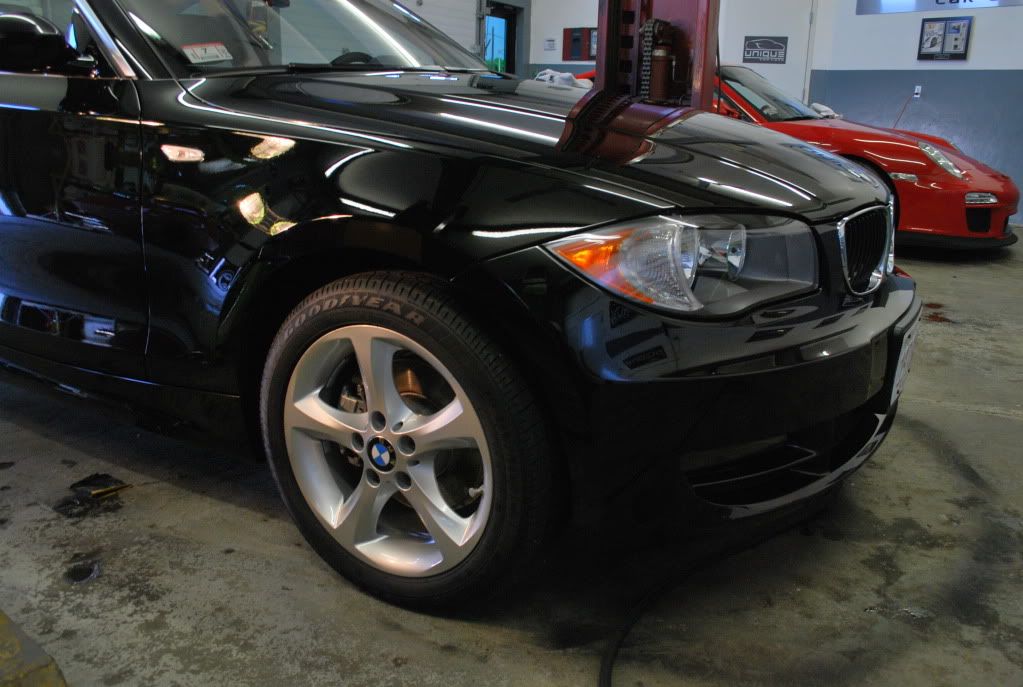
I received a call from the owner of this brand new BMW 128i about having the exterior detailed and discussed a good time to bring the car by so I could take a look at the condition of the paint. He was concerned about some hazing and holograms that were visible on the top surfaces and was afraid that it may have been from improper washing.
He stated that he had done lots of homework, researching what products to use and the correct way to wash and care for the car. He just couldnât understand why he was experiencing these problems, since there was only 250 miles on the car and he had only washed it twice. As soon as I looked at the paint, it was evident that the car had been improperly buffed, which left a considerable amount of holograms and buffer trails. He mentioned that when he took delivery of the car from the dealership, there was some water-spotting on the top surfaces, so he brought the car back in to have them fix the problem. Now it was starting to make sense that the dealership had caused what he was seeing and was not from improper washing.
It was evident that the dealership must have used an aggressive compound with a wool pad to remove the water spots and ended up buffing the entire exterior, leaving excessive micromarring, buffer trails, swirl marks, holograms, etc.. Instead of refining the finish further, they just applied a glaze to cover it up. Most glazes contain silicon oils, polymers, oils, etc. and will make the finish look perfect, when in reality it is not. Over a short period of time, the glaze begins to wash off and the true condition of the paint is revealed. I inspected the car carefully and gave the owner an estimate. We set up an appointment for the following week.
The car arrived in the same condition as the week before and I expected to have the car finished in a day or two. I was hoping to get away with doing nothing more than a 2-step polishing treatment to get the car back in âlike newâ condition. I have done lots of newer BMWâs and find them to have relatively hard paint, which I prefer, since softer paint can be finicky and difficult to correct at times.
Knowing that the dealer had applied some sort of glaze to the exterior, it was very important to strip all traces of it from the paint before any polishing took place. Most glazes contain silicon, which deeply embeds itself in the paint and can be very difficult to remove. I find it absolutely necessary to remove all traces of silicon from the paint in order to fully remove the defects. When there is silicon present on a paint finish, it acts as a lubricant and makes polishing near impossible. The silicon oils prevent the abrasives in the polish from cutting into the paint, which is necessary in order to correct the defects. As most of you know, a microscopic amount of clear coat is removed in order to level the paint when polishing. When there is silicon present on a finish that you are trying to correct, the buffing pad tends to âhydroplaneâ above the surface, not allowing the paint to be leveled.
I was expecting the car to look a little worse once I was done removing the glaze from the paint, but I had no idea what I was getting myself into!! I started by giving the exterior a normal wash, cleaned the wheels & tires and rinsed down the engine compartment. Next, I spent a good amount of time trying to strip the paint free of all silicon oils.
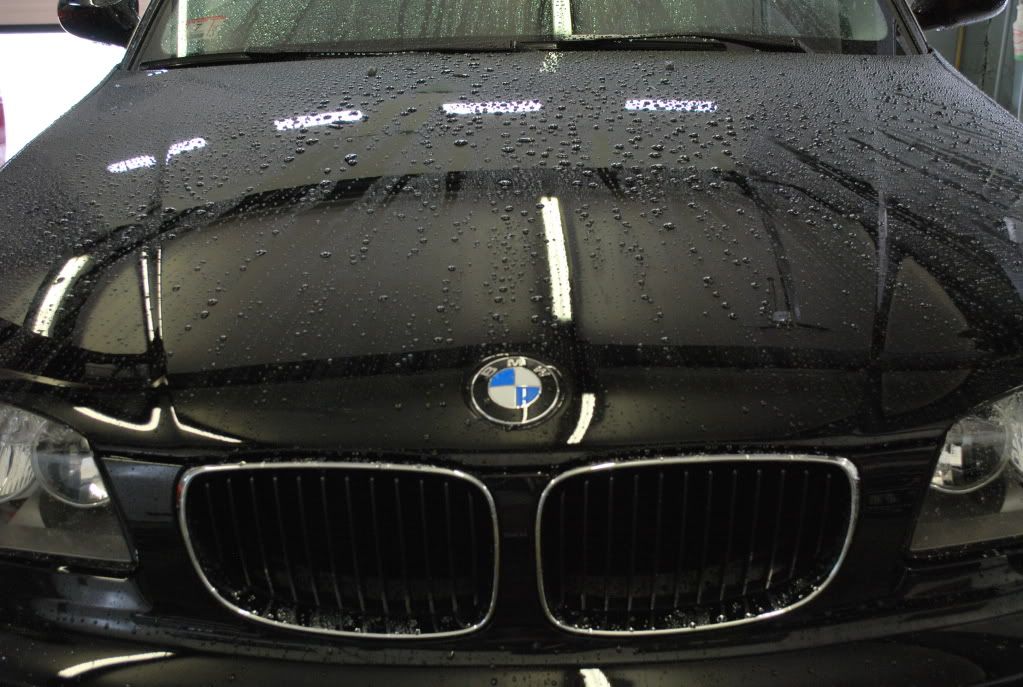
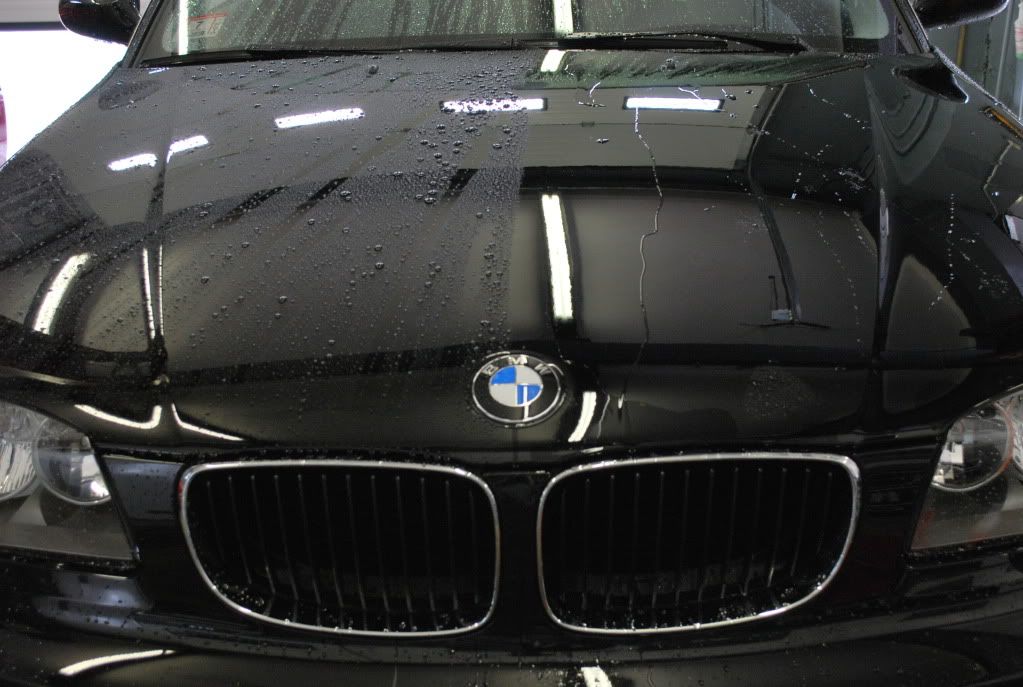
The picture below shows the paint beading the water heavily, meaning there is some sort of wax, sealant, glaze, quick detailer, etc. on the paint.
To strip the paint free of any previous products, I used some industrial strength degreaser at full strength by spraying it into a new microfiber towel and scrubbing each section for several minutes. Whatever product that was on the paint was very difficult to remove and took about 4 degreasing steps in order to remove it.
The picture below shows how the water is beading heavily on the side that was washed with regular cars soap (left) and how the water is sheeting off the side that has been degreased (right). The water sheeting is a pretty good indication that the paint is completely bare.
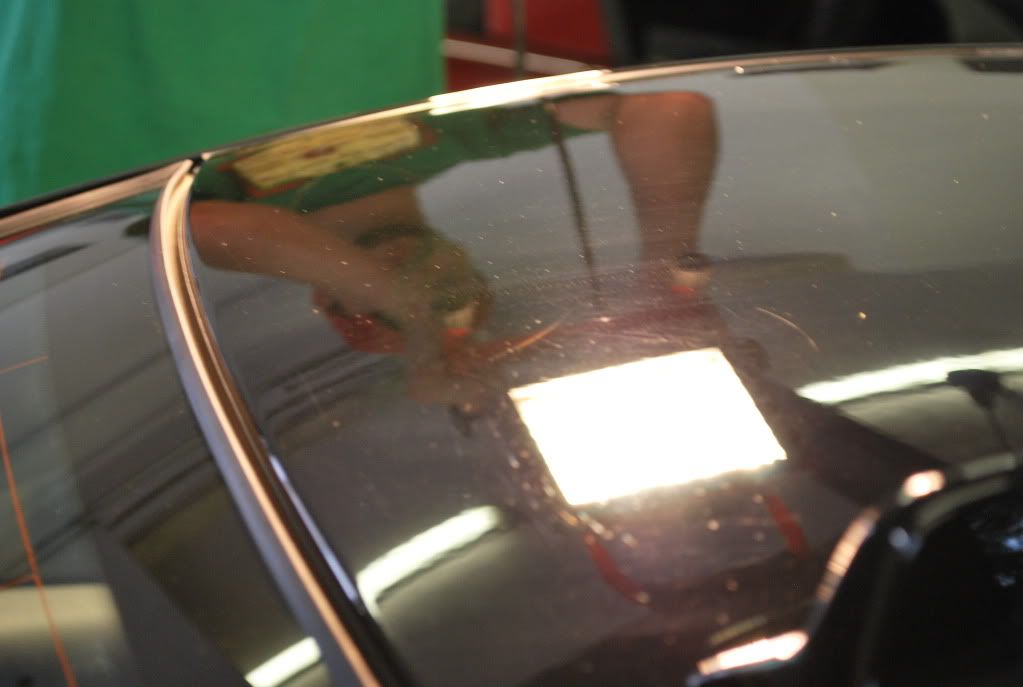
I continued to go around the car and degrease every panel until the entire car was no longer beading water. This step along took almost 4 hours, since the product did not come off easily. After completing the degreasing step, I gave the car another quick wash with regular car wash soap to remove any residue left behind from the degreaser. I dried the exterior using a microfiber drying towel, blew out all cracks & crevices with purged air and wiped all jambs clean with a fresh microfiber towel. Once dry, I masked off all areas that could be stained or damaged from the buffer and gave the exterior a quick alcohol wipedown to ensure a perfect surface for polishing.
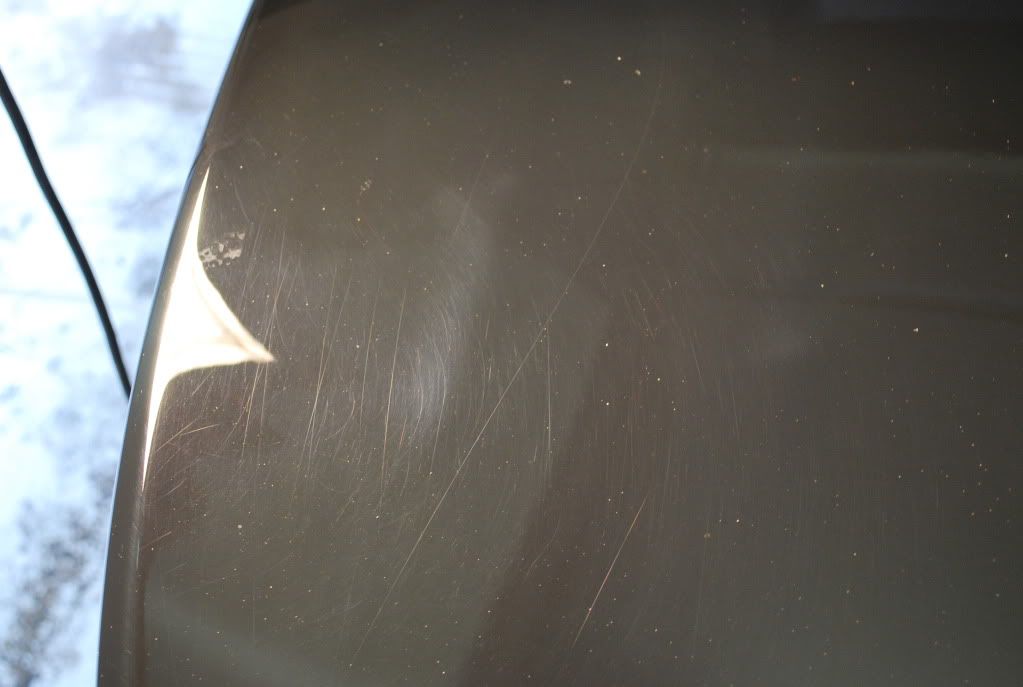
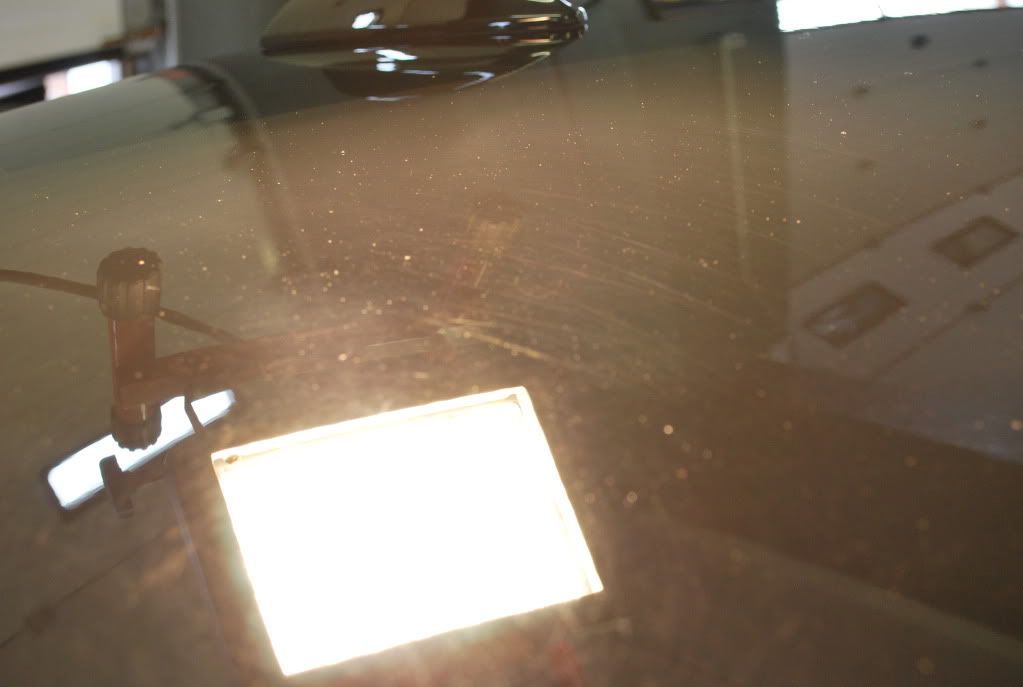
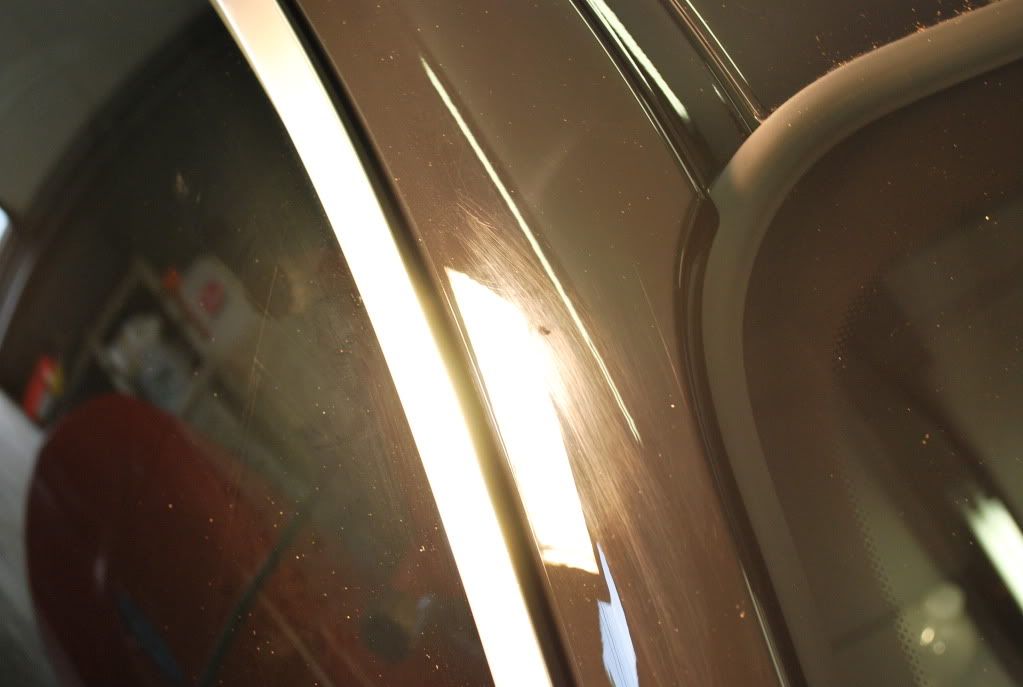
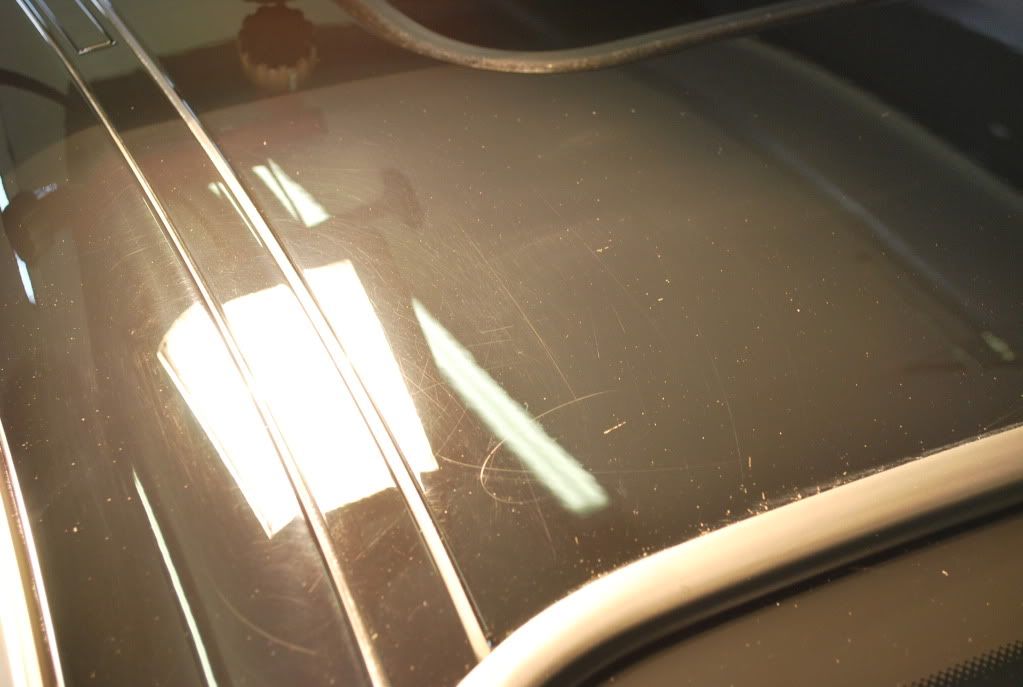
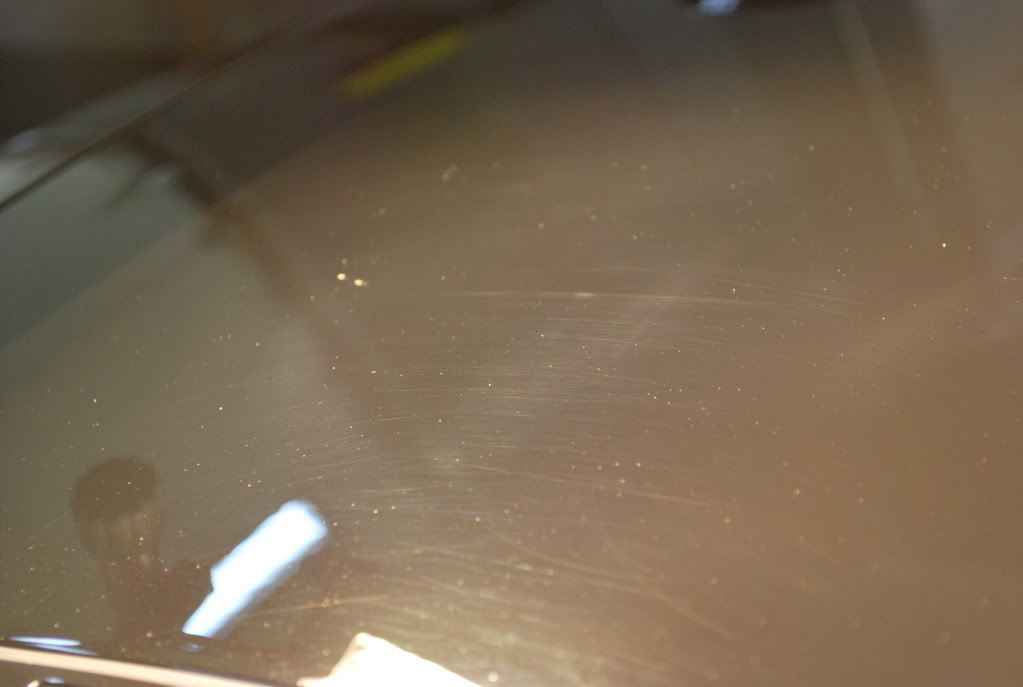
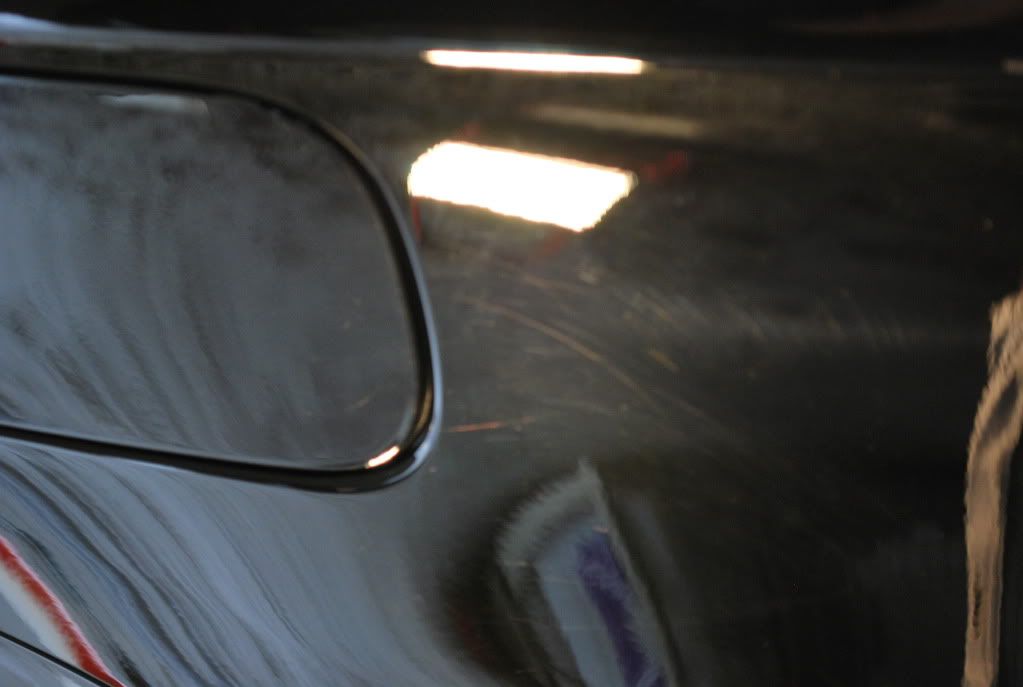
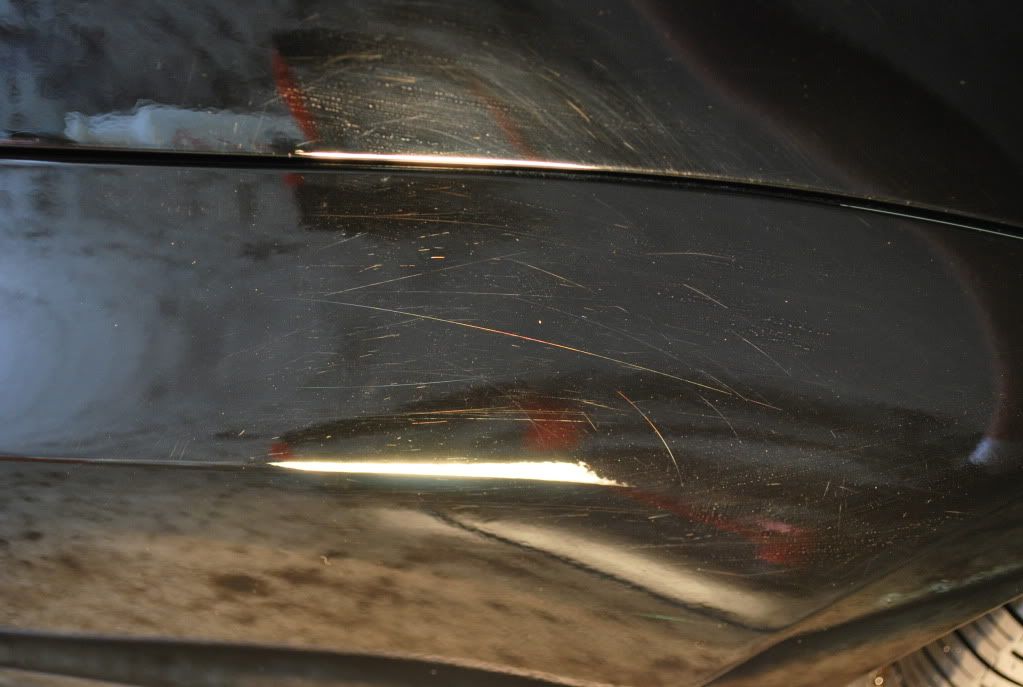
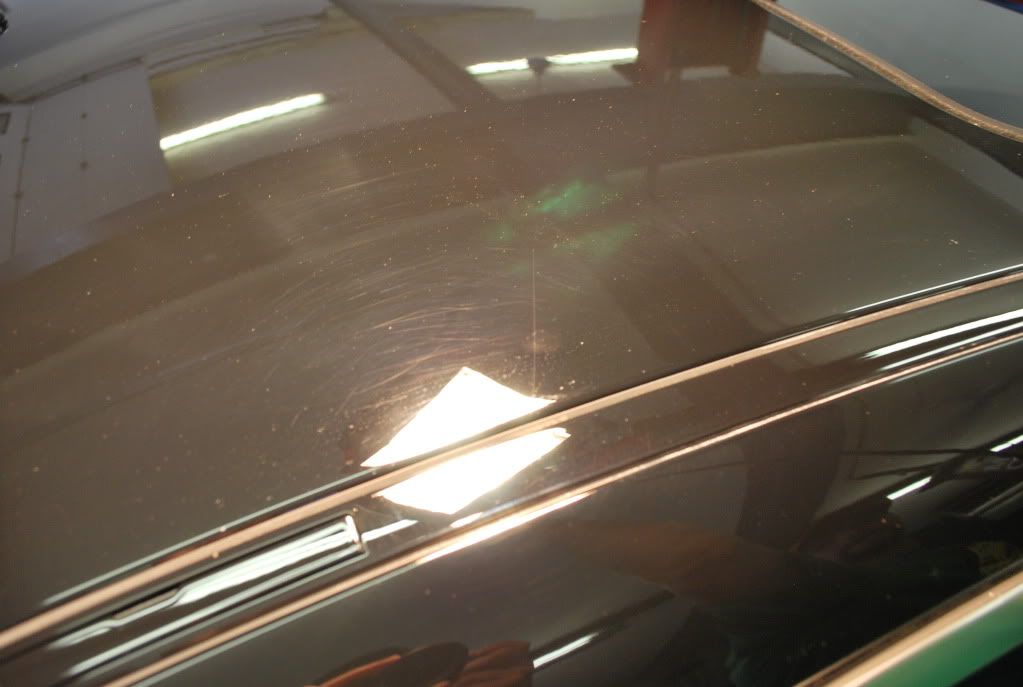
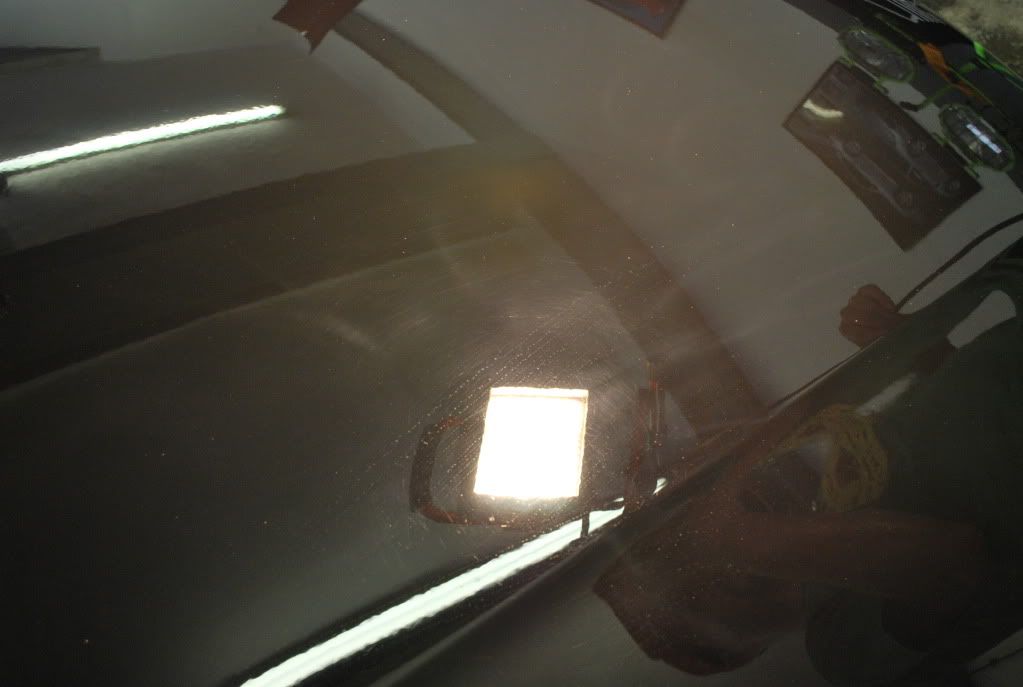
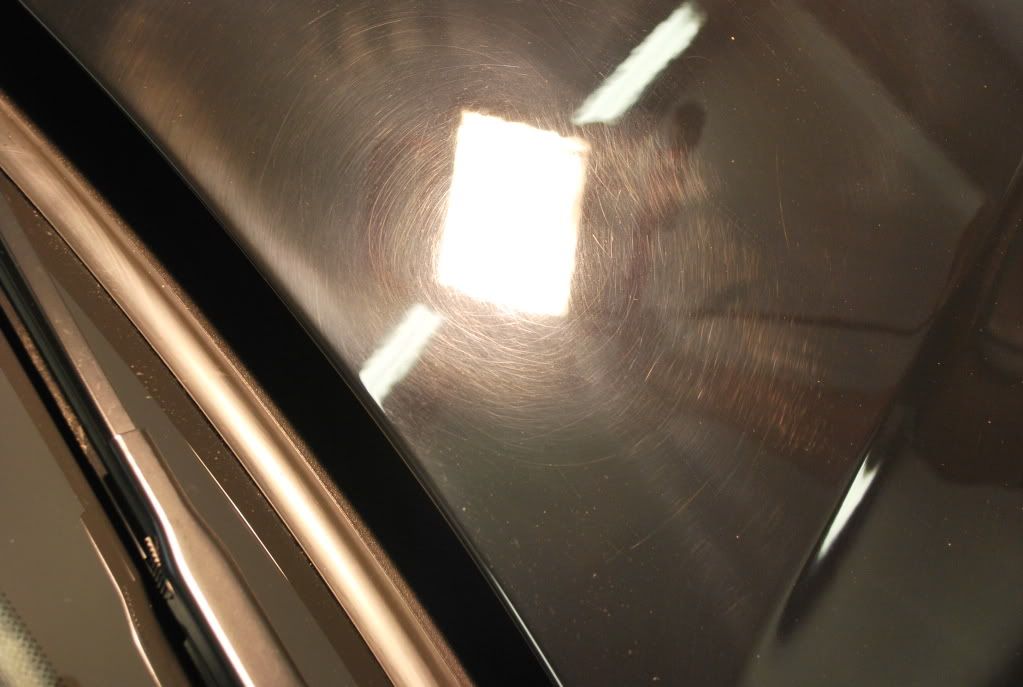
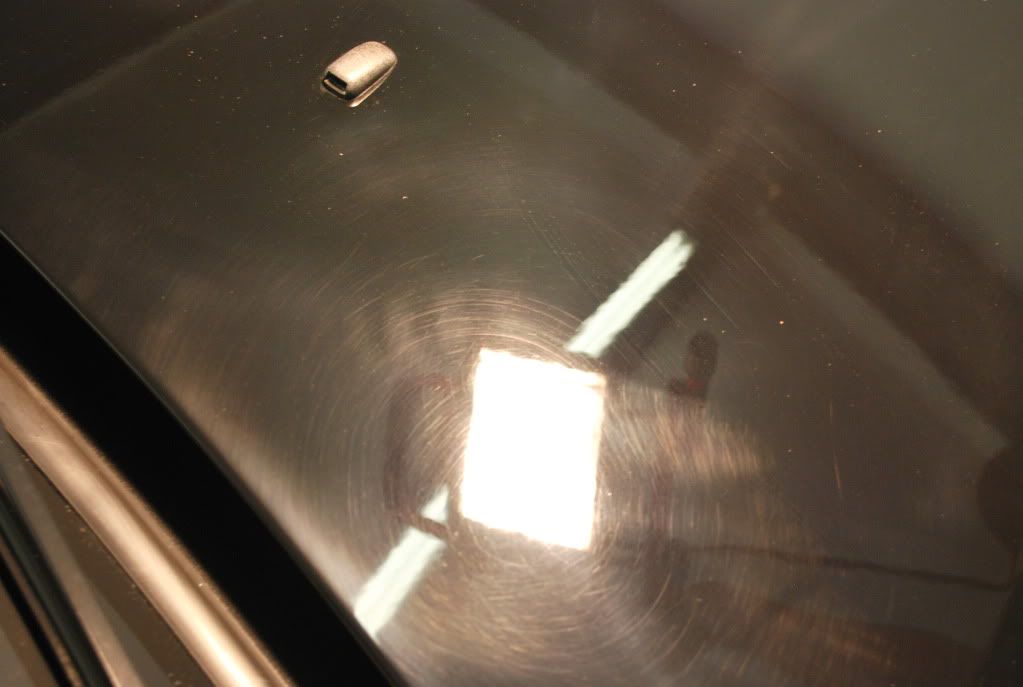
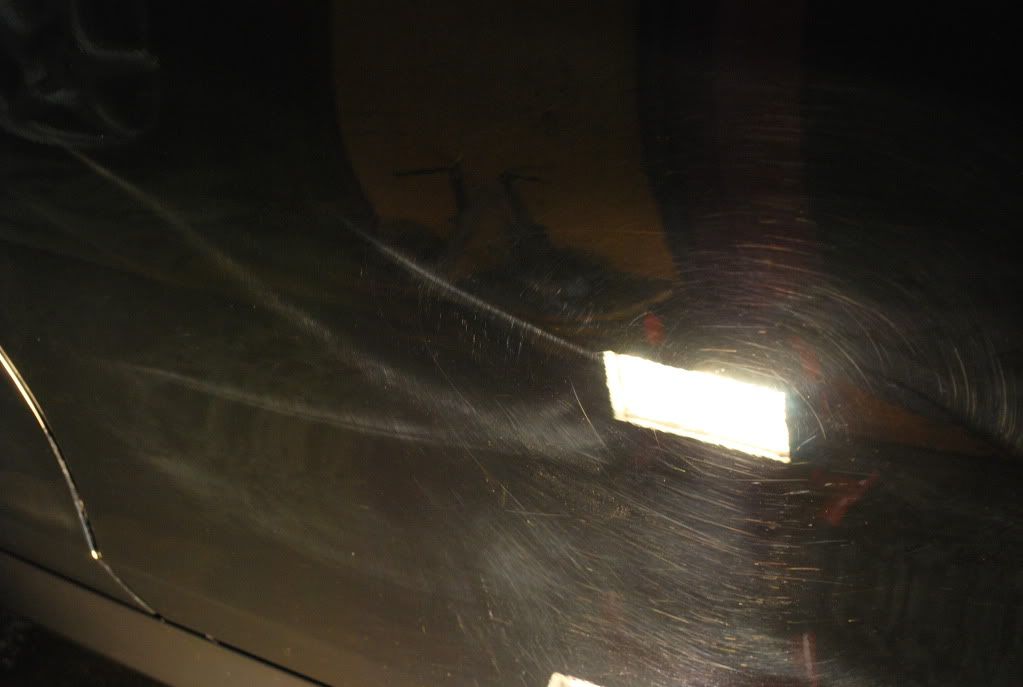
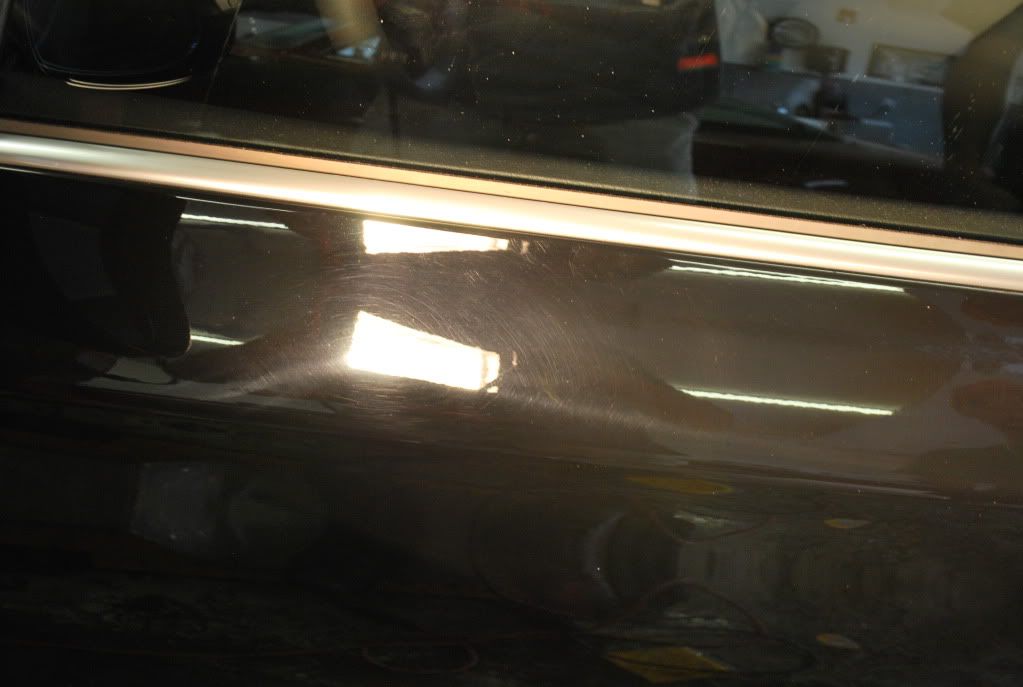
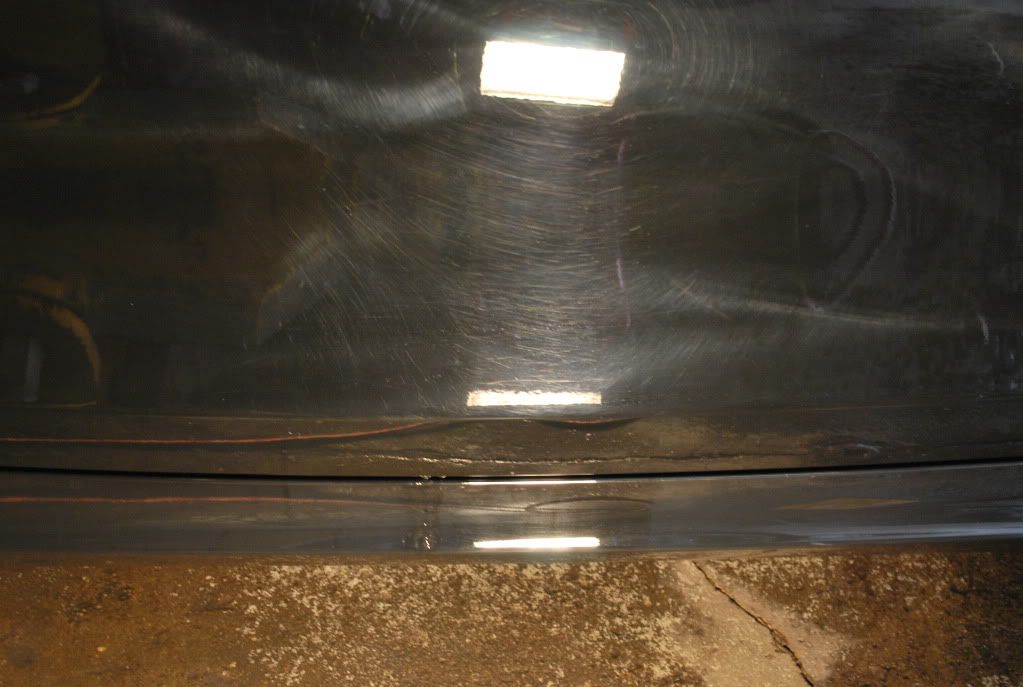
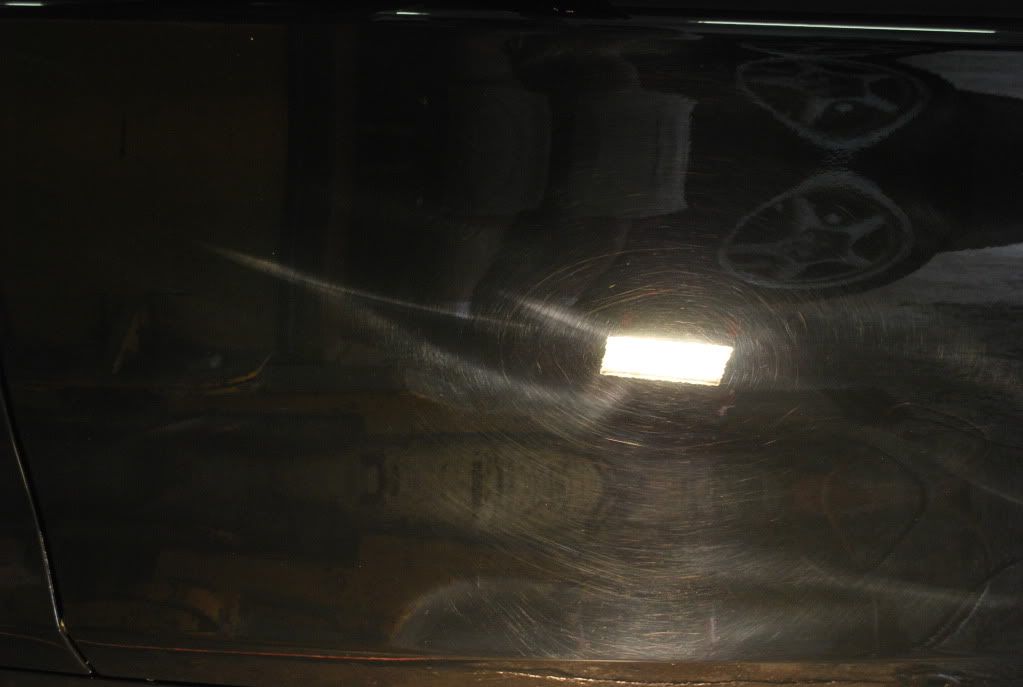
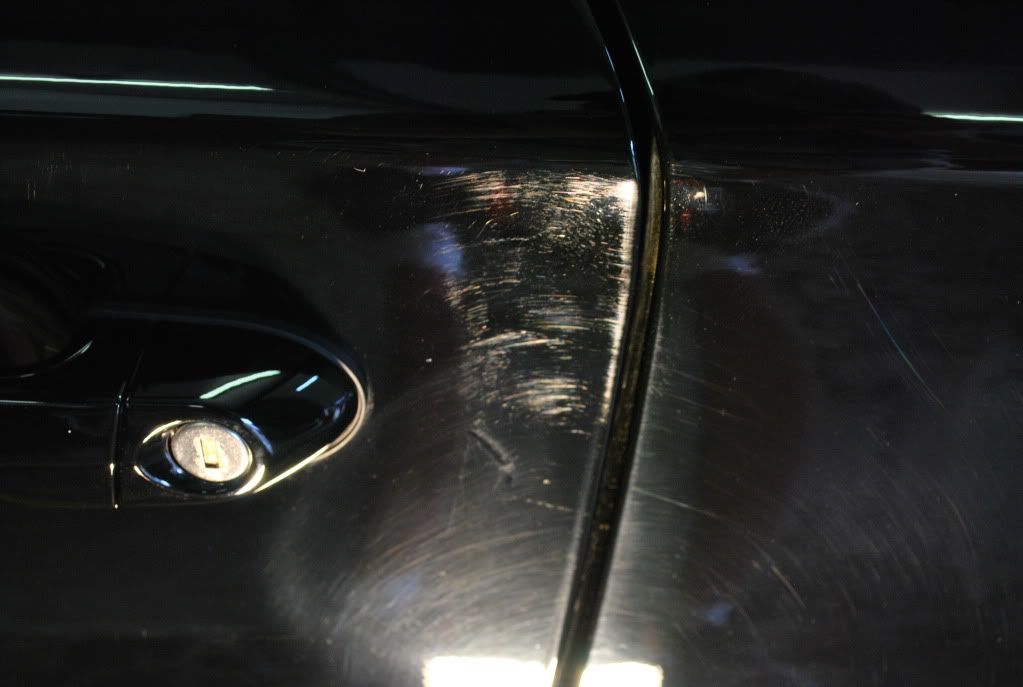
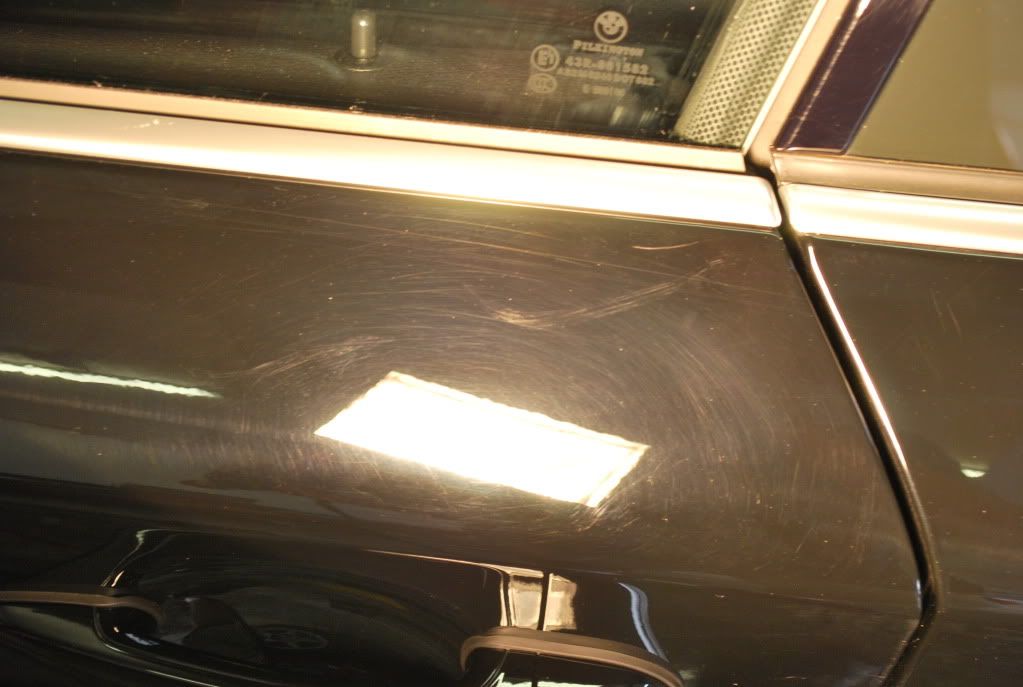
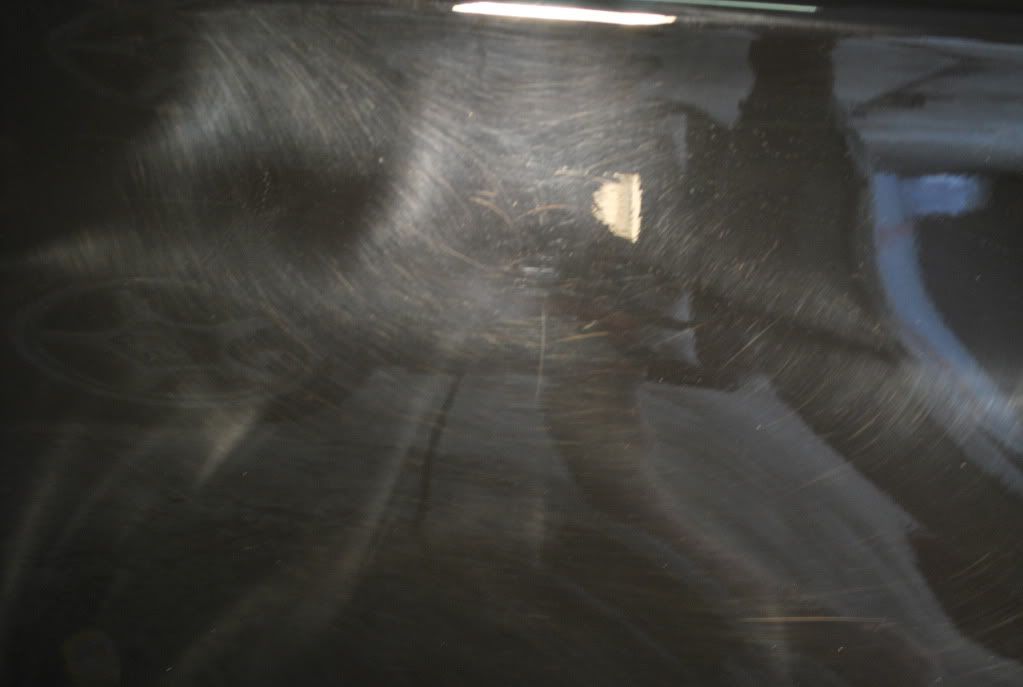
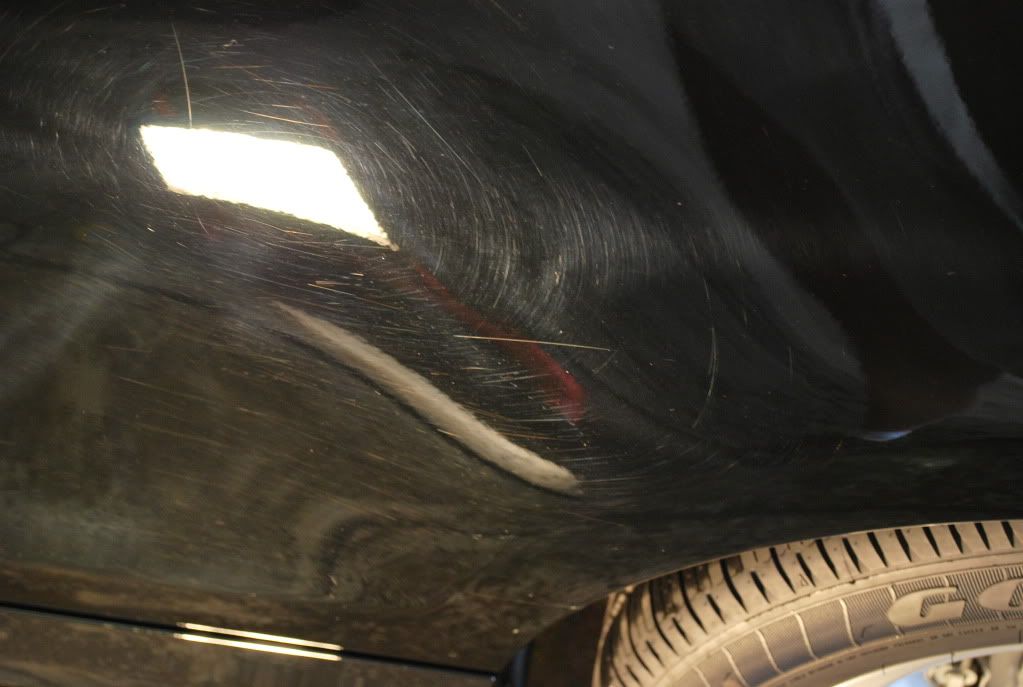
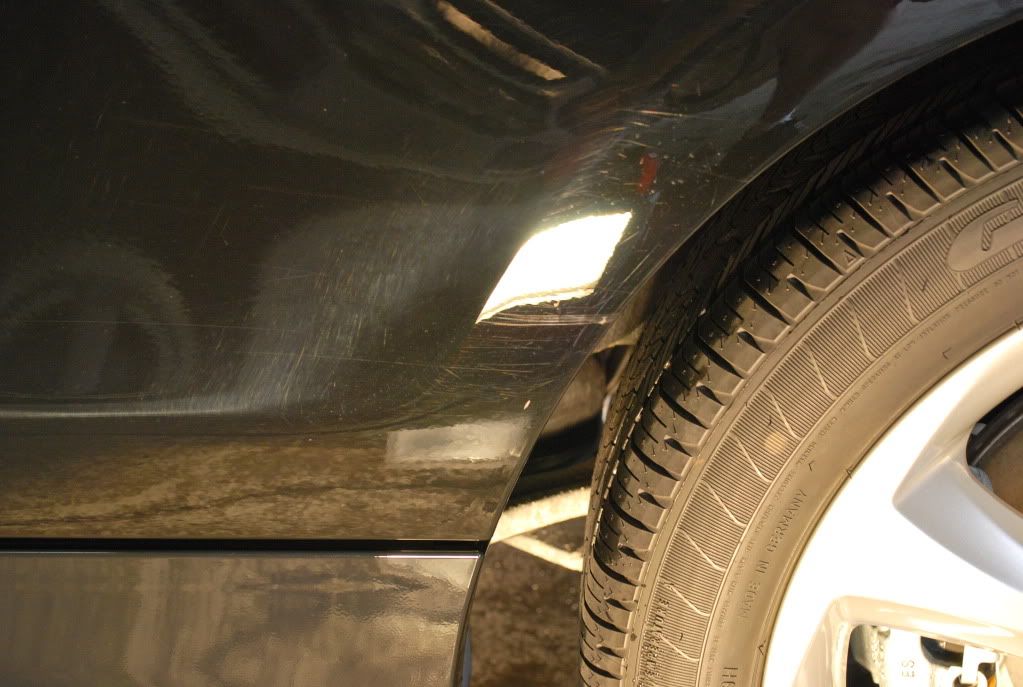
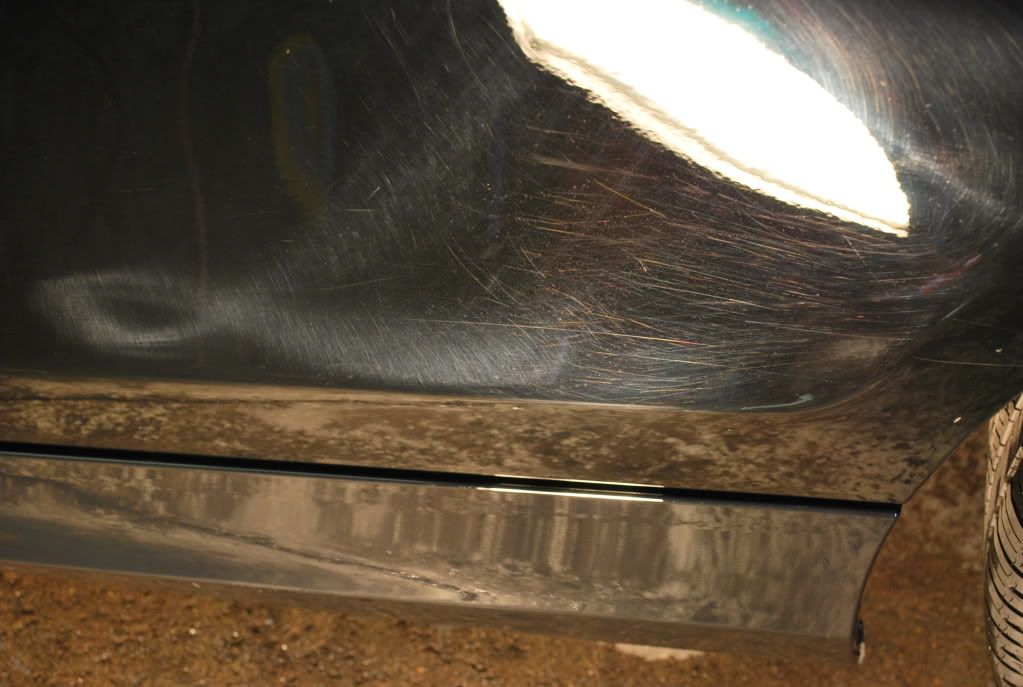
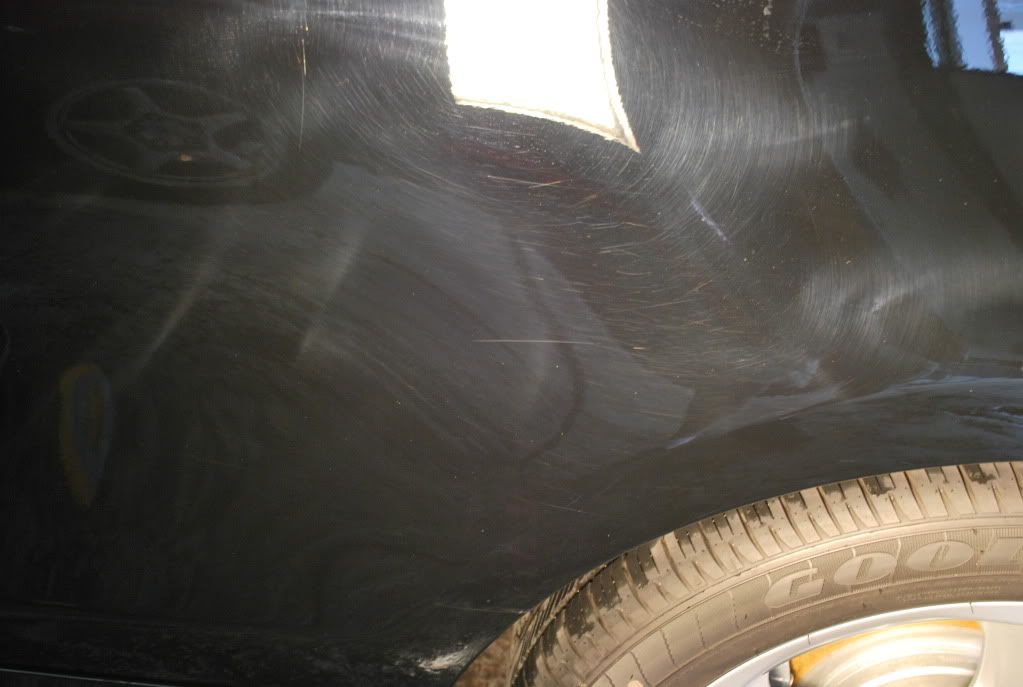
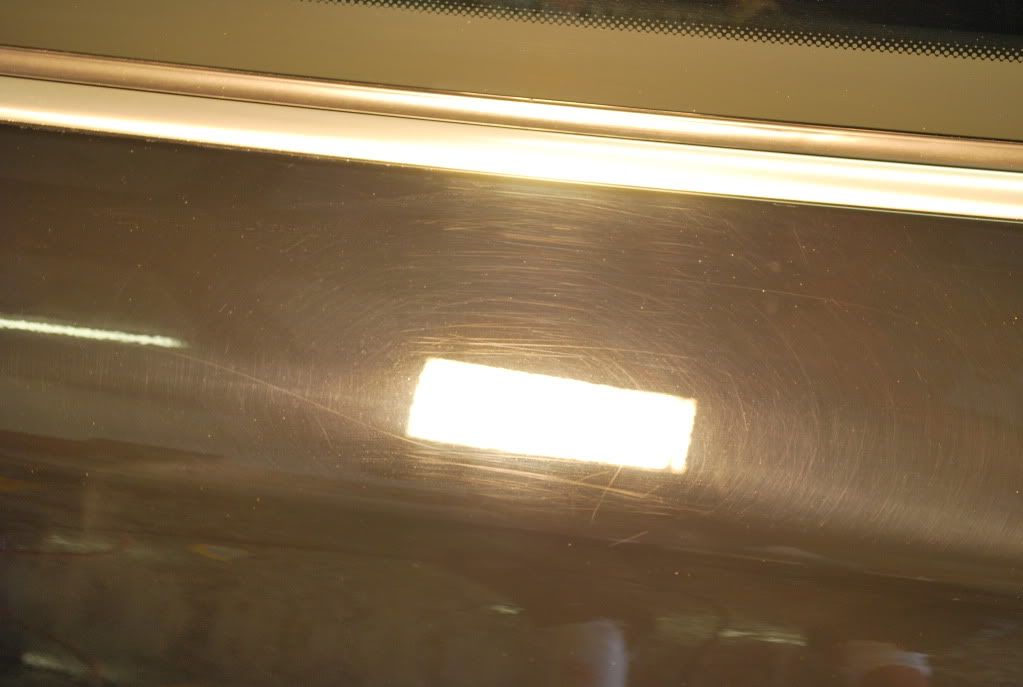
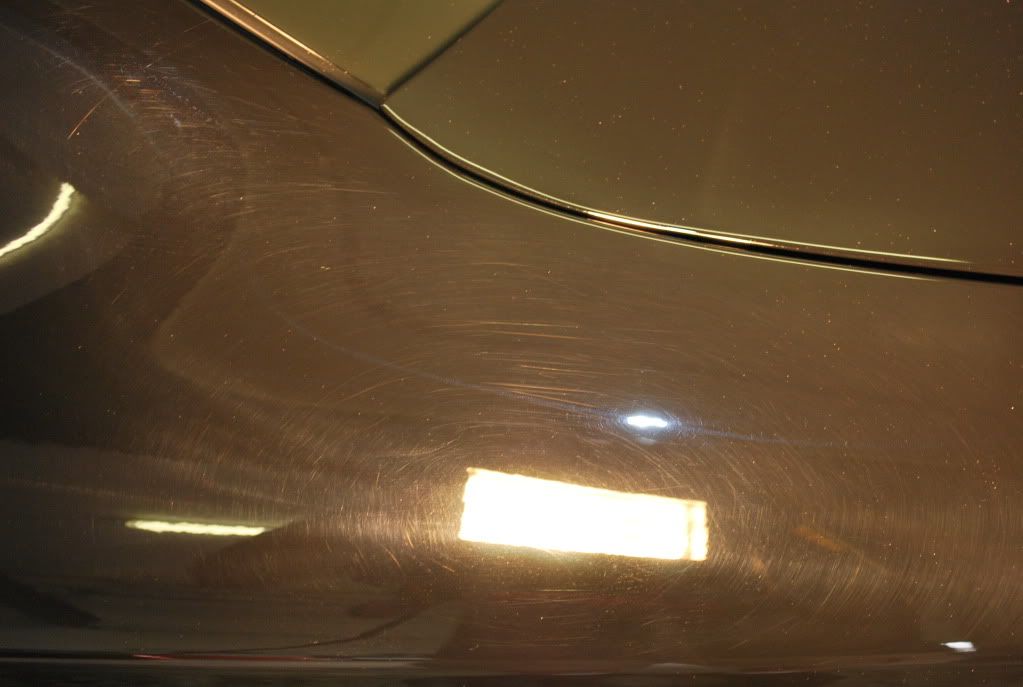
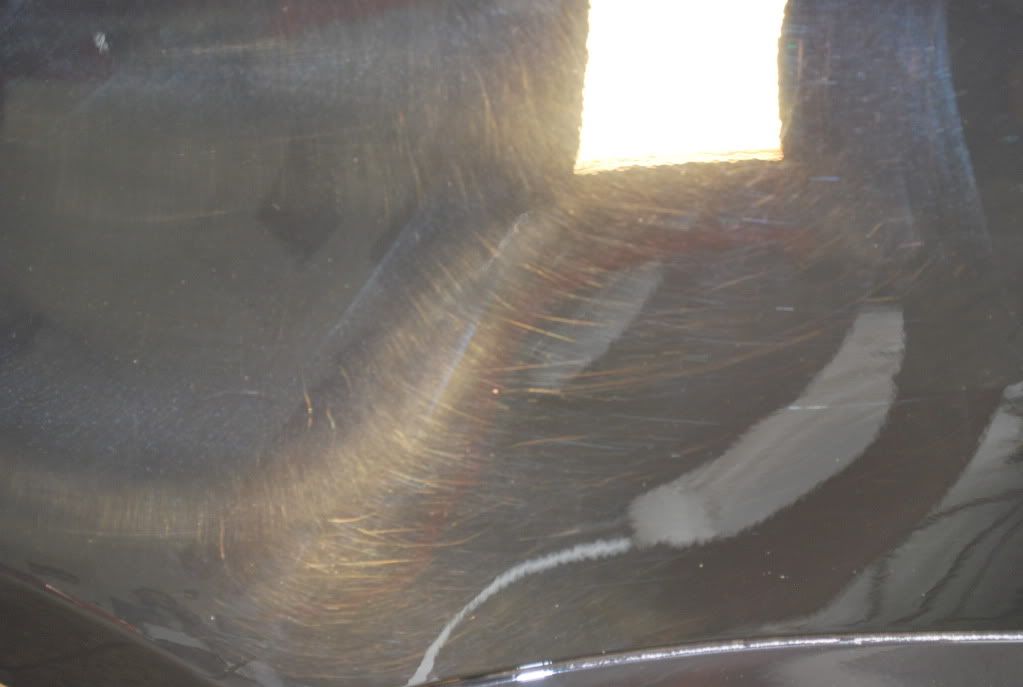
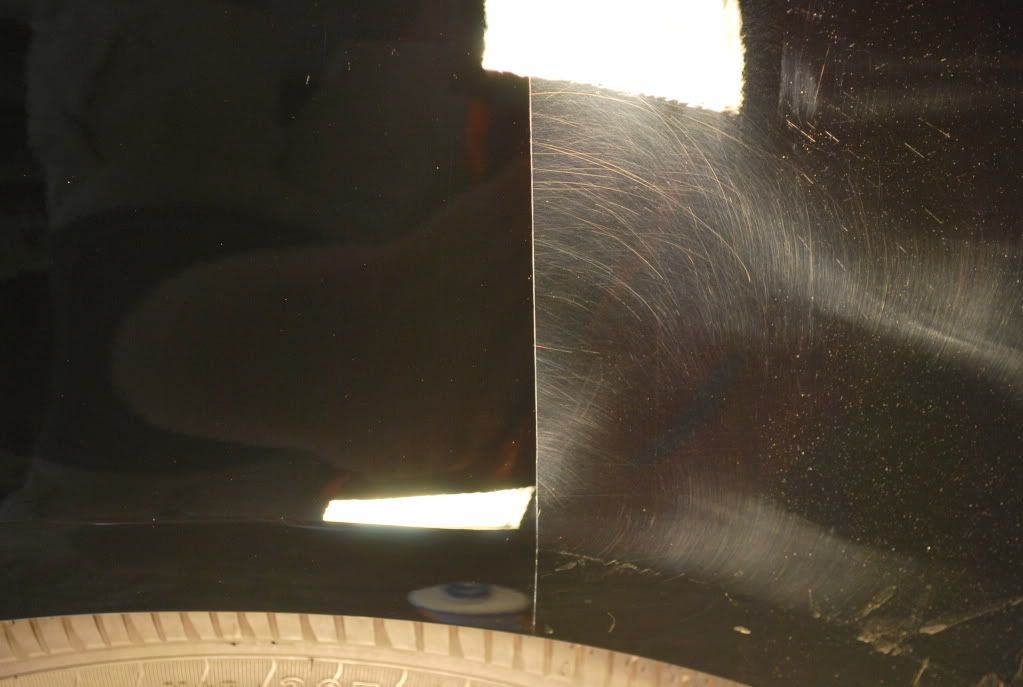
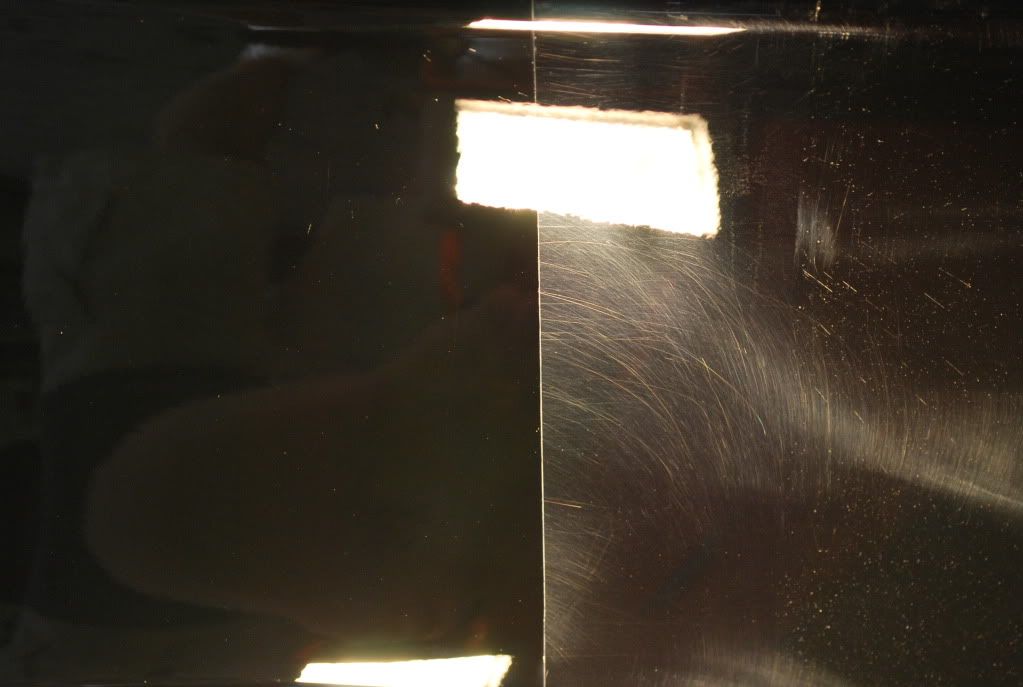
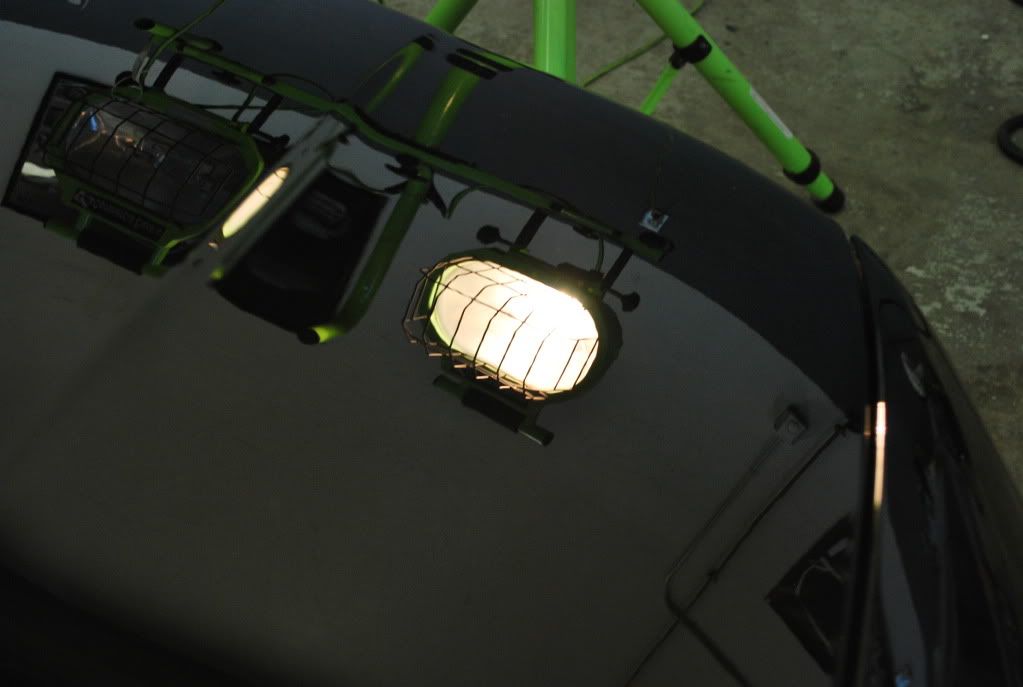
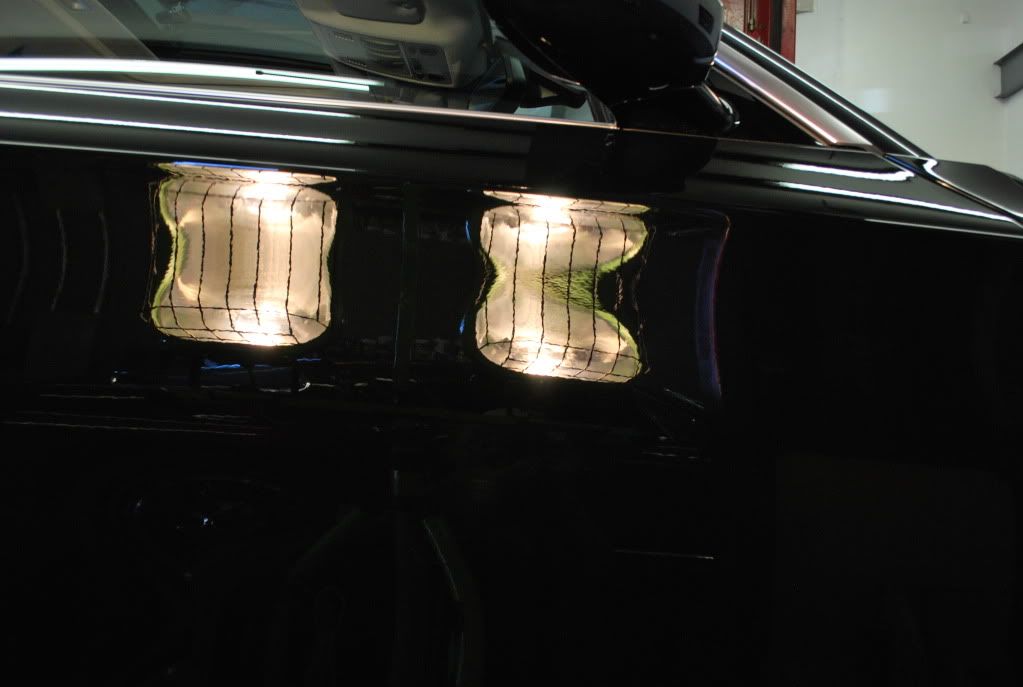
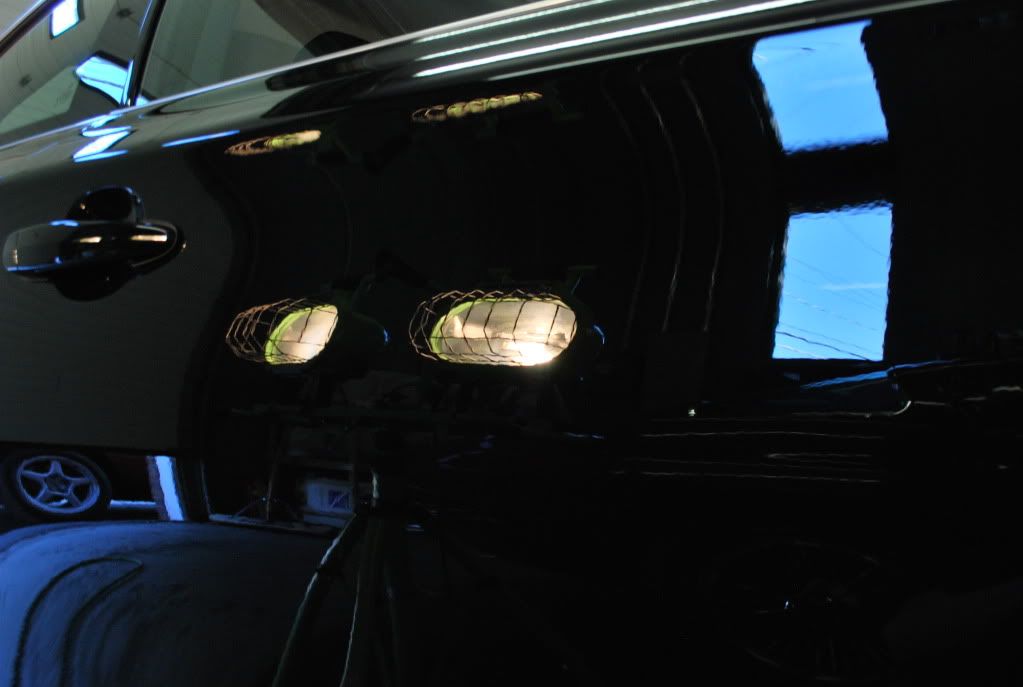
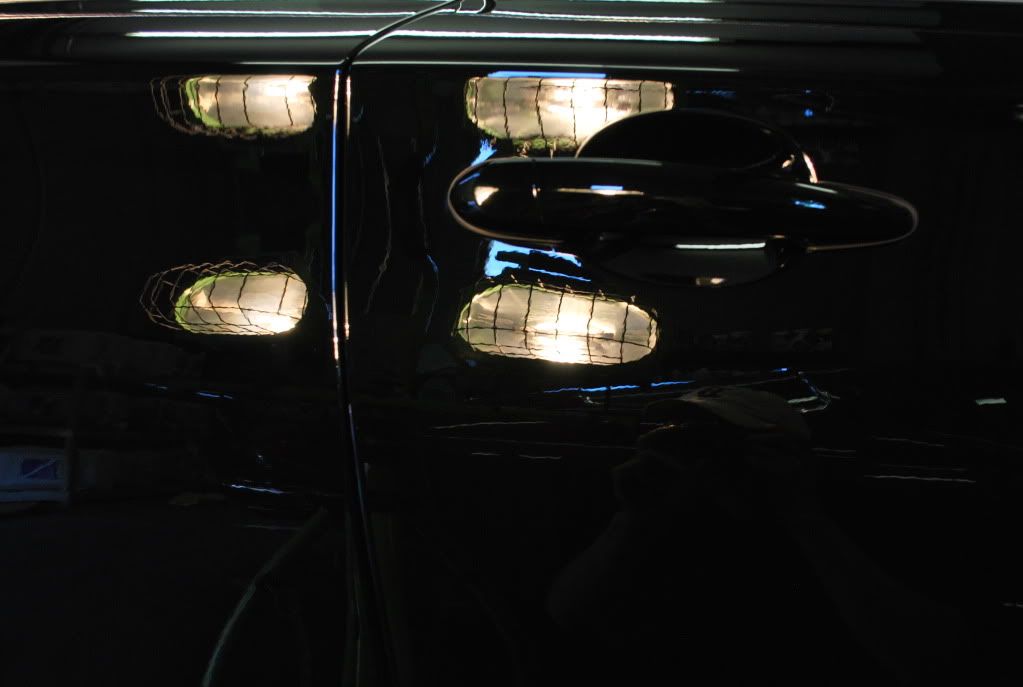
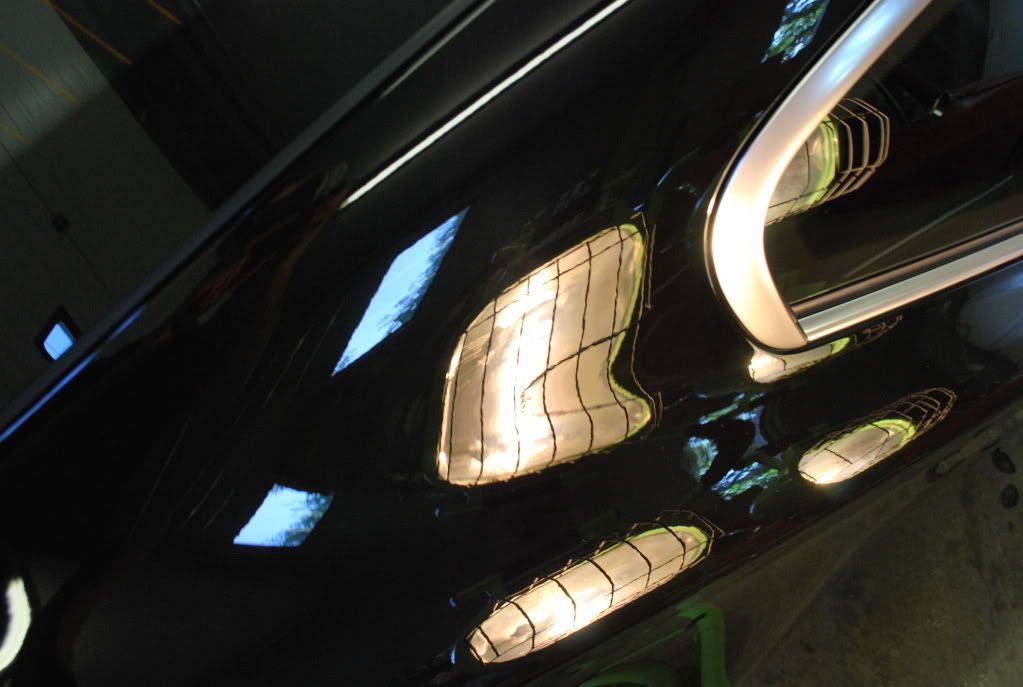
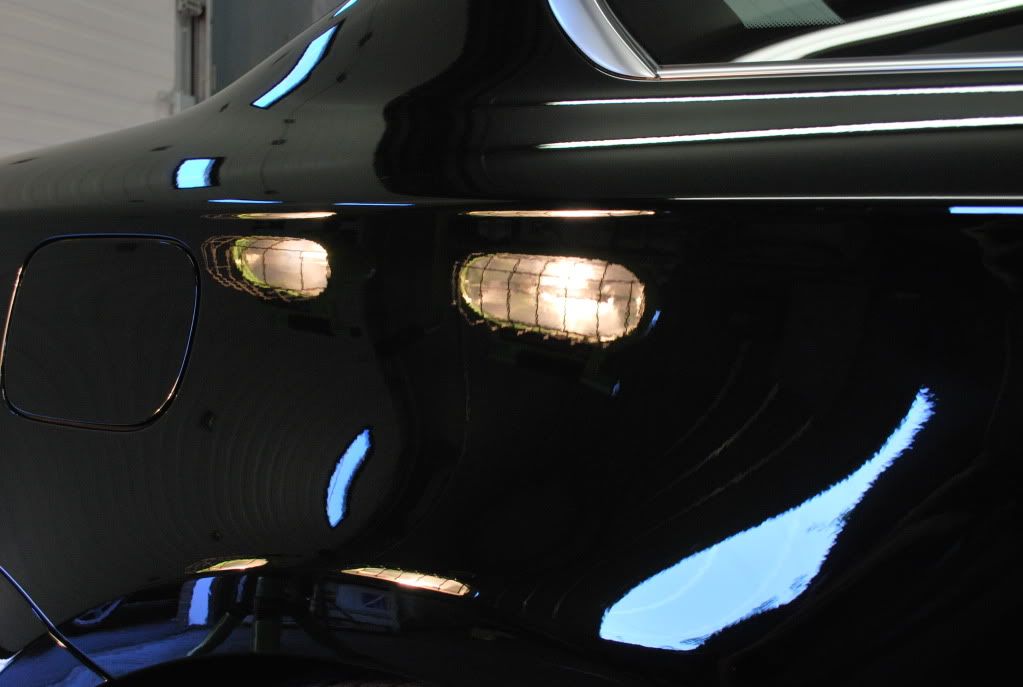
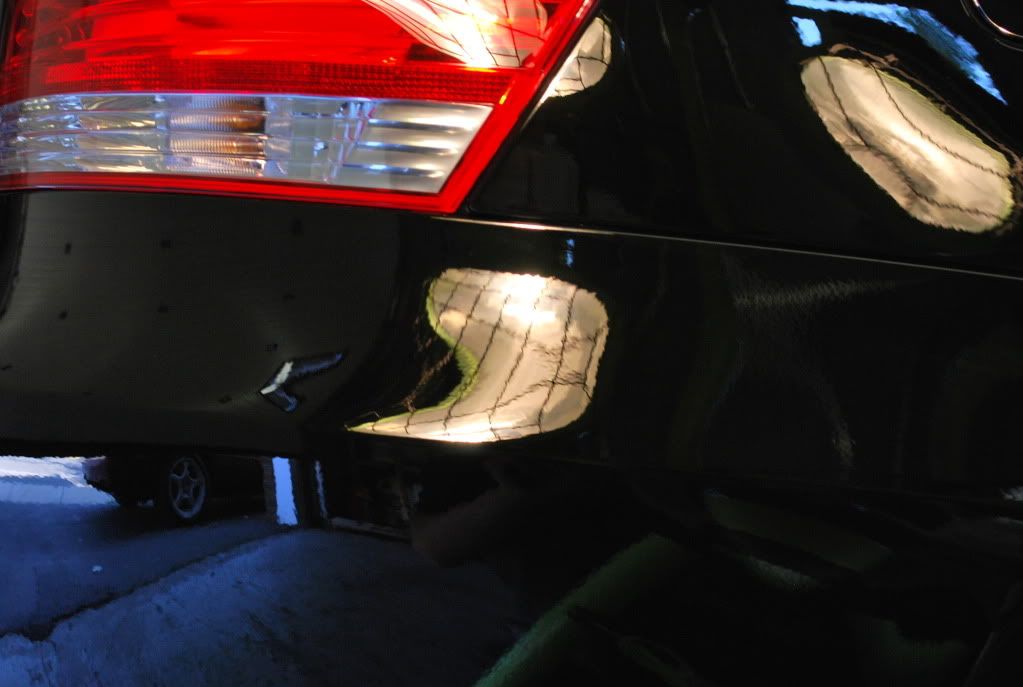
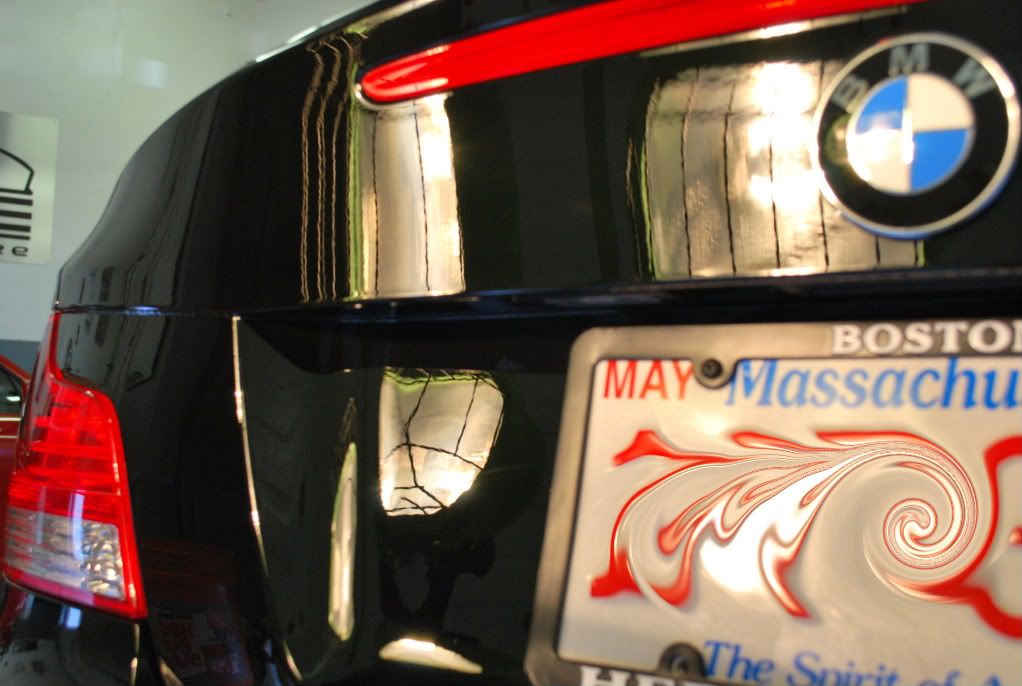
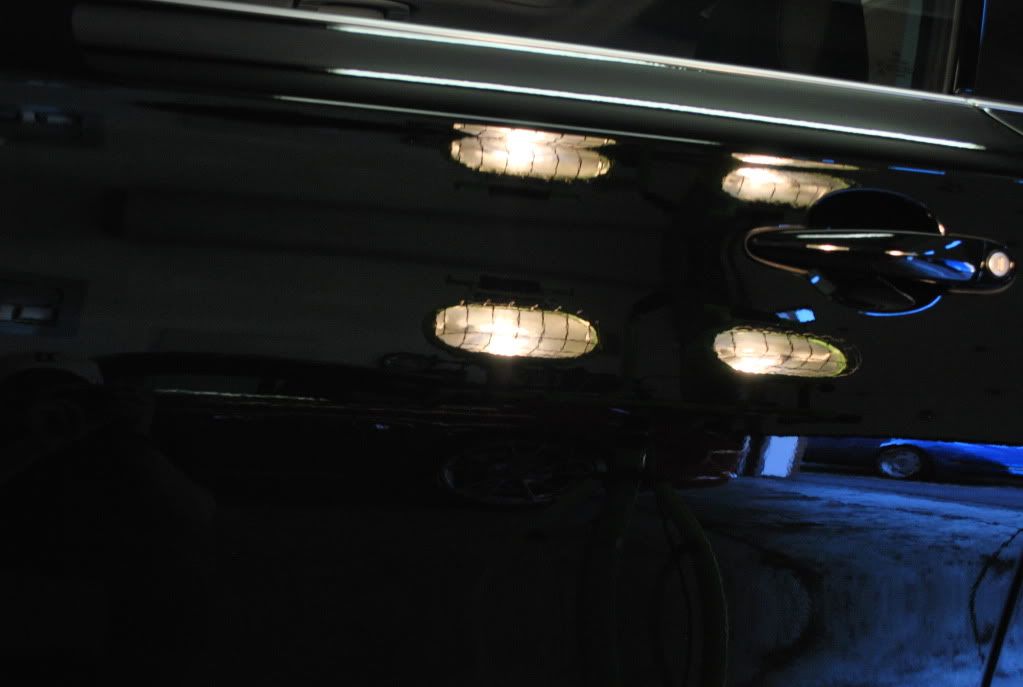
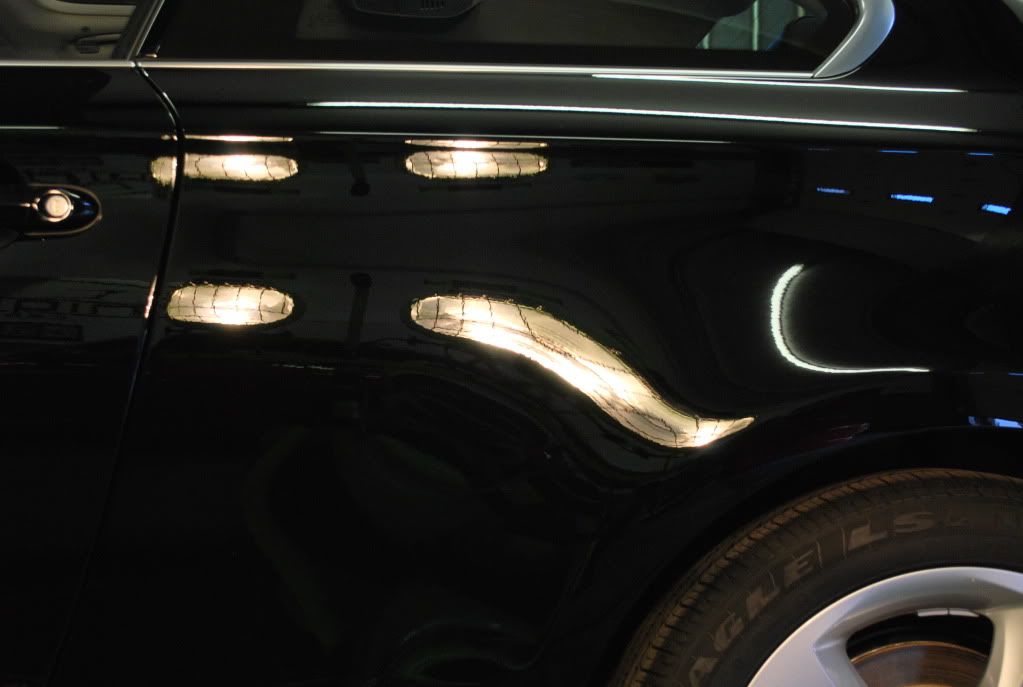
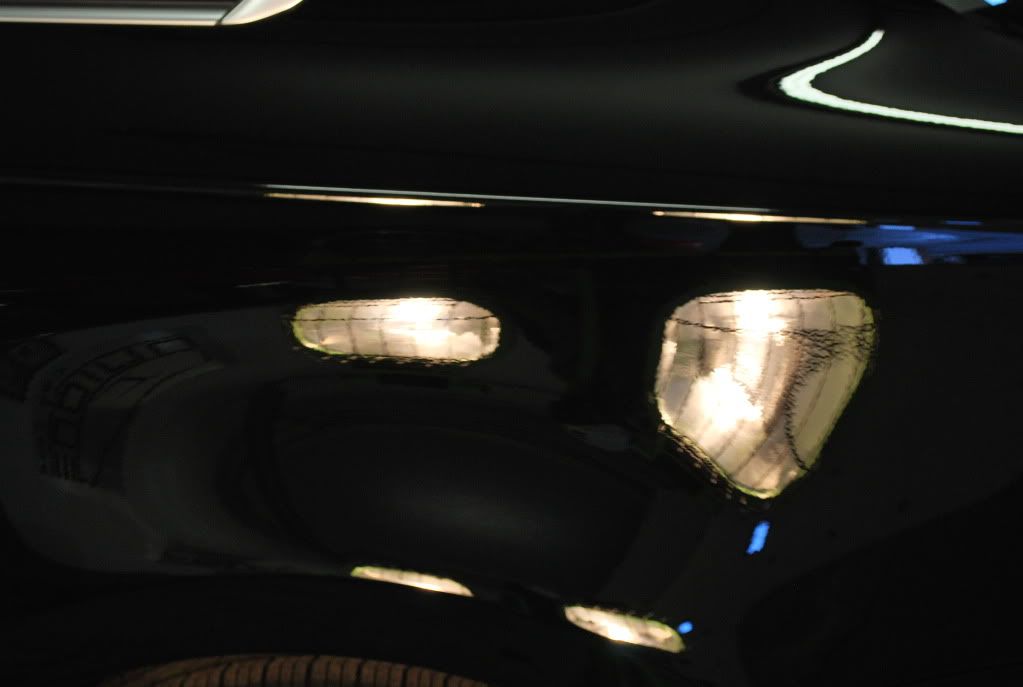
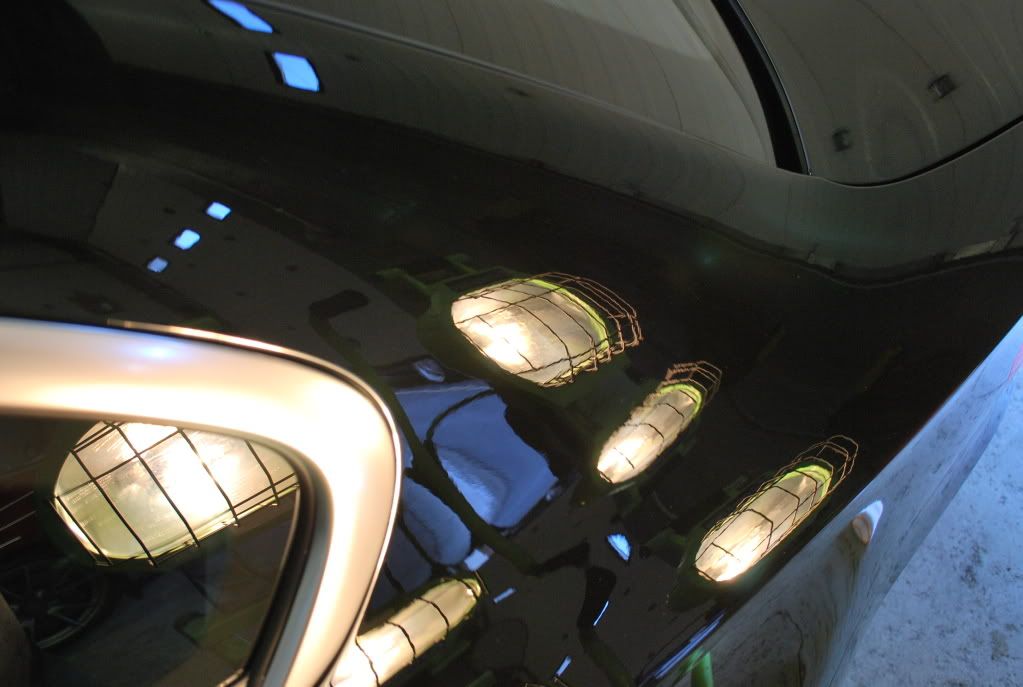
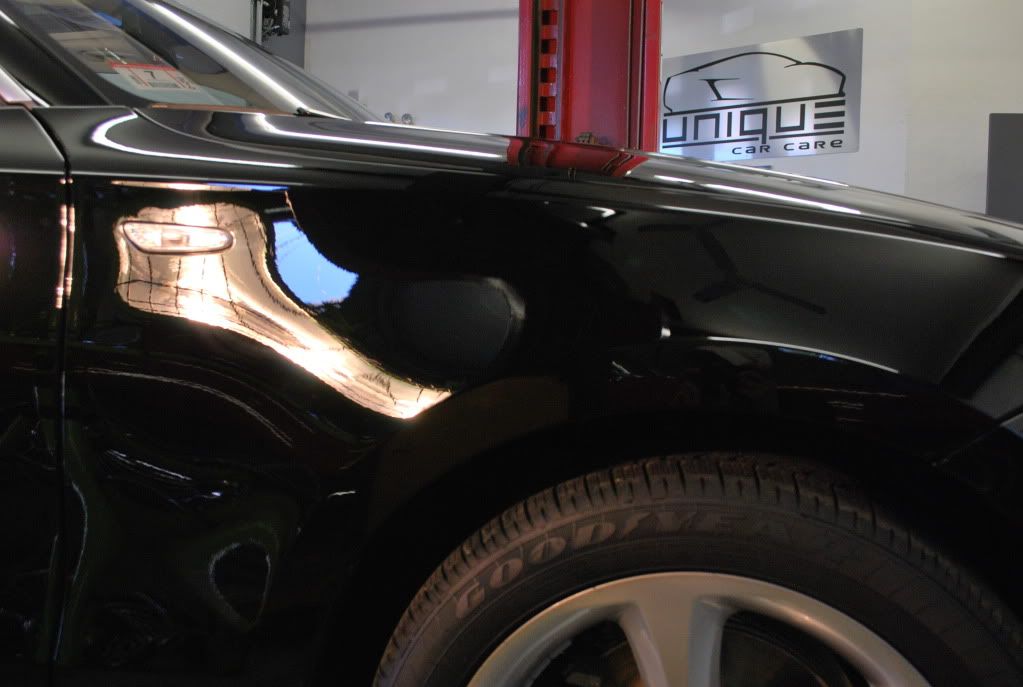
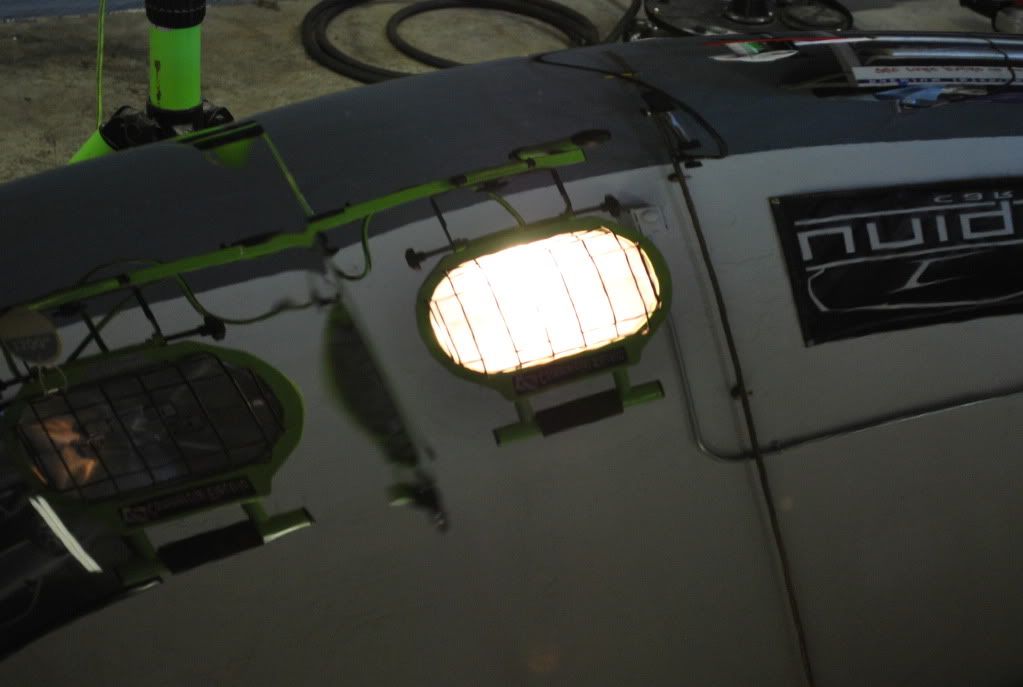
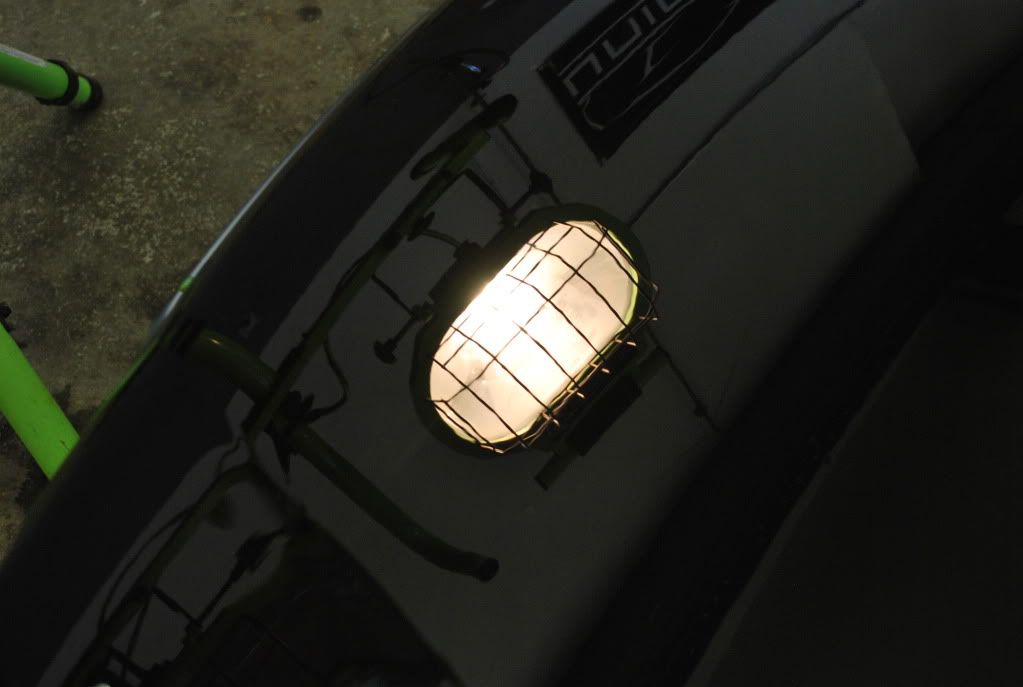
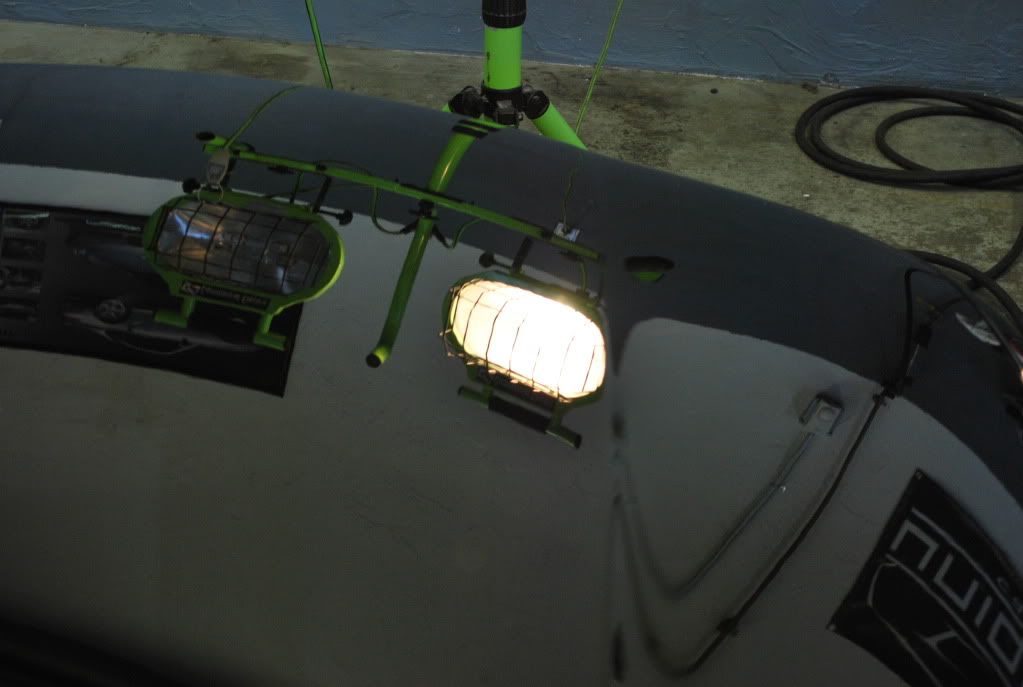
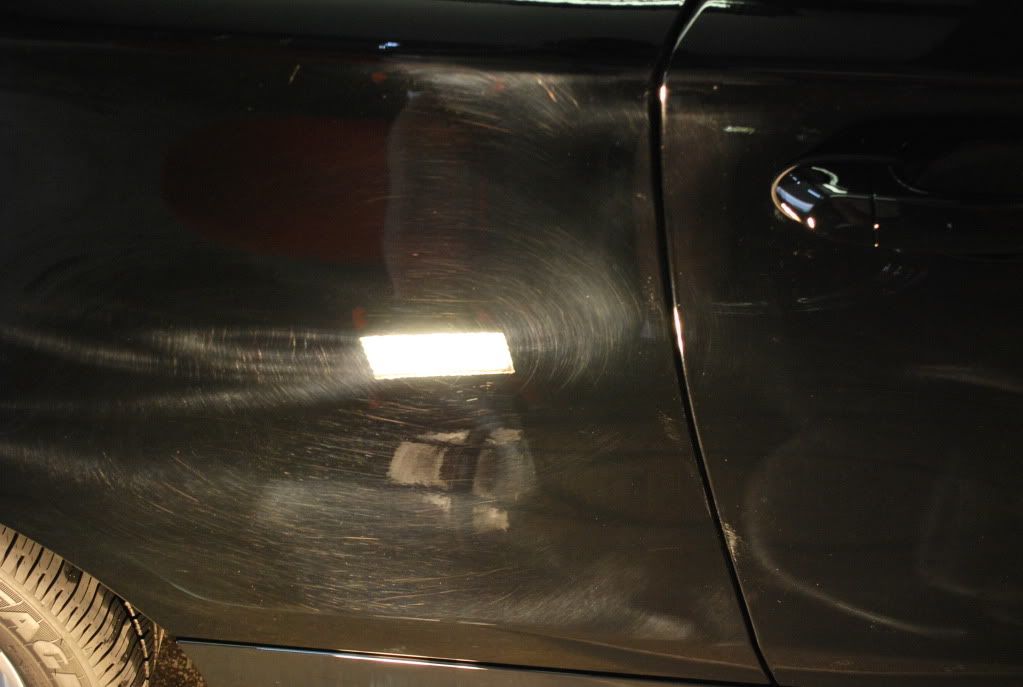
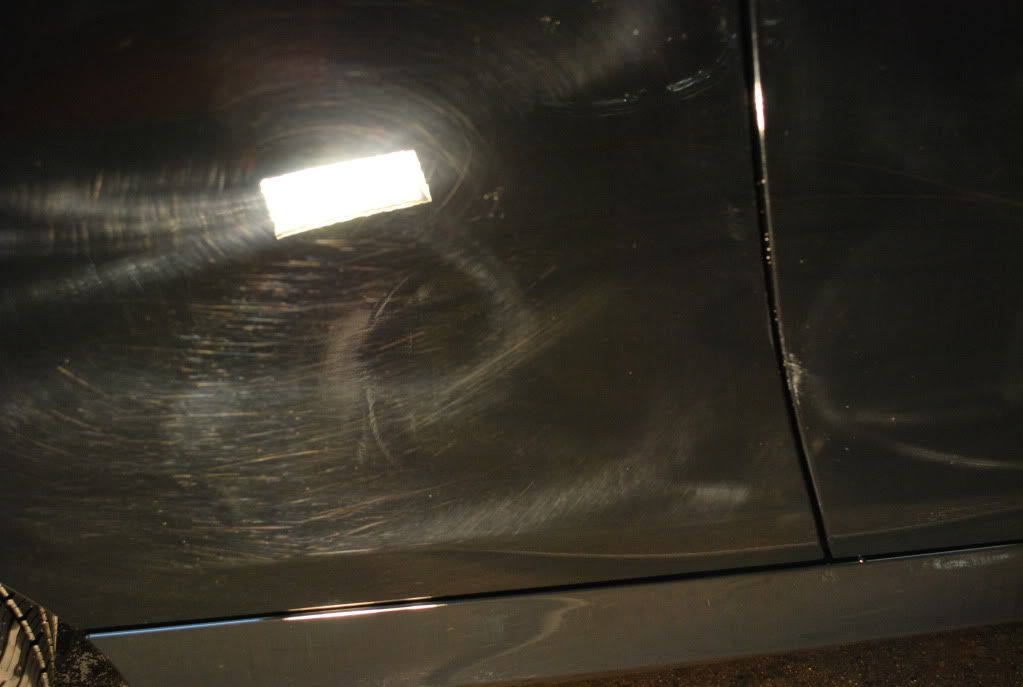
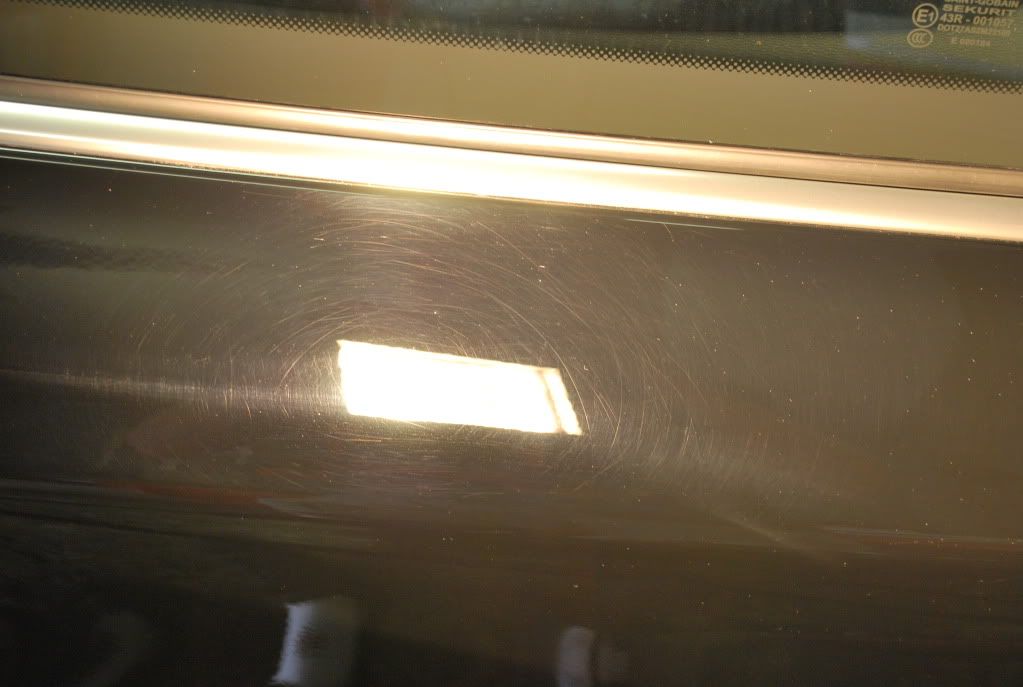
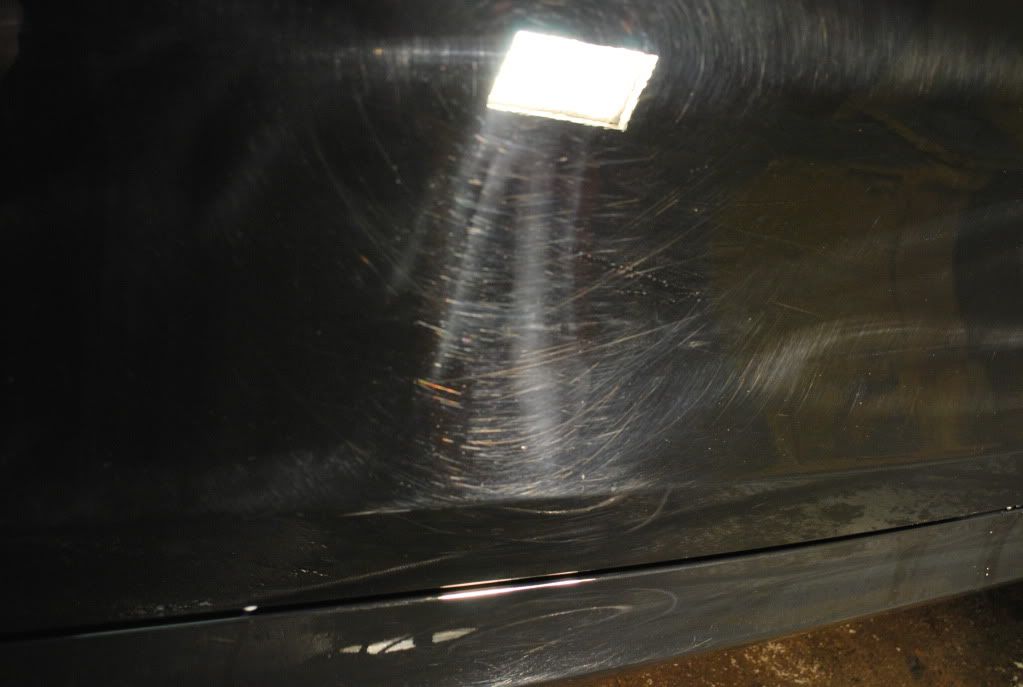
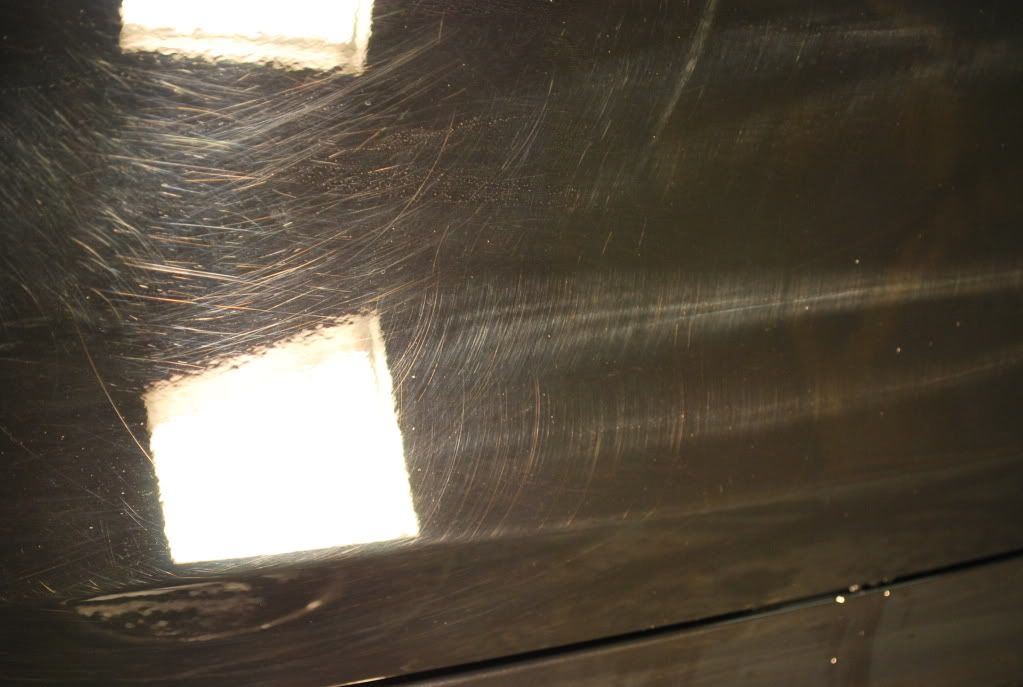
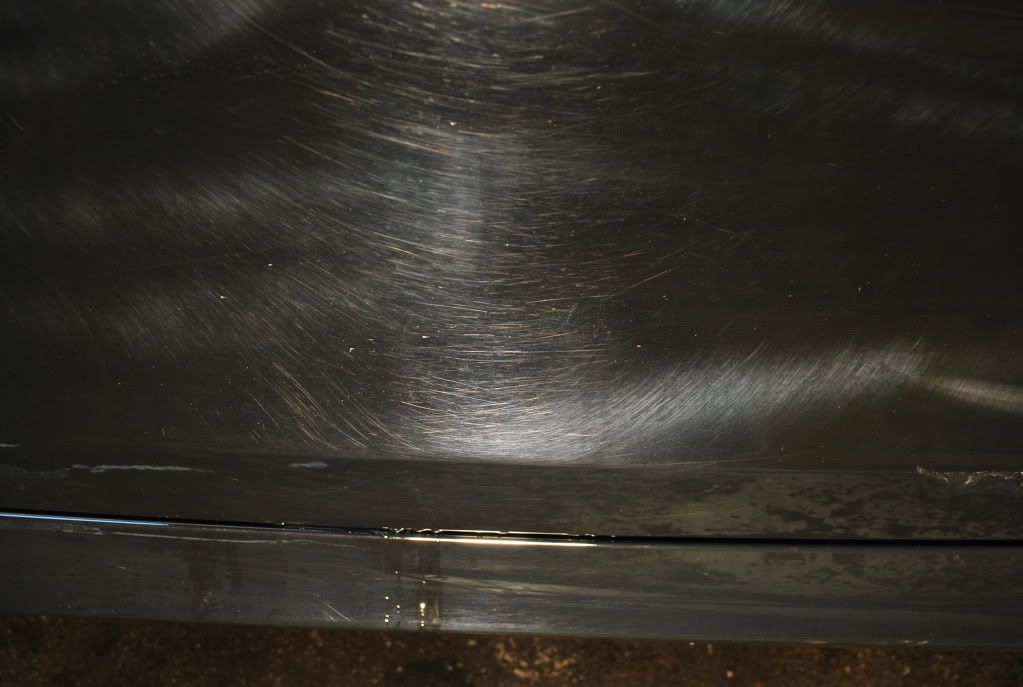
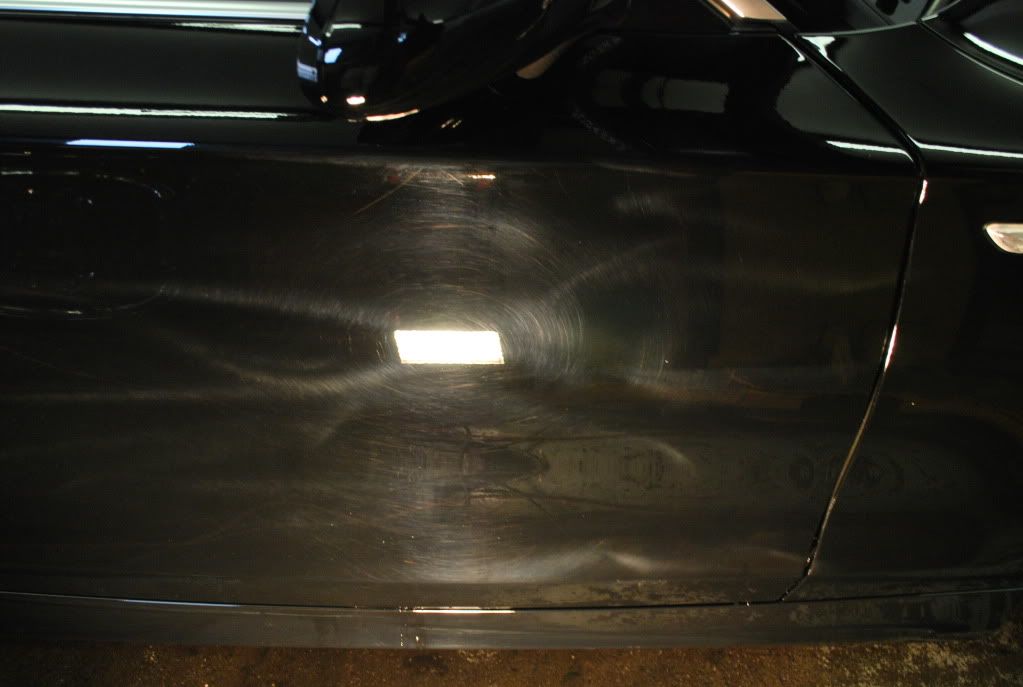
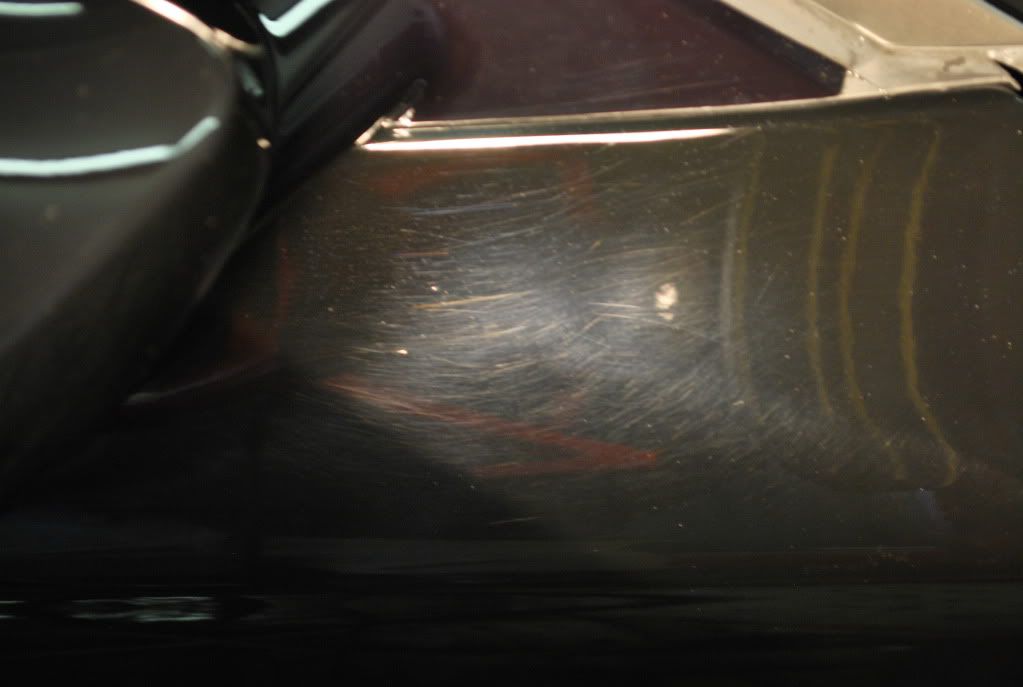
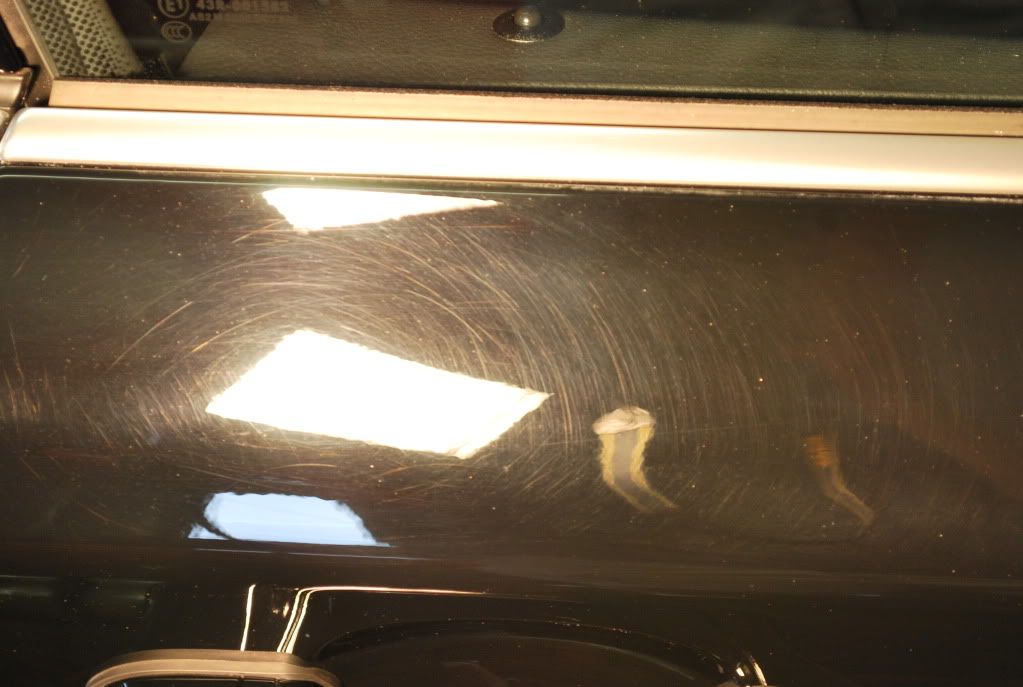
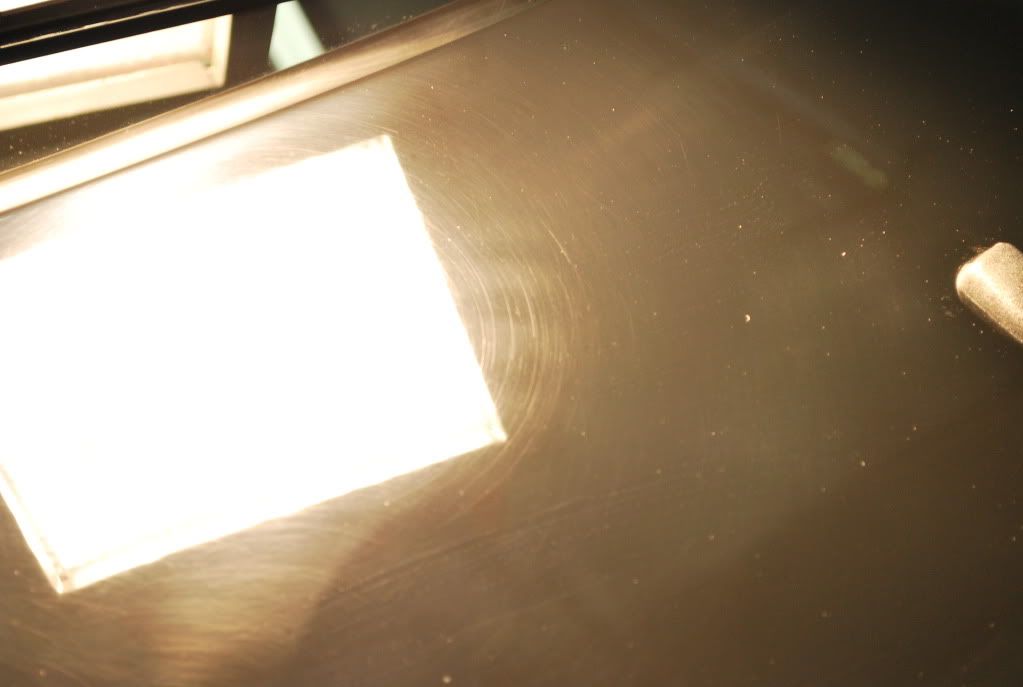
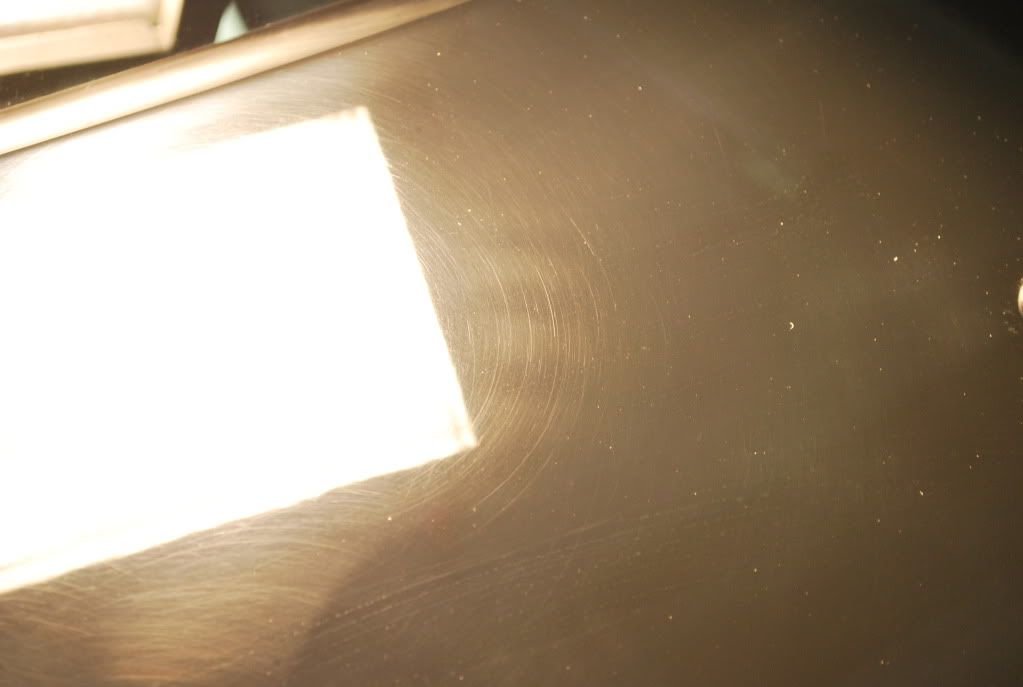
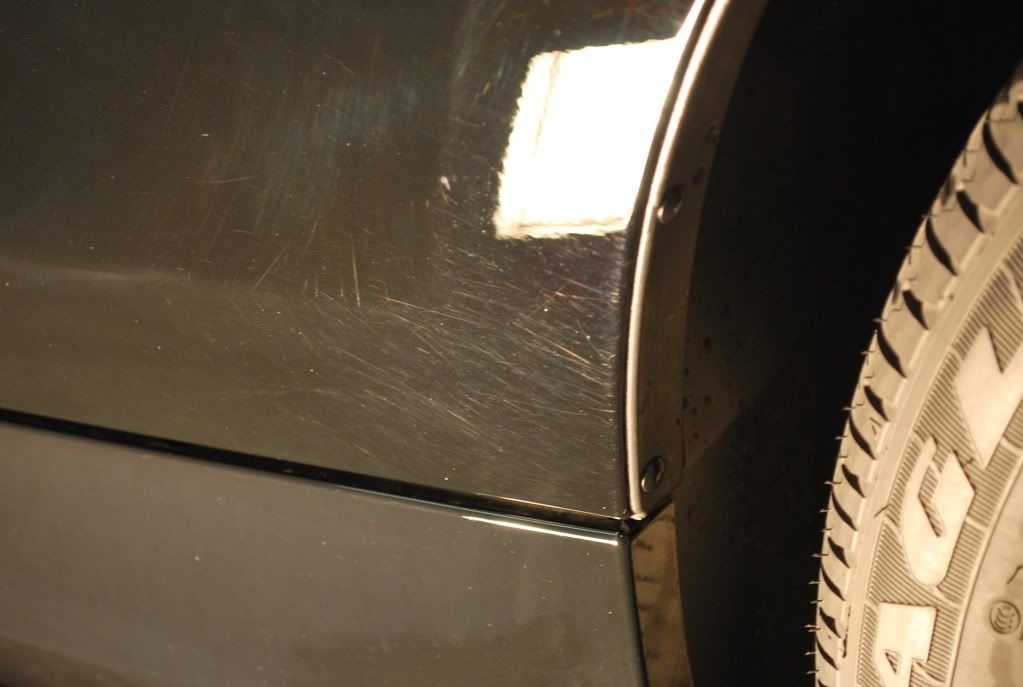
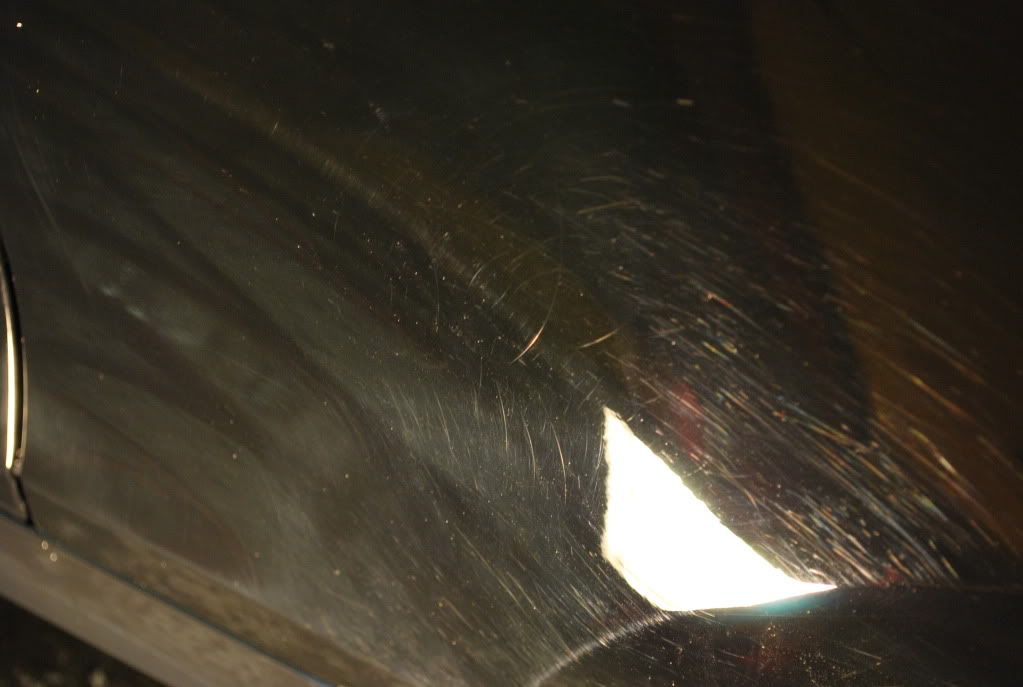
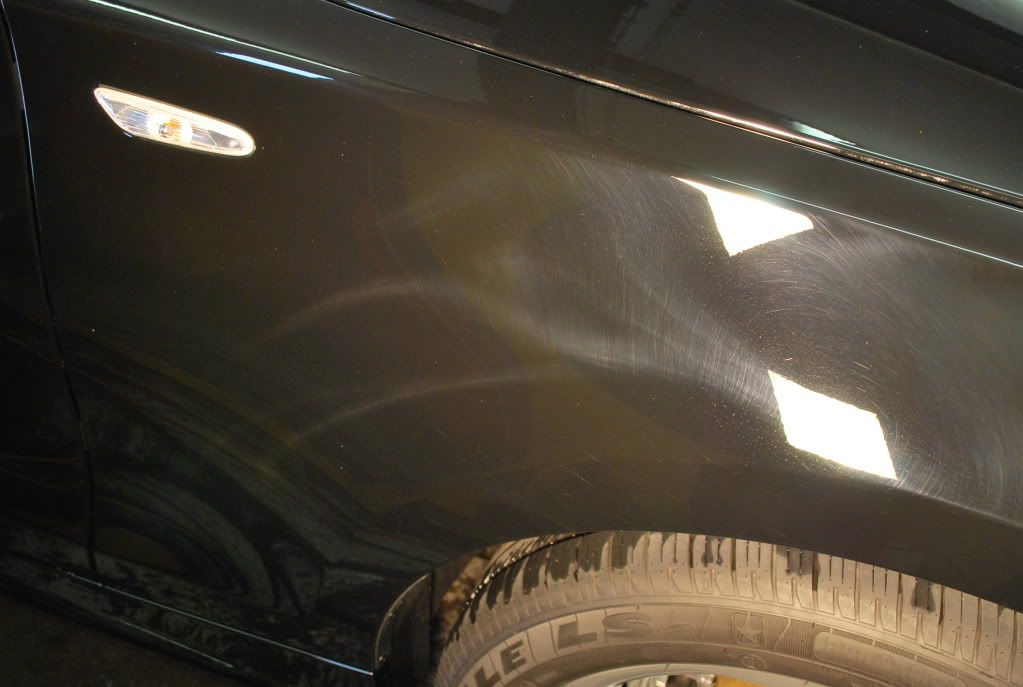
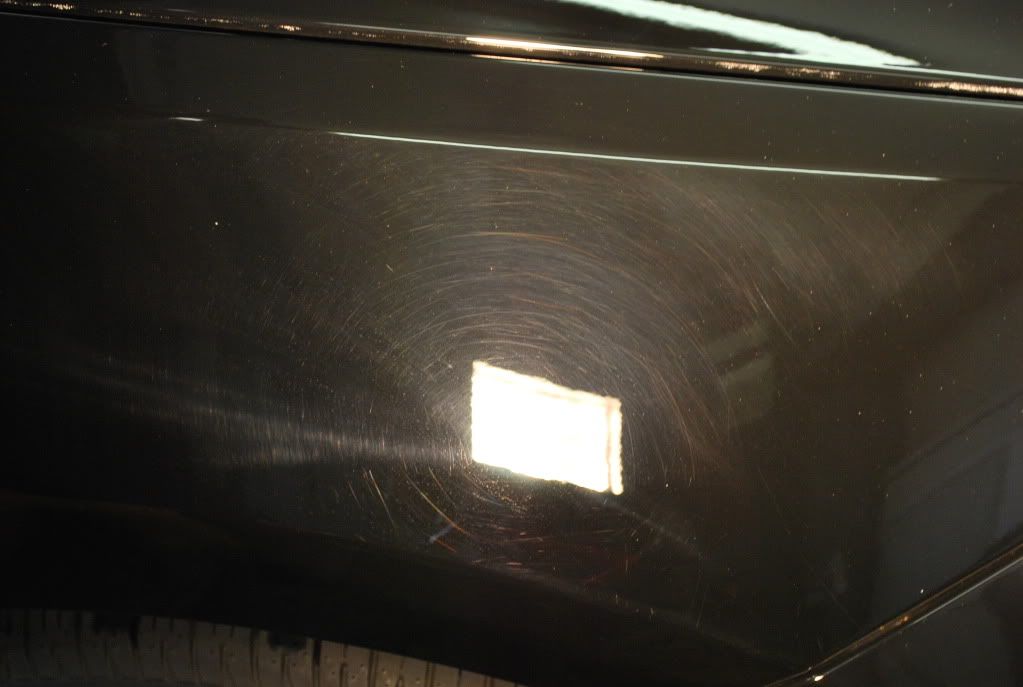
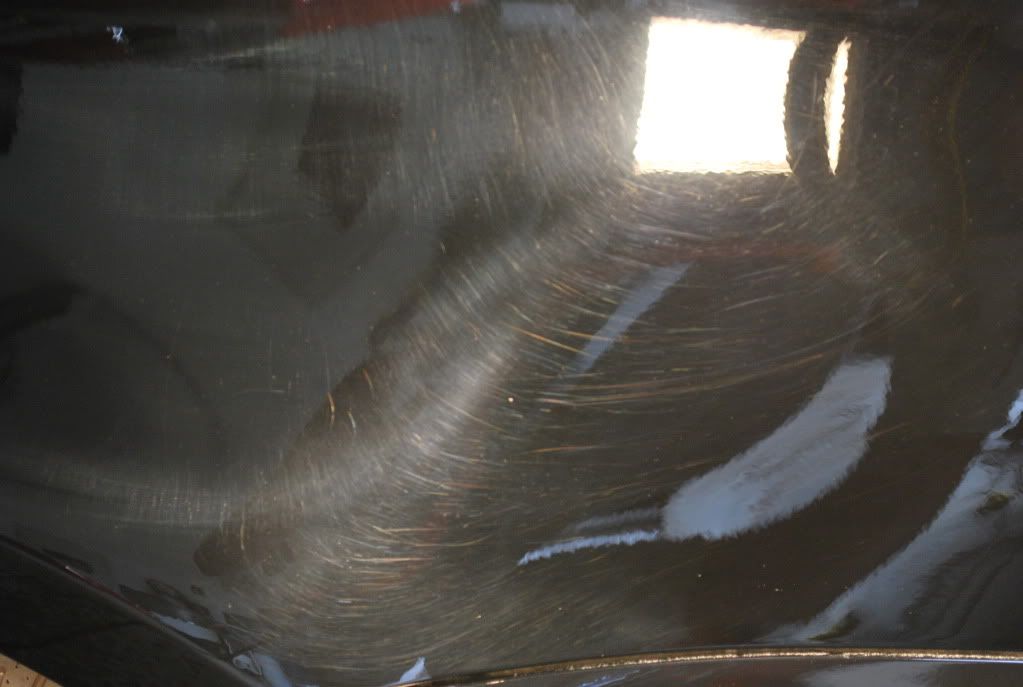
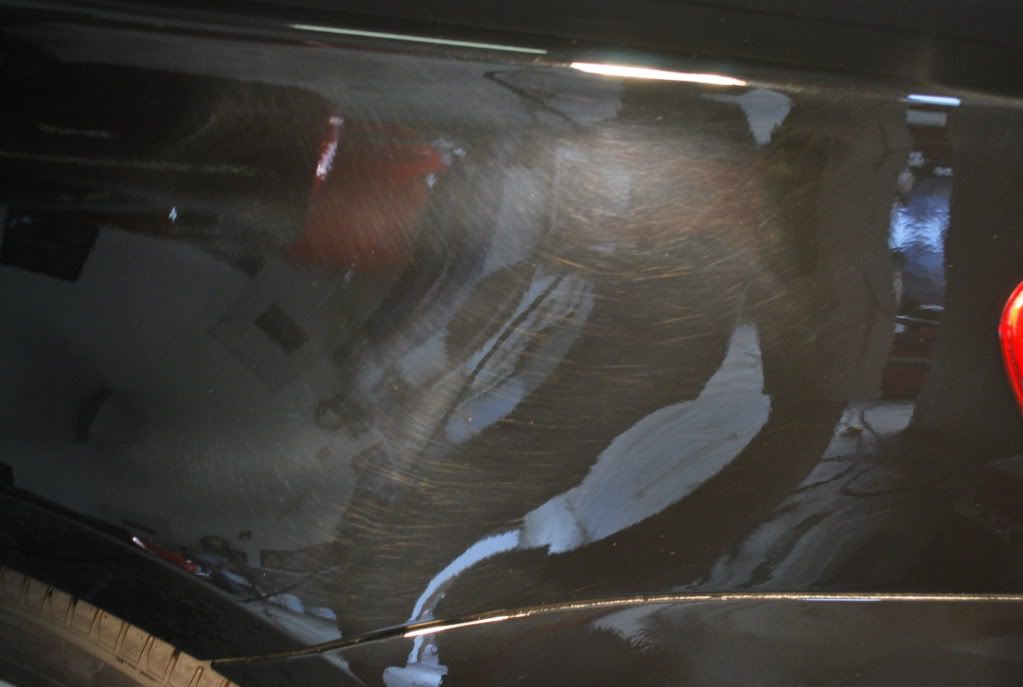
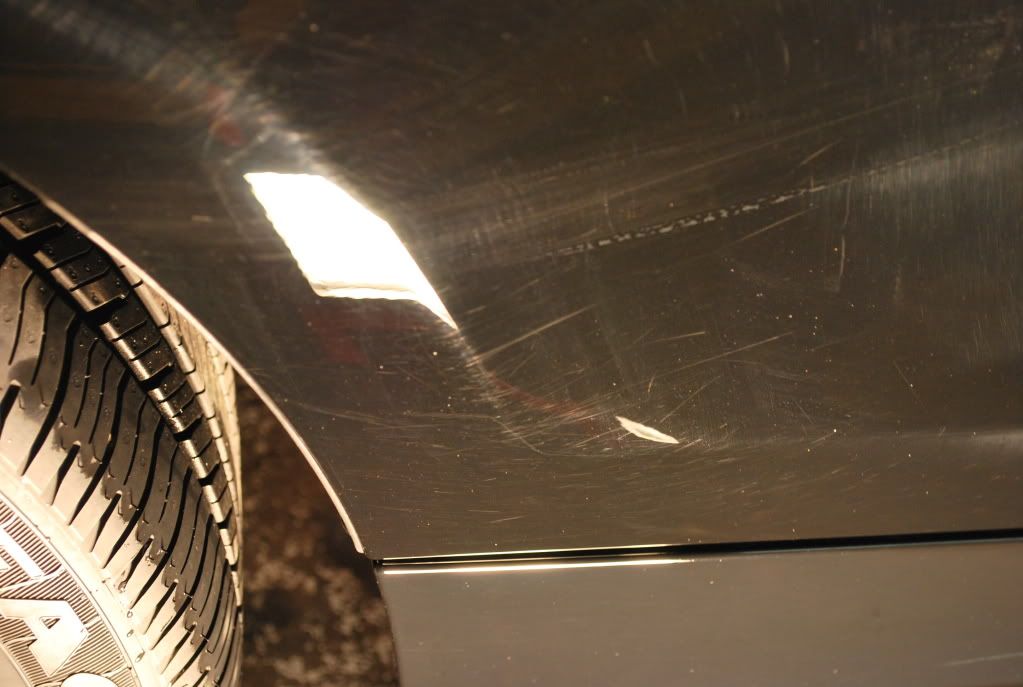
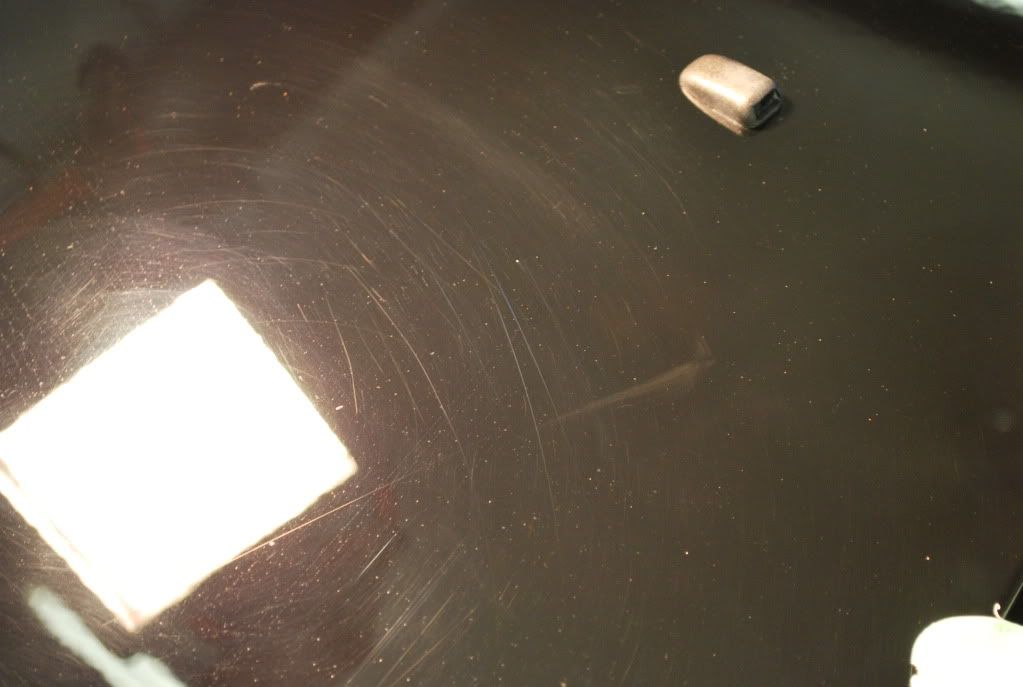
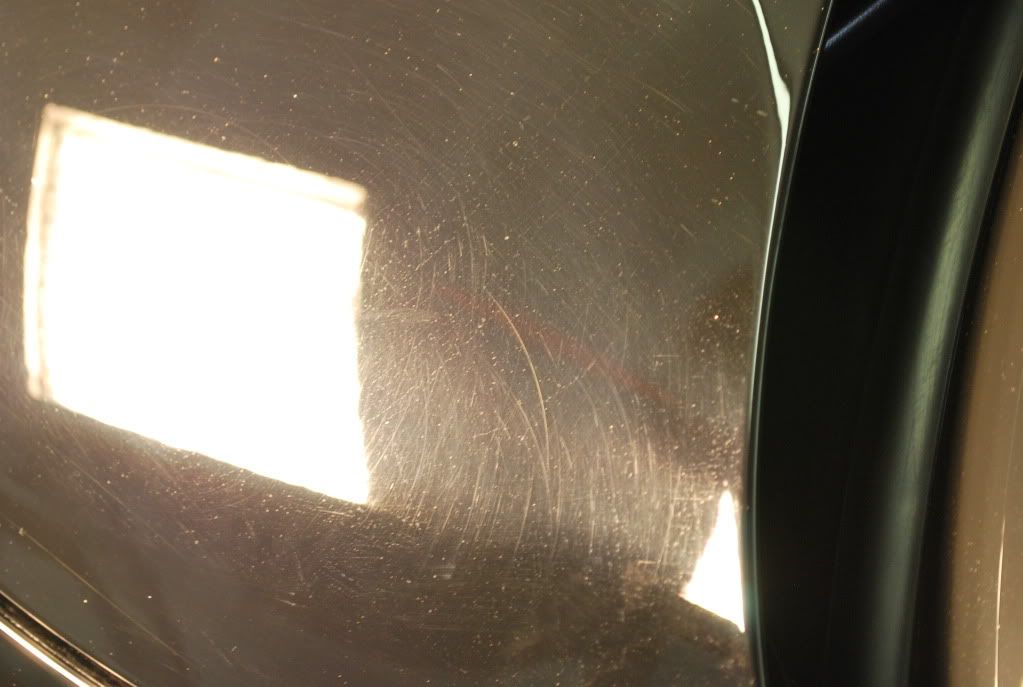
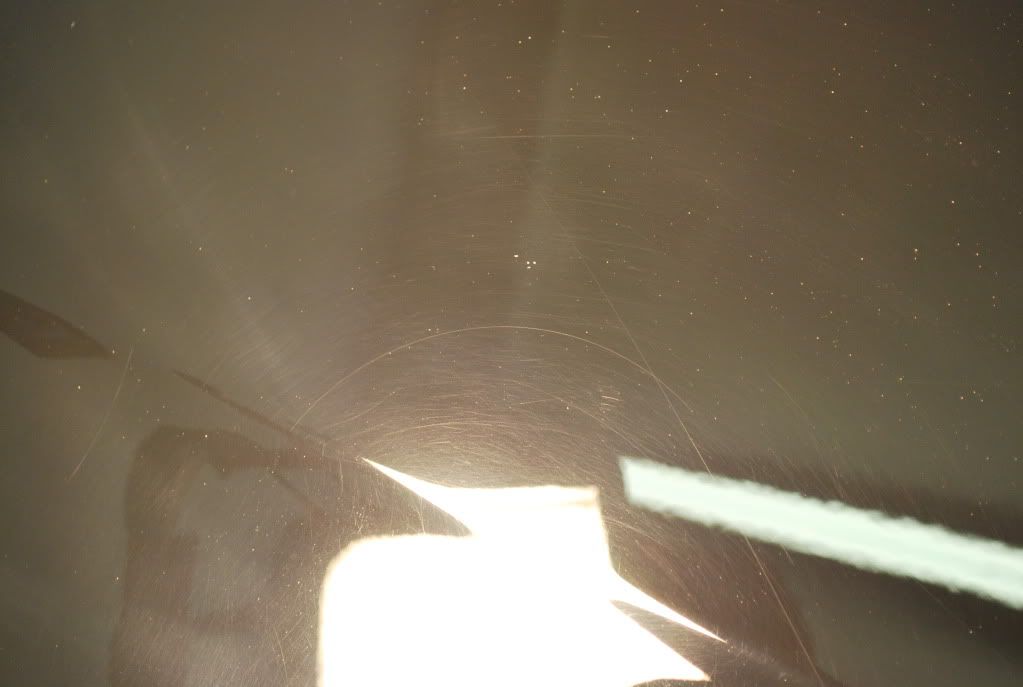
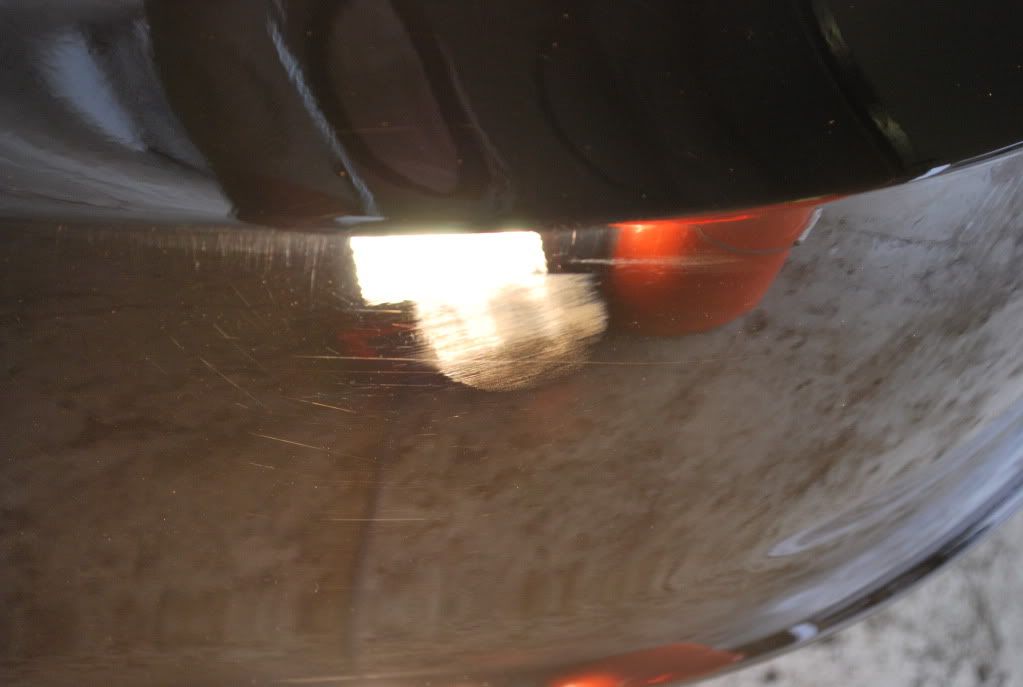
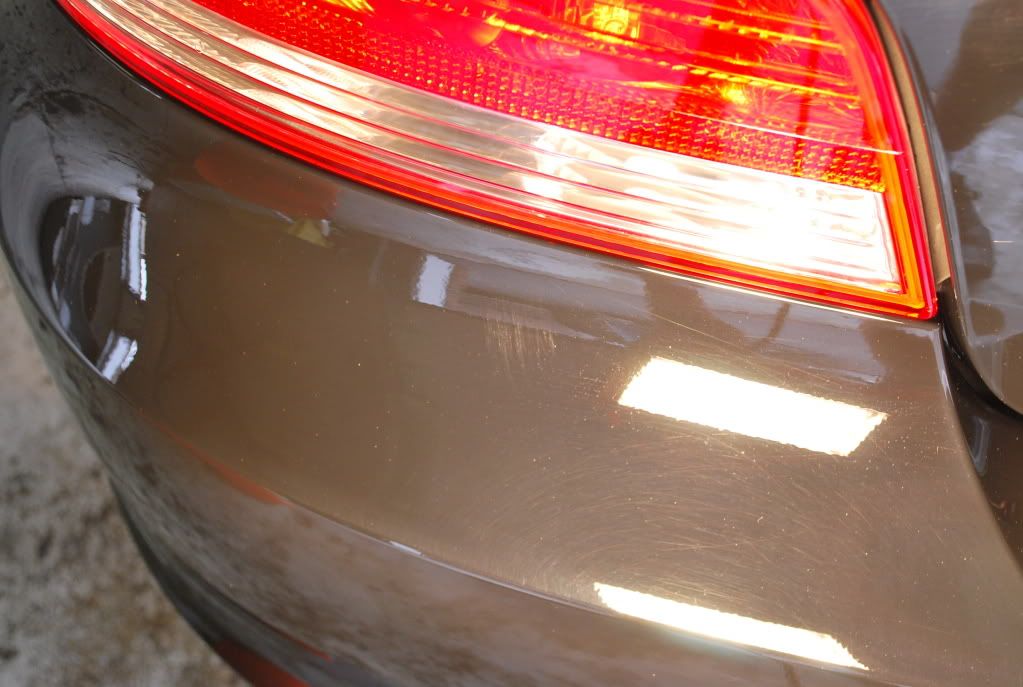
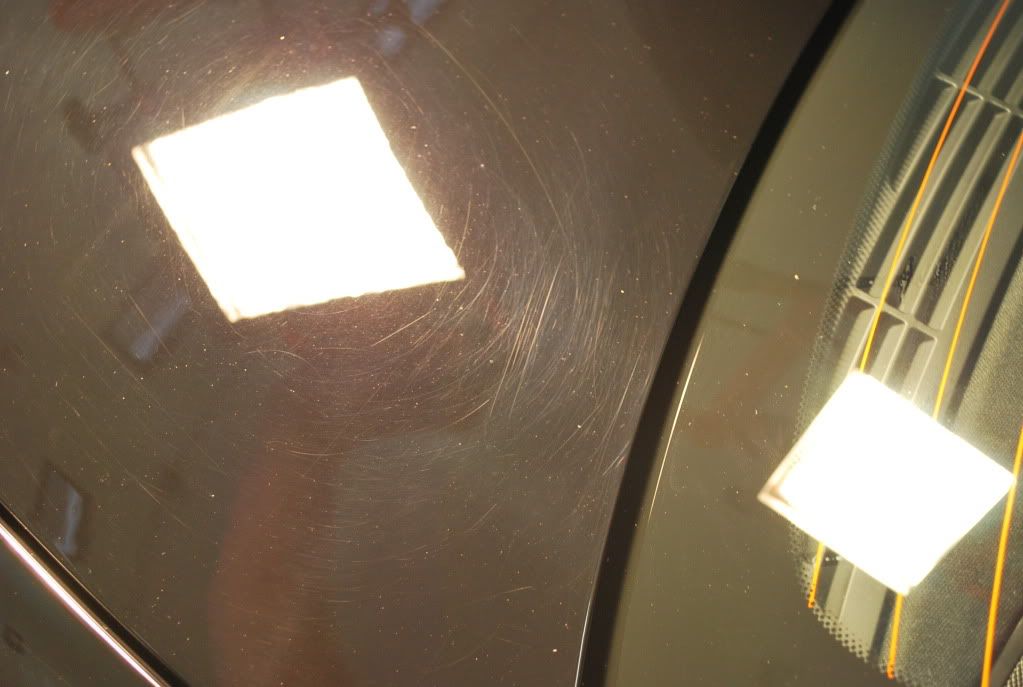
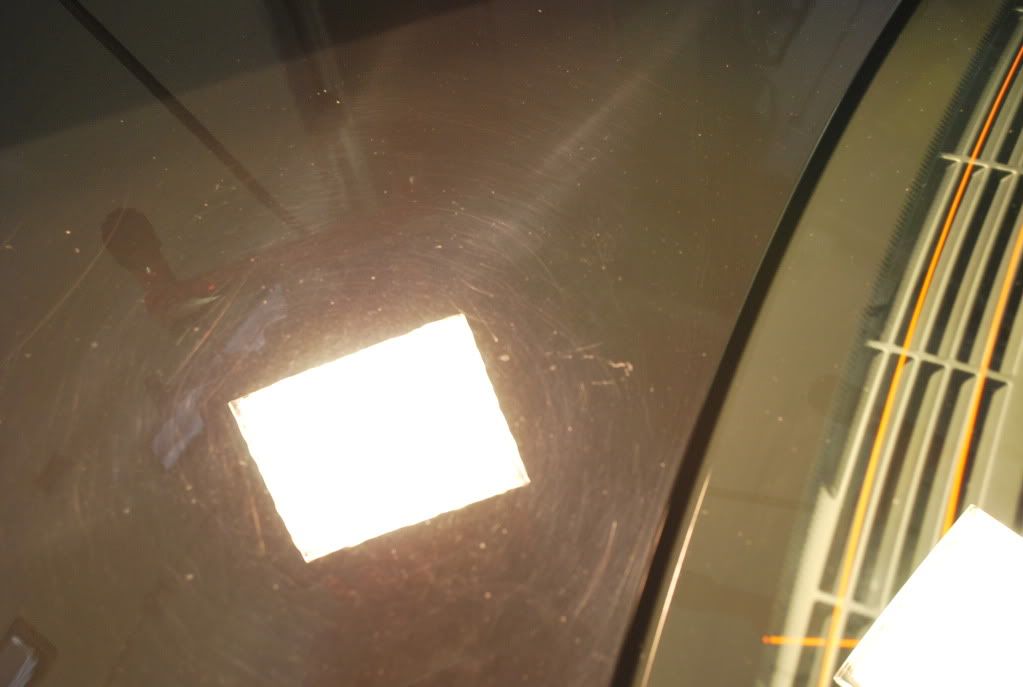
OK, this is where it gets ugly! While I was cleaning my buffing pads and getting my buffer ready, I decided to turn on the halogen lights to inspect the paint carefully before proceeding to any polishing. This allows me to see any and all paint defects that are not visible with the fluorescent lights. To my surprise, the paint was in much worse condition and was going to be way more work than I had originally expected.
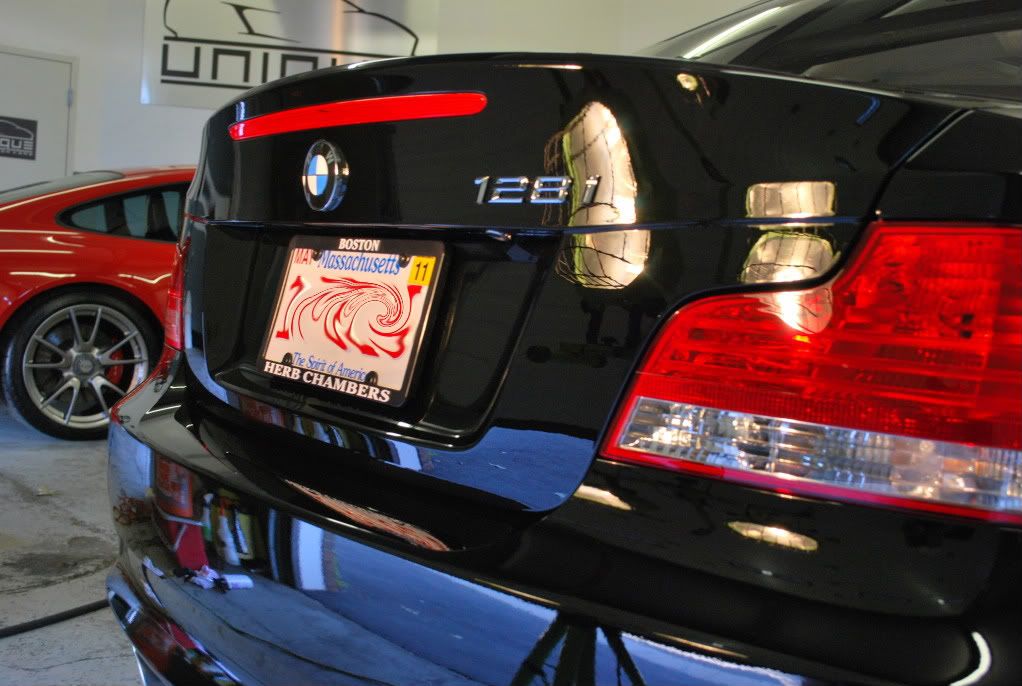
These pictures below were taken after all of the prep was complete, before any polishing took place⦠Keep in mind, this car has less than 300 miles on it!
Results 1 to 15 of 106
-
08-19-2009, 05:31 AM #1


- Join Date
- May 2005
- Location
- Wakefield, MA
- Posts
- 2,400
- Post Thanks / Like

-
08-19-2009, 05:33 AM #2
- Join Date
- May 2005
- Location
- Wakefield, MA
- Posts
- 2,400
- Post Thanks / Like

-
08-19-2009, 05:34 AM #3
- Join Date
- May 2005
- Location
- Wakefield, MA
- Posts
- 2,400
- Post Thanks / Like
Usually when I give an estimate to a client, I know what to look for and have a pretty good idea how much work is involved. Sometimes a car will be a little worse than I had originally thought and take a little more time than expected. This is part of being in business, so I usually just suck it up and stick to my original quote, no matter how much time I have to invest to make a car perfect. Every car that drives out of the shop is a rolling advertisement of my business, so for me it is worth putting in the extra time just to make a customer happy. I knew just by looking at this car that it was going to be triple the amount of work than I had originally thought, so I made a call to the owner right away and told him how bad the car was.
I told him that I was totally confident that the car would come out perfect, but I could not do it for the price I had originally gave him once I factored all of my overhead into the equation. I sent him pictures of the damage by e-mail to see how he would like to go about this now that the price was going to be significantly more. He told me to go about my business and make the car perfect, since there really was no other choice. Typically, new cars donât always leave the dealerships looking perfect, but this was just totally unacceptable and unfair to the customer if he has to pay the bill for something that they did.
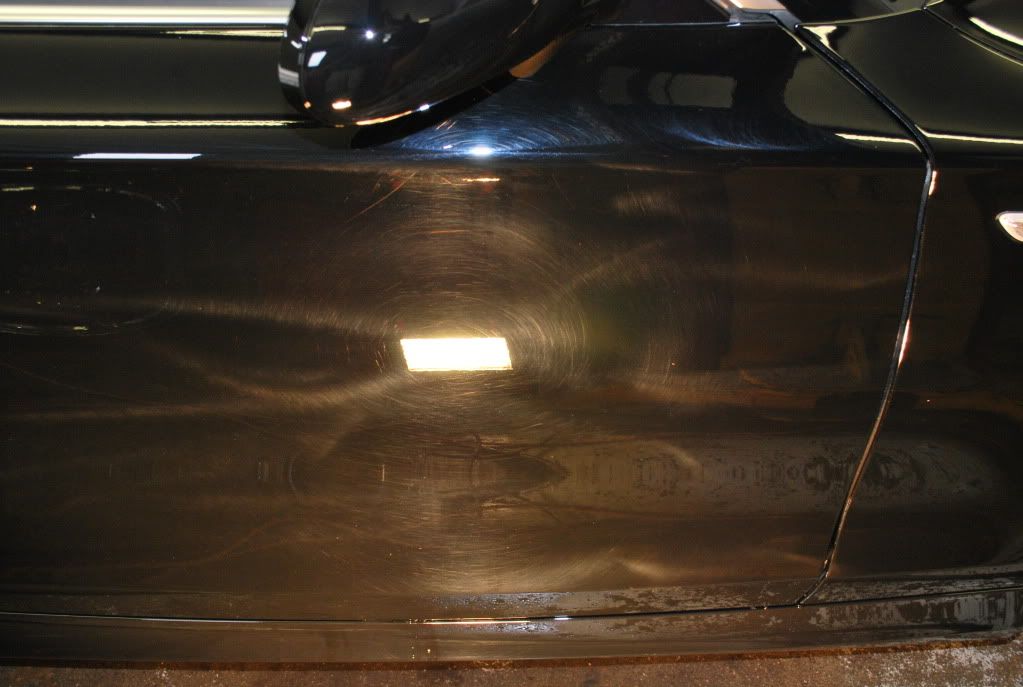
I told the owner that I would document everything and take pictures of the damage if he decided to ask the dealer to cover the cost of the detail. I decided to do a test panel to figure out what products worked the best and see exactly how much work it was going to be. After testing various pad / polish combinations, I realized that this car was not going to be easy and would require about 5 polishing steps to get the results I was looking for.
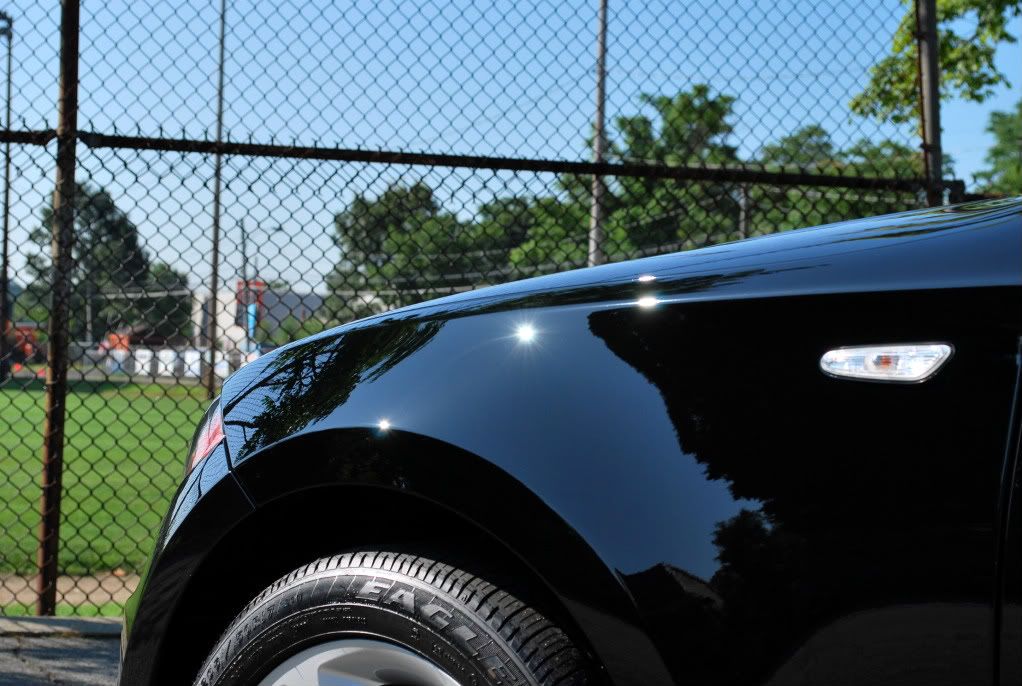
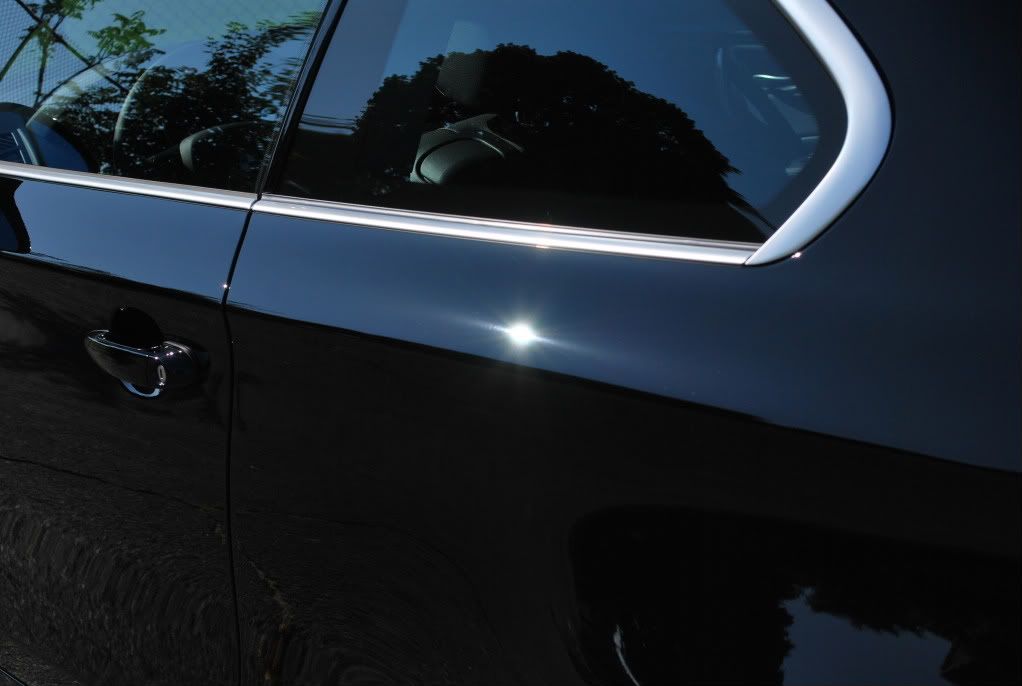
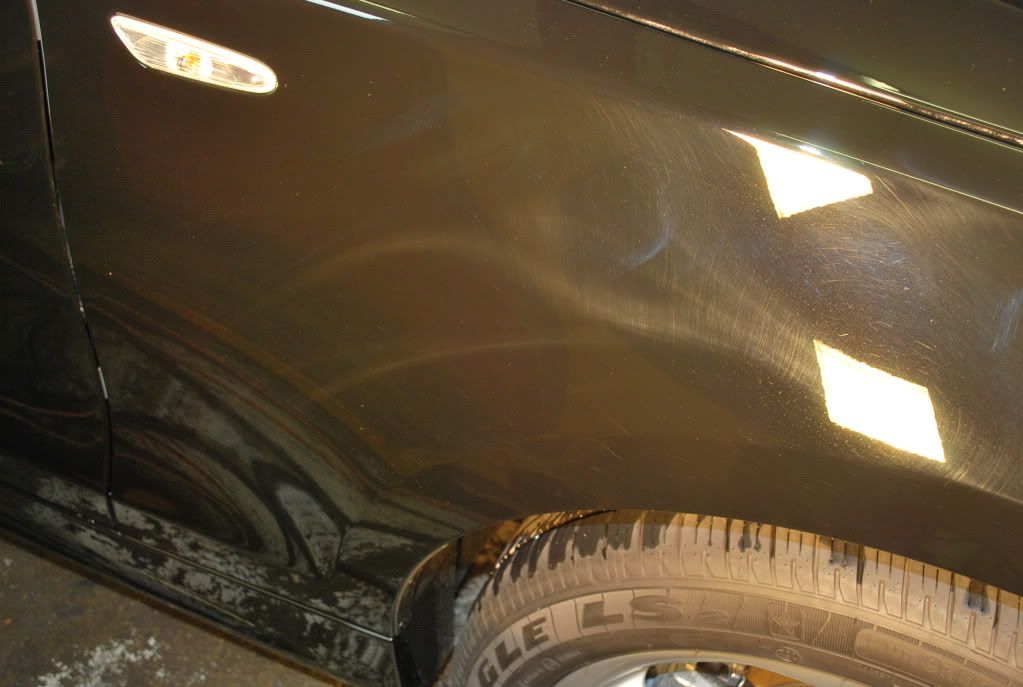
Below is a couple good 50/50 comparisons to show the difference in the paint after 5 polishing stepsâ¦
Now that I had my process figured out, Ryan and I started by polishing the complete exterior using a black Tuf-Buf lambs wool pad with Menzerna Power Finish to remove the heavier defects. It did a good job removing most of the visible defects, but left a considerable amount of RIDS (Random Isolated Deep Scratches) behind. After a second polishing session using the same process, we were able to remove all visible RIDS from the finish. Unlike most BMWâs we have worked on, this car had very finicky paint to deal with and took a great deal to make any progress. By the time we were able to remove all of the major defects and RIDS, we had already invested a considerable amount of time. This was definitely the most time consuming step and left the finish a bit hazy with very minor wool pad marring and buffer trails.
To further refine the finish from the previous polishing steps, we polished the complete exterior with Meguiars 105 Ultra- Cut Compound and an orange foam pad using the Porter Cable 7424XP, which really did a great job. For some reason, this paint did not polish out well using the rotary, so we decided to switch over to PCâs. After this step was complete, the car was covered in dust and had a good amount of polishing spatter in all of the cracks & crevices. We decided to give the car a much needed wash to remove any residue that was present to ensure the abrasives from the compound would not interfere when performing the final polishing steps. We did an alcohol wipedown and inspected the paint carefully before proceeding to the next step.
Now that all of the heavy correction work was complete and the car was clean, we moved on to the next polishing step. We polished the complete exterior with Menzerna Power Finish and a flat orange pad to restore the gloss and clarity of the paint. This step really brought the paint back to life and left the paint ready for the final polishing step, which would ensure a perfect, swirl-free finish.
Ryan polished the complete exterior with Menzerna 85rd and a black foam pad using the PC to make sure the finish was 100% perfect. This step went quick and left the paint ready for the application of a sealant.
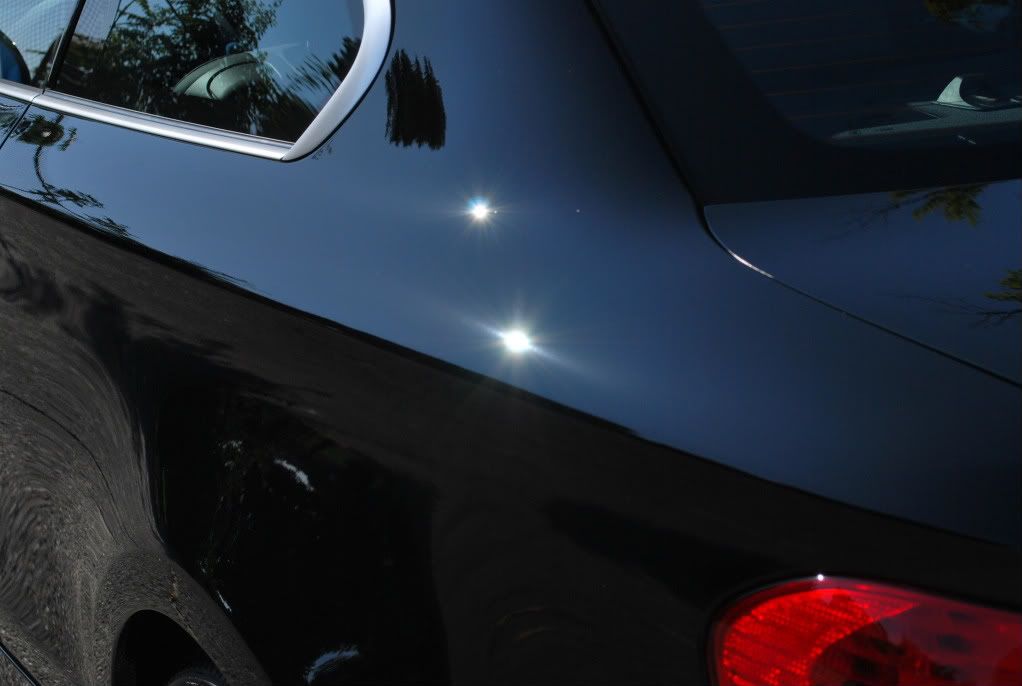
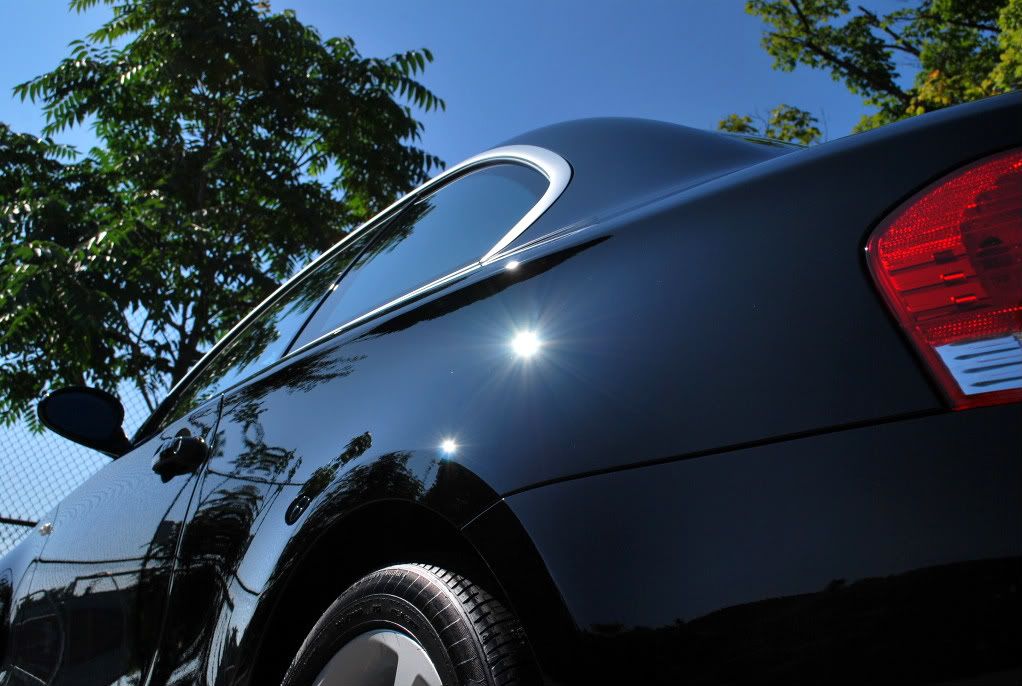
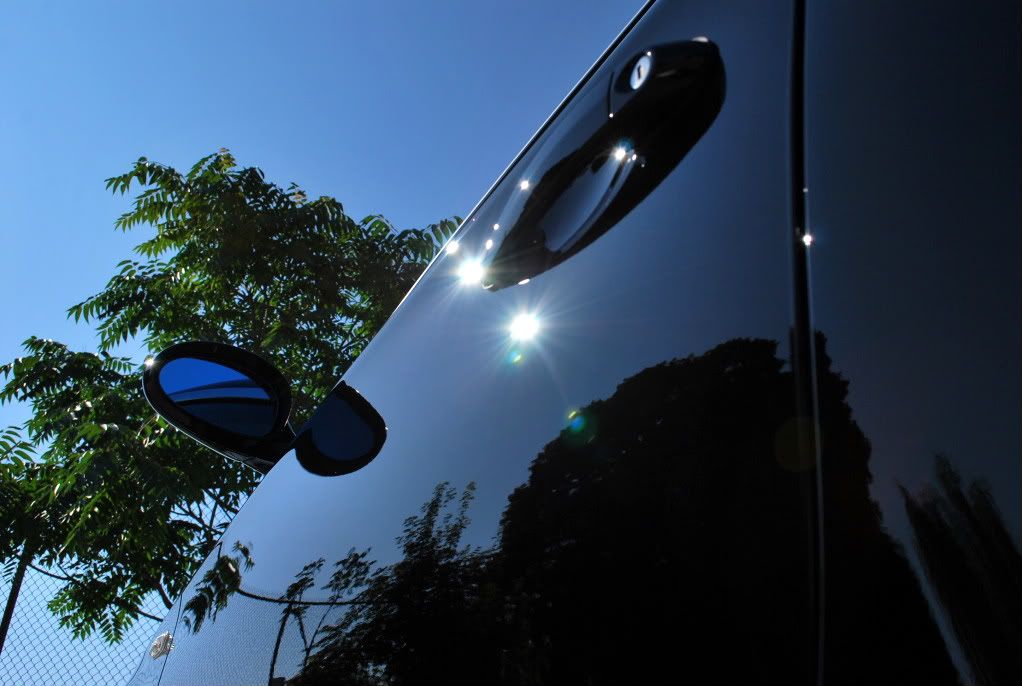
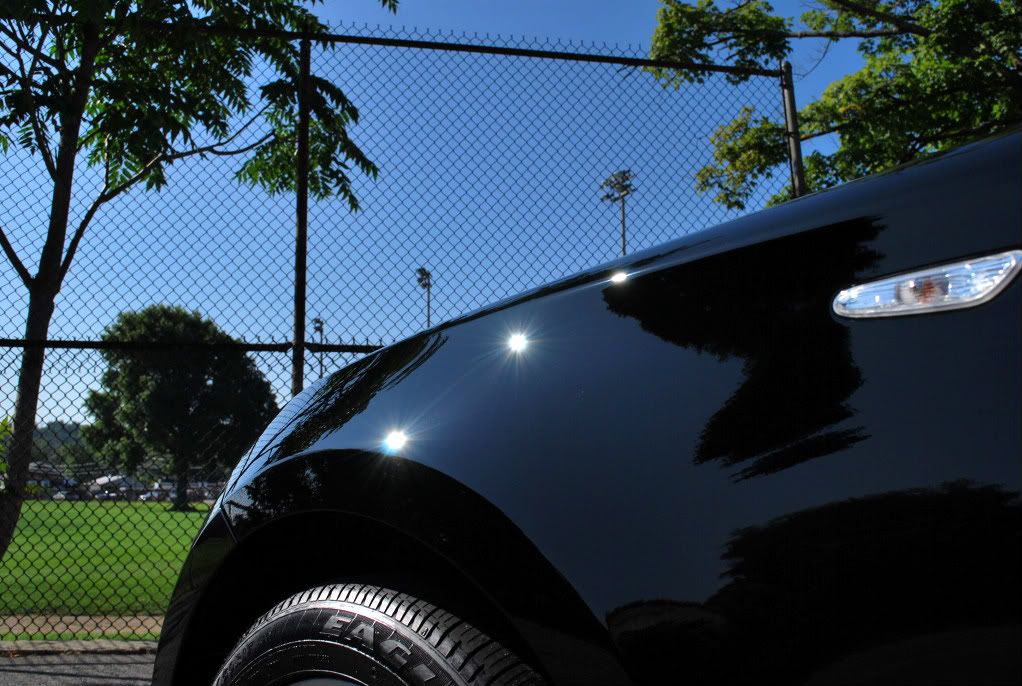
We chose to use Blackfire Wet Diamond sealant for the LSP and applied it using a gold CCS pad via PC to ensure even coverage. While waiting for the sealant to flash off, all door, hood & trunk jambs were wiped clean and the tires were dressed using Optimum Opti-Bond tire gel. Once the Wet Diamond was ready for removal, Ryan and I wiped down the complete exterior using fresh microfiber towels. We both looked at each other with a sigh of relief now that were finally finished. The car spent the night in the shop until the owner arrived the following day. We had some streaking issues with the Blackfire because of the high humidity, which you may or may not be able to see in the pictures.
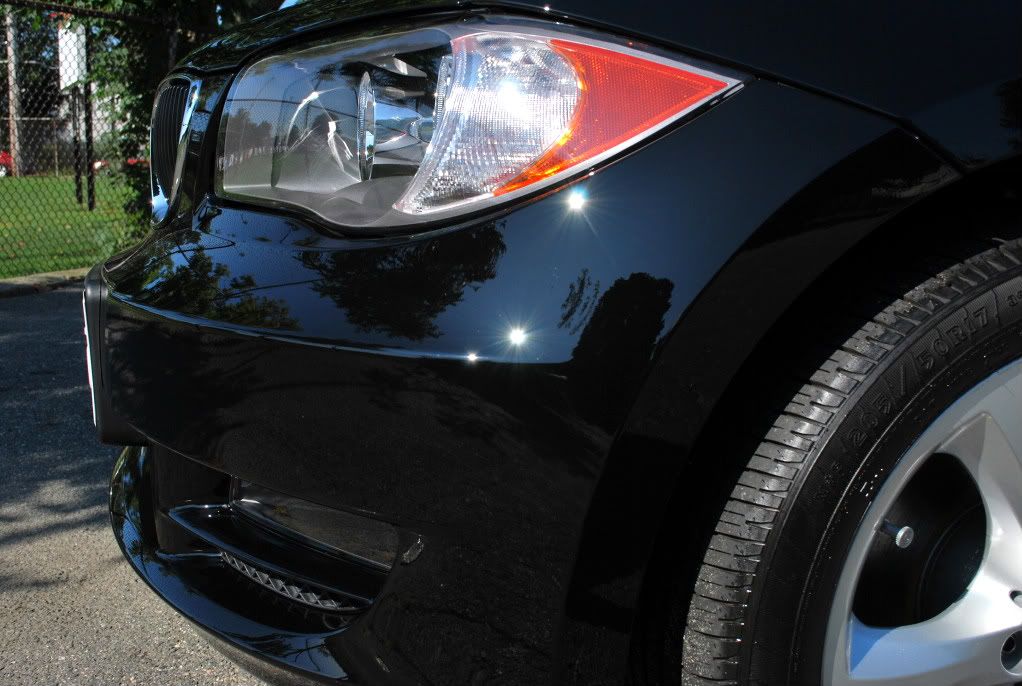
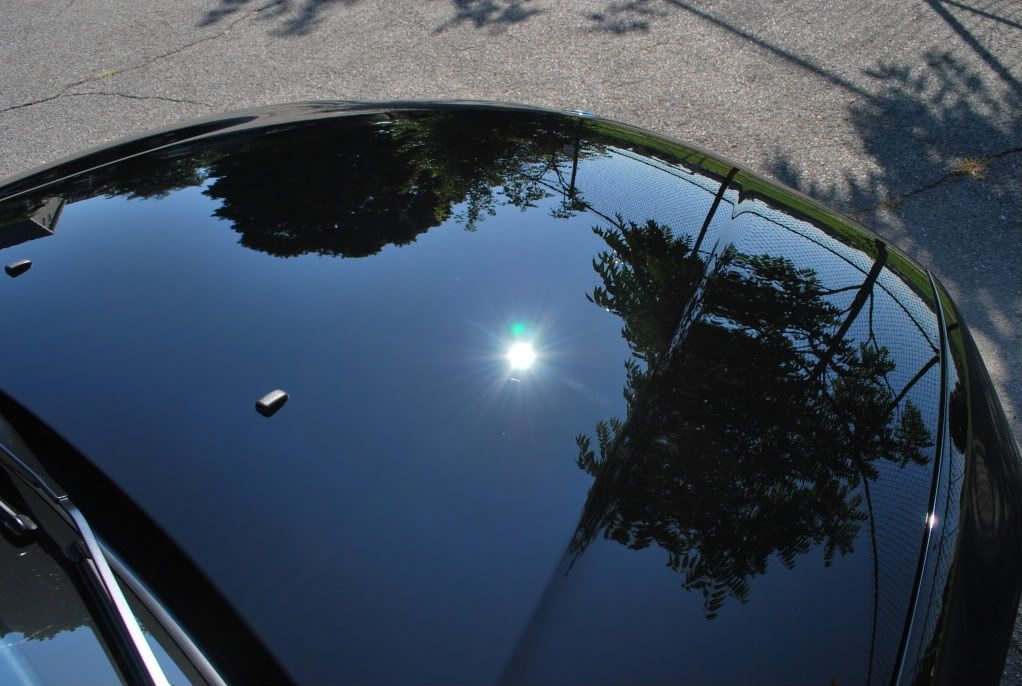
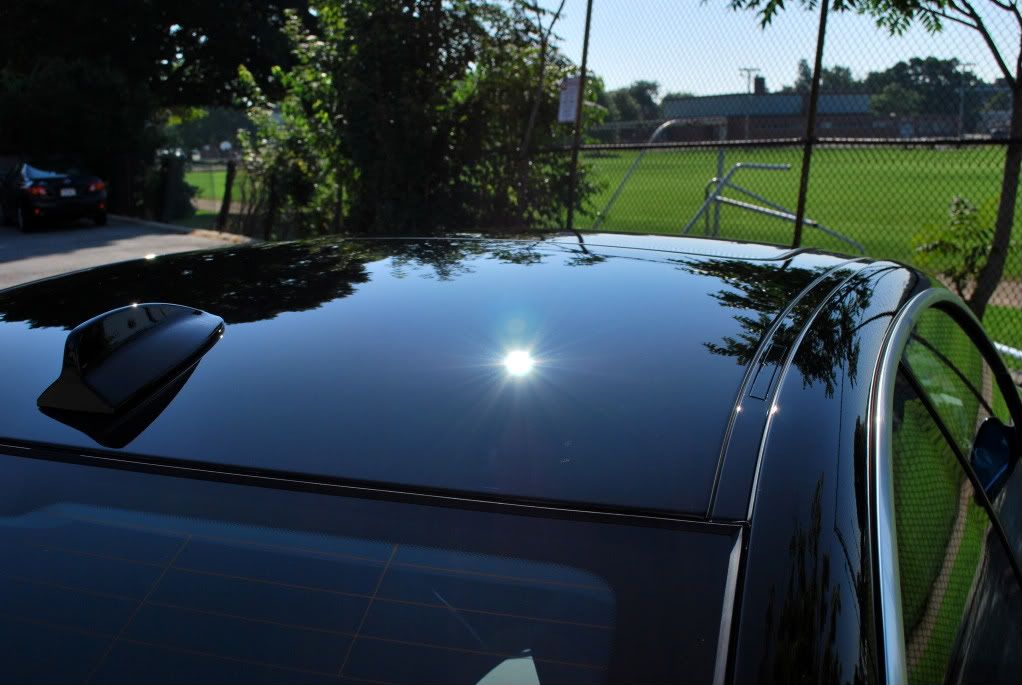
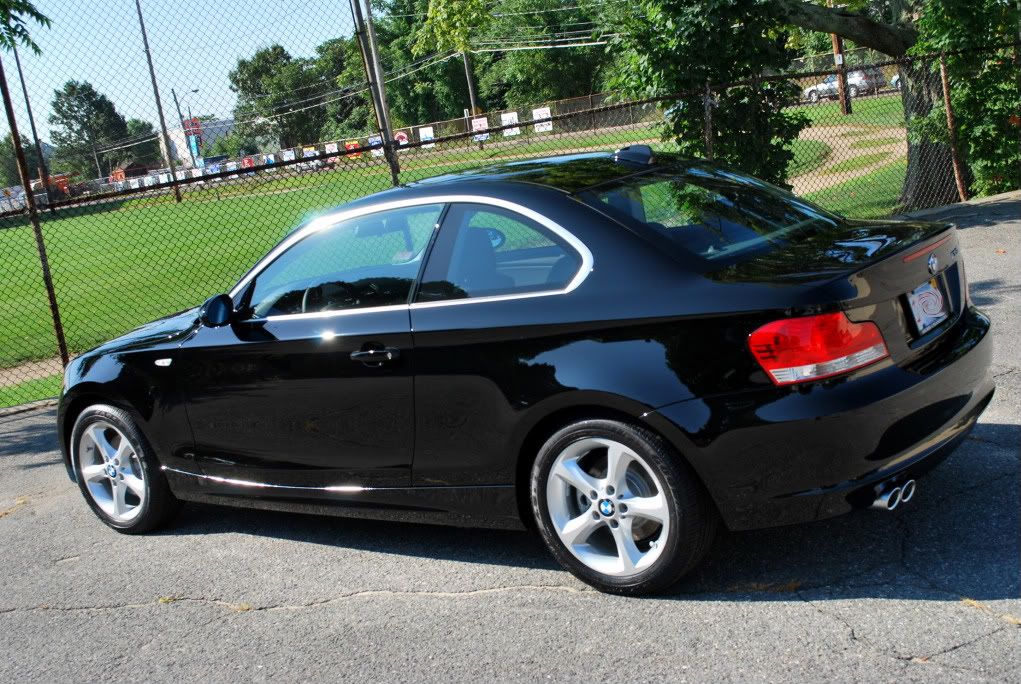
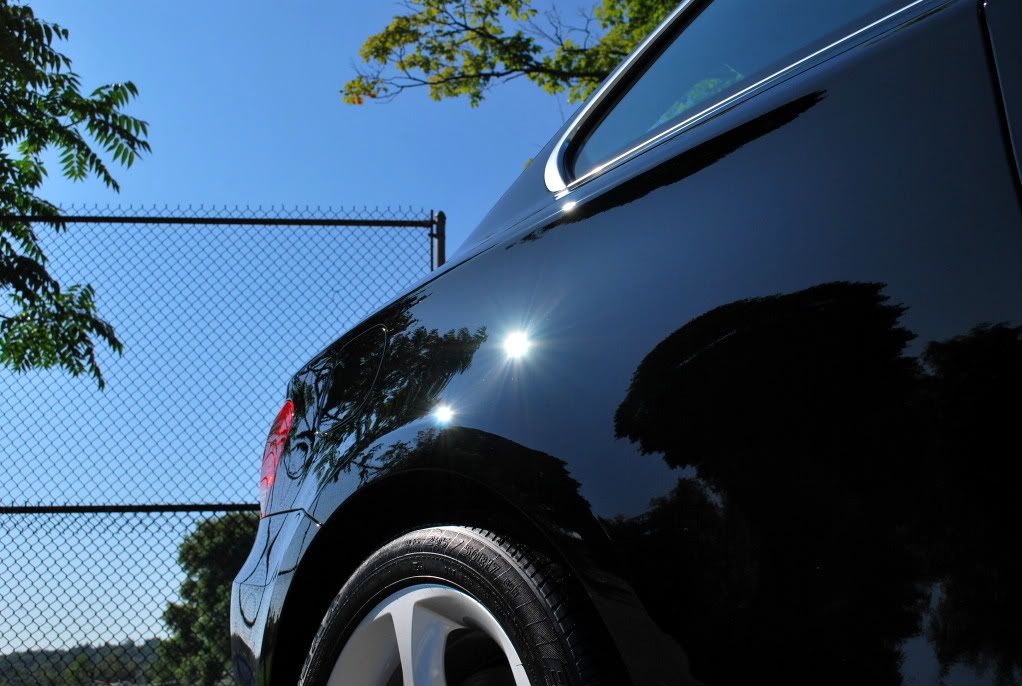
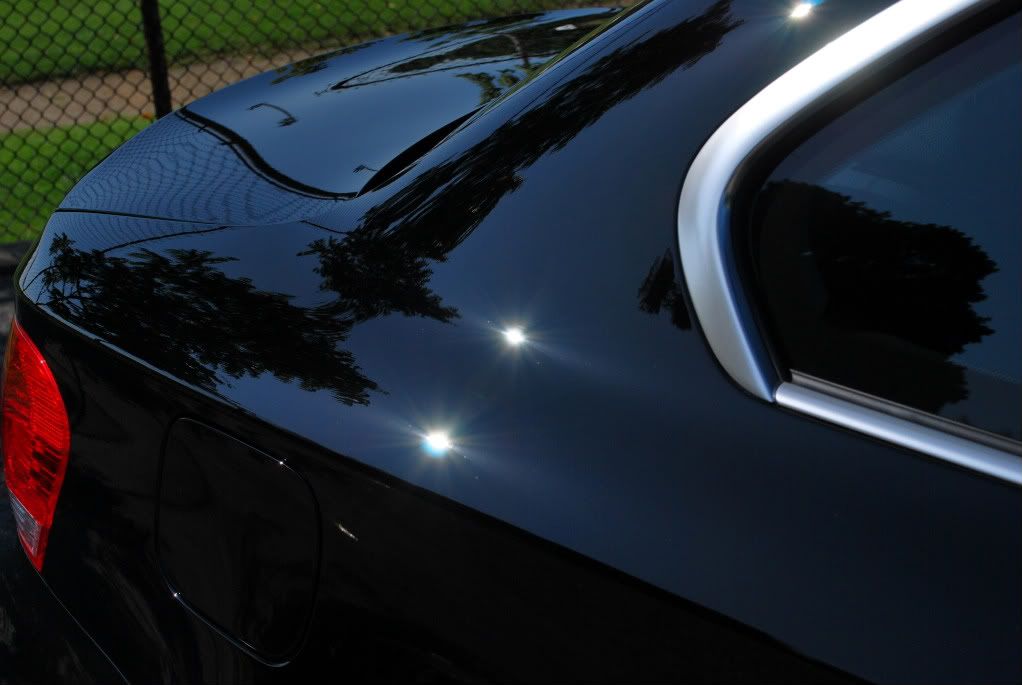
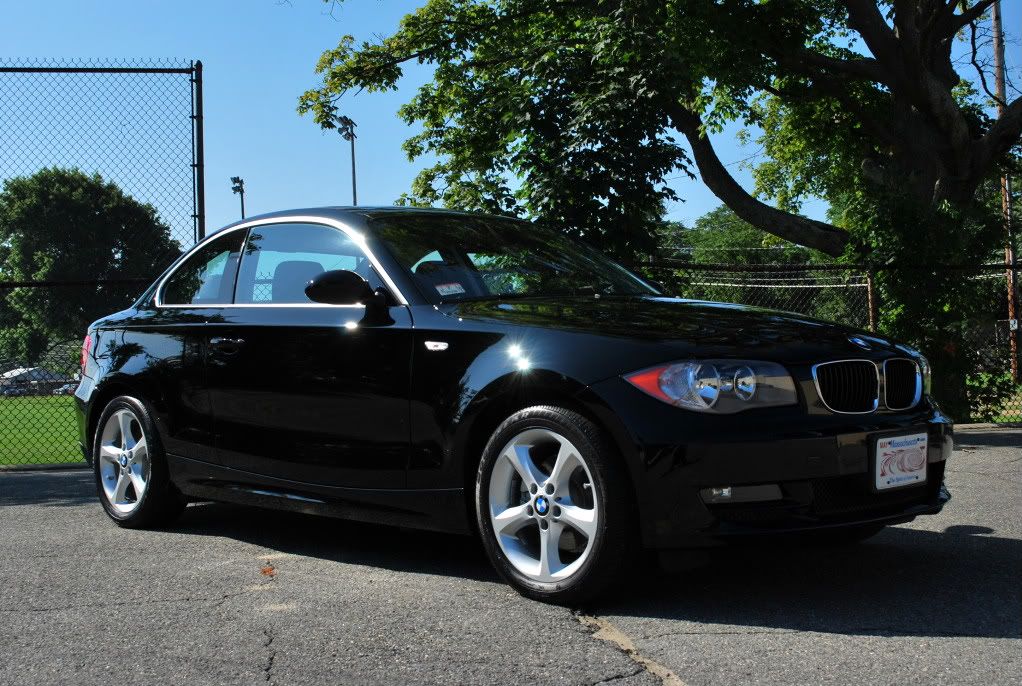
Here are the final results!
-
08-19-2009, 05:35 AM #4
- Join Date
- May 2005
- Location
- Wakefield, MA
- Posts
- 2,400
- Post Thanks / Like


-
08-19-2009, 05:40 AM #5
- Join Date
- Apr 2004
- Posts
- 500
- Post Thanks / Like
Ive been waiting to see this write up. That thing was really hammered. Great job! Finish up my GT3 already would ya?:laugh:
-
08-19-2009, 06:27 AM #6
- Join Date
- May 2005
- Location
- Wakefield, MA
- Posts
- 2,400
- Post Thanks / Like
 Originally Posted by Jokeman
Thanks Bryan!
I never thought we would finish... It came out great in the end, which is all that matters. Not looking forward to doing another one any time soon.
I promise to have the GT3 ready for you soon!
-
08-19-2009, 06:50 AM #7

- Join Date
- May 2010
- Posts
- 1,578
- Post Thanks / Like
Originally Posted by RickRack
Saw the Guards Red GT3 peeking over there, one of the best corrections I have ever seen!!! that is a thirty hour correction at least even with the two of you guys working on it(lovely BMW Jet black paint) which is one of the hardest finishes to get right.
Love the sun pics just awesome looking finish.
-
08-19-2009, 07:10 AM #8
- Join Date
- Aug 2006
- Location
- Malaysia
- Posts
- 433
- Post Thanks / Like
You guys are true paintwork correction masters!!!
Superb skills and workmanship.
Very excellent job guys, this really differentiates a pro that holds a buffer everyday compared to an enthusiast like me.
Also very good photos of the defects and the after sun shots.
The gloss and colour depth is amazing. What colour does BMW call this?
Excellent work again, added this thread to my favourites.
edit: out of interest, do you guys do normal wash and waxes? (i.e. a `quick paint cleaner + sealant/wax` job) or it`s paint correction 24/7?
-
08-19-2009, 07:28 AM #9

- Join Date
- Dec 2009
- Location
- Fort Lauderdale
- Posts
- 1,173
- Post Thanks / Like
Rick, MOST excellent result!

someone should be beat within an inch of their life for that mess.
-
08-19-2009, 07:32 AM #10
- Join Date
- Oct 2007
- Posts
- 1,423
- Post Thanks / Like
Dedication, sun shots prove all. !
-
08-19-2009, 07:40 AM #11
- Join Date
- Jun 2009
- Location
- West Chester, PA
- Posts
- 489
- Post Thanks / Like
This is exactly why I have no problem sending people your way Rick. EXCELLENT job! BMW black is very difficult to work with, but you`ve made it look like cake.
:thumbup:
-
08-19-2009, 07:49 AM #12
- Join Date
- Jul 2006
- Location
- MA / NH
- Posts
- 3,594
- Post Thanks / Like
Ah yes, this was an absolute problem child car! But once again Rick, we fixed it! I was still amazed at how much depth and gloss it had when we rolled it outside in the sun.
Raising The Gloss Bar One Car At a Time!
UNIQUE POLISHING, MA / NH
Ryan Blanchette
-
08-19-2009, 07:52 AM #13
- Join Date
- Jul 2006
- Location
- MA / NH
- Posts
- 3,594
- Post Thanks / Like
Originally Posted by fishbonezken
I call it saitan black.Raising The Gloss Bar One Car At a Time!
UNIQUE POLISHING, MA / NH
Ryan Blanchette
-
08-19-2009, 07:55 AM #14
- Join Date
- Apr 2007
- Location
- Northern Va and Va Beach
- Posts
- 1,741
- Post Thanks / Like
Looks Killer Rick! Great job.
DJ Mayo
Paint Correction Specialist
Northern, Va
Detailed Image Mid-Atlantic Featured Detailer
-
08-19-2009, 08:20 AM #15
- Join Date
- May 2010
- Posts
- 203
- Post Thanks / Like
Awesome job Rick- those outdoor pics look incredible.


 Reply With Quote
Thread Information
Users Browsing this Thread
There are currently 1 users browsing this thread. (0 members and 1 guests)
Similar Threads
-
Metallic Black Mercedes CL500 Paint Correction by Unique Car Care!
By Rickrack in forum Click & Brag -The Detailers ShowcaseReplies: 33Last Post: 02-23-2011, 05:24 PM -
Black Porsche Paint Correction and Clear-bra Install by Unique Car Care
By Rickrack in forum Click & Brag -The Detailers ShowcaseReplies: 28Last Post: 11-17-2010, 10:07 PM -
Carbon Black BMW M3 - Extensive Paint Correction by Unique Car Care!!
By Rickrack in forum Click & Brag -The Detailers ShowcaseReplies: 26Last Post: 04-14-2010, 09:53 AM -
Trashed Sapphire Black BMW Paint Correction by Unique Car Care!
By Rickrack in forum Click & Brag -The Detailers ShowcaseReplies: 37Last Post: 02-16-2010, 10:56 AM -
** Imola Red BMW M3 Paint Correction by Unique Car Care **
By imported_RickRack in forum The Detailers ShowcaseReplies: 9Last Post: 04-08-2009, 07:35 PM
Posting Permissions
All times are GMT -5. The time now is 05:20 PM.
 Copyright ©, 2002-2015, Autopia Forum - All Rights Reserved
4.2.2
Sponsored by Autopia-CarCare.com
Bookmarks