

SWETM- Huh, that`s interesting info...and to think I`ve never heard of `em!
Results 31 to 45 of 48
Thread: Most aggressive compound...
-
06-01-2018, 03:11 PM #31


- Join Date
- Sep 2002
- Location
- NE Ohio
- Posts
- 86,984
- Post Thanks / Like

Re: Most aggressive compound...
Post Thanks / Like - 1 Likes, 0 Thanks, 0 Dislikes SWETM liked this post
-
06-01-2018, 07:50 PM #32dansautodetailing.com

- Join Date
- Apr 2009
- Location
- NorCal.. Avatar = Swan Lake, Hallstatt, Austria
- Posts
- 5,191
- Post Thanks / Like
Re: Most aggressive compound...
Rsurfer - Originally Posted by Rsurfer

How you been ? Hope all is going good for you !
Yes ! I would also vote for sanding it (lightly with a block by hand), at the highest grit possible..
You know, back long ago when I was working in an Auto Paint Shop, we color sanded after painting, with nothing but 3M 600 grit wet or dry paper, a rubber block and a water hose with the metal end cut off..
I never used a machine to sand paint, I wanted to "feel" the drag of the wet paper with water running over it, across the panel, and keep that same amount of "light downward pressure" the same all the way to the end of the sanding stroke, and then backwards..
The idea taught to me was to take off as little as possible, and make the paint - flat - and with as little amount of scratches on the paint as possible, so that the scratch correction (compounding) will be easier..
And somehow, we were able to use wool and wool blend pads on a Rotary, and get all these 600 grit sanding marks off and leave a clear, glossy, flat, no swirls, etc., finish..
I don`t even believe that 3k, 4k, and 5k grit paper was even invented yet... I never saw it in the shop.. Perhaps the Owner didn`t believe in extra expense, etc.. ?
Dan F
-
06-02-2018, 01:45 PM #33
- Join Date
- Sep 2002
- Location
- NE Ohio
- Posts
- 86,984
- Post Thanks / Like
Re: Most aggressive compound...
Stokdgs- Heh heh, reading that, and nodding my head in recognition, I realized that we`re dating ourselves with some of those references again

But yeah, I too like the feel/control/etc. of doing it by hand. And hey, back in the days of ss even *I* could finish out OK with a rotary and those nasty pads we used back then
The only finer papers I knew from were, IIRC, marketed for polishing plastics. The same little foam pads you can get today as best I can remember/tell. But yeah I remember rubbing 600 sheets together to make `em milder...did that with a lot of sandpaper actually.
-
06-02-2018, 02:19 PM #34

- Join Date
- Jul 2015
- Location
- Chicago, IL
- Posts
- 2,068
- Post Thanks / Like
Re: Most aggressive compound...
No i mean the 501, not the HD stuff. The 3D cuts so much more. Originally Posted by DaveT435
2018 Acura TLX ASpec
-
06-02-2018, 07:13 PM #35

- Join Date
- Jul 2012
- Location
- Arlington Texas
- Posts
- 552
- Post Thanks / Like
Re: Most aggressive compound...
Originally Posted by Stokdgs
The optimum words here being "should be" nothing about this car has been like it should be lol the roof was 5.5 mils and the rest was around 8. What really surprised me was the consistency of the readings. Normally on a repaint you`re going to sand some areas more because of scratches, etc. even the sanding process itself should remove inconsistent amounts of paint. You sand with around 180-220 grit correct??
I`m covering all my bases. I know what process I want to use. I`ve got the Mirka Abralon discs in 3000 and 4000 if I need them. I don`t know if the Flat Top would be any more aggressive than the Scholl`s. I wish they sold it in a smaller bottle. Really don`t want to spend another 75.00. I ordered CarPro Clear Cut as well. Originally Posted by RaydiantDetail
At this point I think I have everything I could possibly need. I talked to the owner yesterday. I have surgery coming up on Thursday so he opted to wait until I`m healed up to drop it off with me. Fortunately he has a couple cars so there won`t be any rush.
CarPros sell the spider pads here. I may have to check them out. I did order a few of the 3D purple cutting pads. I may have to give the Spide pads a shot. Originally Posted by SWETM
I would like to thank everyone for their input and the generous offers to send me product. As mentioned I think I have everything I will need now. It will be a few weeks but I`ll try to let y`all know how things turn out.
-
06-02-2018, 10:21 PM #36dansautodetailing.com
- Join Date
- Apr 2009
- Location
- NorCal.. Avatar = Swan Lake, Hallstatt, Austria
- Posts
- 5,191
- Post Thanks / Like
Re: Most aggressive compound...
DaveT435 -- I hope all goes well with your Surgery this week --
Wow ! 5.5mil = 139.7 microns total thickness - Top
8.0 mil = 203.2 microns total thickness - Rest of vehicle
What I did as a Painter in that field was this --
* Get the vehicle back from the Body shop, with all "repaired areas" filled, and the areas around the repair and the repair itself was scratched to heck with 40-grit paper, files, grinders, etc., because that is how most body men work.. Its a mess..
* I clean it all up with prep-sol, etc., take an air powered D/A sander with some 280 and 360 grit on the pad and smooth out all the scratches as much as possible, blow it all off, clean again.
* Use the DA to feather edge all the painted areas around the repair, so that they are all flat, and exposing all the layers underneath them just right.. Everything needs to be as flat as possible..
* Take the Primer gun, and lay down several coats of primer to completely cover all the area and beyond..
* Take a can of flat black or white lacquer and spray a mist all over the primered areas..
* Use this misted layer as a "guide coat" and a 3m Block and 360 grit wet or dry paper and water, and block sand the entire area so its all scratch-free and flat..
* Tape off the areas around the repair and lay down several coats of paint, last coats adding more clear, last coats more wet so they flash and flow out flat..
* When dry, mist a coat of flat black lacquer on the paint, block wet sand with 600 grit to get it flat again, and try to not embed scratches into the work..
* Compound the area and beyond to include full panels, so it all matches in gloss, and add some meguiars glaze and or wax to protect at the end, after washing the entire vehicle inside and out..
* Inspect the work several times with different eyes, if perfect, deliver to Client..
So, to answer your question, yes, everything from the first work after the repair is to remove repair scratches, get everything flat, then primer it, then block sand it flat, then paint, then block sand it flat, then compound it..
To have consistent total thickness numbers around the car is pretty darn good ! Must have been the Painter with gray hair..
Dan F
-
06-03-2018, 06:10 AM #37TTQ B4U
- Join Date
- Sep 2017
- Location
- NW Columbus, Ohio
- Posts
- 74
- Post Thanks / Like
Re: Most aggressive compound...
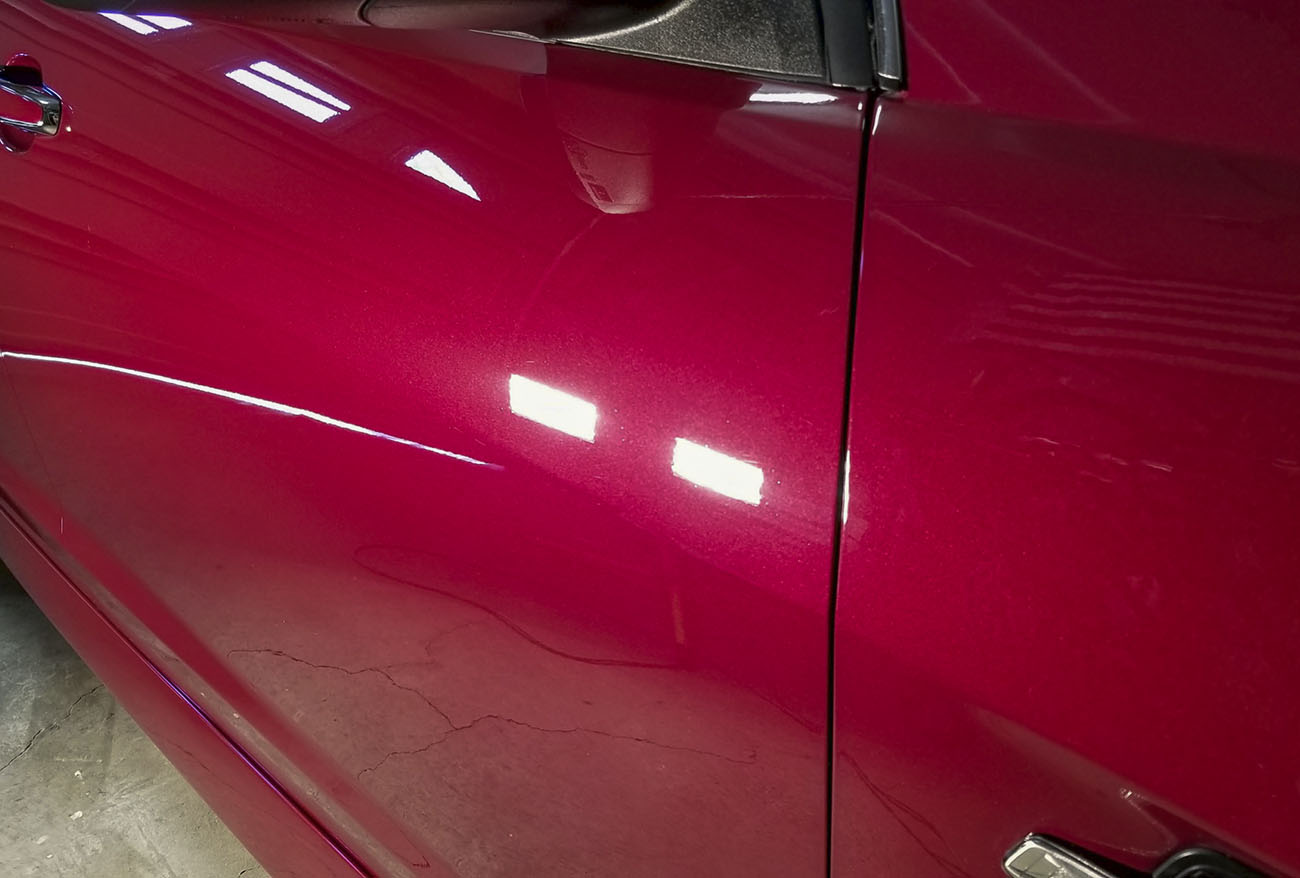
Late to the thread, but I would suggest CarPro Clear Cut and Purple Wool on a Flex 3401. Use MF on a regular DA. Cuts better than M101 or M105 and finishes out beautifully. A light polish after is all you`ll need. Originally Posted by DaveT435
Here is what the paint on this vehicle was like when I started:
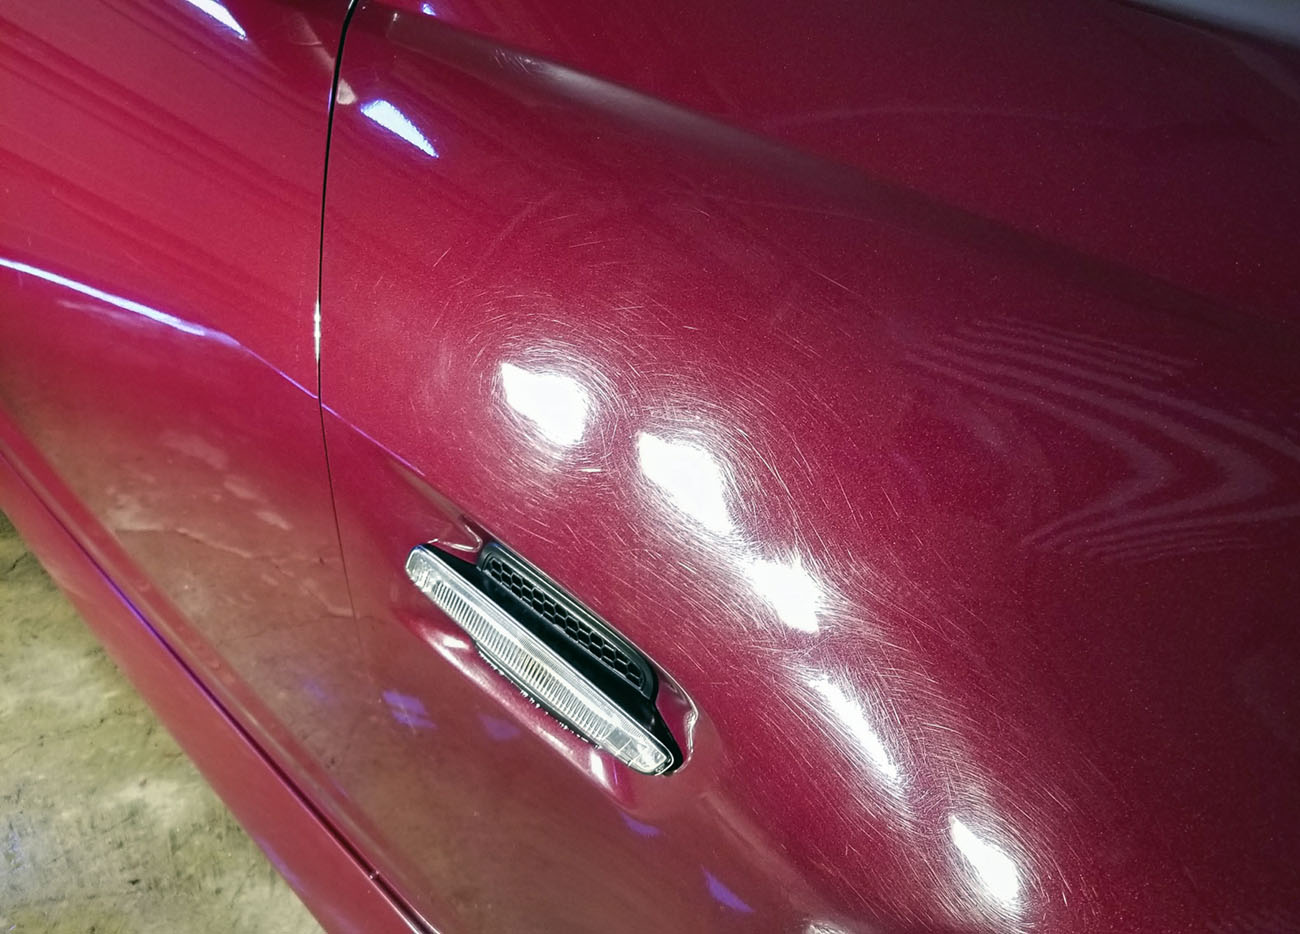
After only 3 Passes with the above mentioned:
 2018 Midnight Black Metallic AWD Infiniti Q50S Red Sport 400 | Burger MS JB4
2018 Ruby Red Metallic AWD Lincoln MK-C Reserve | 2.3l EcoBoost - Wife`s
-
06-03-2018, 11:20 AM #38
- Join Date
- Jul 2012
- Location
- Arlington Texas
- Posts
- 552
- Post Thanks / Like
Re: Most aggressive compound...
I`ve got everything you mentioned except the 3401. I have a Mille. I think I have all bases covered. Originally Posted by pdqgp
Thank you
Is that an Audi?Post Thanks / Like - 1 Likes, 0 Thanks, 0 Dislikes
Mary B liked this post
-
06-03-2018, 02:47 PM #39
- Join Date
- Aug 2011
- Posts
- 829
- Post Thanks / Like
 Re: Most aggressive compound...
Originally Posted by pdqgp
Re: Most aggressive compound...
Originally Posted by pdqgp
")
-
06-03-2018, 04:01 PM #40
- Join Date
- Jul 2012
- Location
- Arlington Texas
- Posts
- 552
- Post Thanks / Like
Re: Most aggressive compound...
Originally Posted by Stokdgs
Hey Dan,
I typed out a reply once, guess I never hit post lol Great timing for your post as I`m going to start doing a little painting. I had auto body in high school and went through the entire process on my car. Actually laid down a really nice coat if Gray Metallic paint. Of course back then it was SS.
I got my base coat/CC gun, inline regulator water air trap, gun regulator, I still need a primer gun. My first project is the front part if a `72 bug. Under the trunk behind the front bumper. If it turns out good I`m sure I`ll paint the whole car. Then if that turns out good I`ll probably be doing his daughter`s car.
Just reading your post was a good refresher. Since this is your area of expertise do you mind me asking you questions as they come up??
-
06-03-2018, 05:41 PM #41dansautodetailing.com
- Join Date
- Apr 2009
- Location
- NorCal.. Avatar = Swan Lake, Hallstatt, Austria
- Posts
- 5,191
- Post Thanks / Like
Re: Most aggressive compound...
DaveT435 -
Hope you guys are all good over there in Arlington, Texas...
Sorry the Houston Rockets could not make the cut to the NBA finals..
Painting a volkswagen ! I remember they were pretty hard to do at first, because of the round curvey fenders.. You have to be really disciplined and keep the gun the same distance all the way around the curve or there will be runs, where you got too close. And those flat panels in between the fenders, you have to watch where the gun cuts off on the rounded fenders again.. But you can do it ! Look how many of those Beetles are out there alone !
I will be happy to lend whatever experiences I have with you if needed.. Hey, we are Texas boys, we stick together, right ?
Dan F
-
06-03-2018, 06:03 PM #42TTQ B4U
- Join Date
- Sep 2017
- Location
- NW Columbus, Ohio
- Posts
- 74
- Post Thanks / Like
Re: Most aggressive compound...
I think you`ll be in great hands. Haven`t used the Mille but forced rotation and wool plus Clear Cut will equal a HUGE time savings for you. It`s been the best thing for me since the 3401 was introduced. Originally Posted by DaveT435
Car wise, not that`s a Pontiac G8. Here`s the full view.2018 Midnight Black Metallic AWD Infiniti Q50S Red Sport 400 | Burger MS JB4
2018 Ruby Red Metallic AWD Lincoln MK-C Reserve | 2.3l EcoBoost - Wife`s
-
06-03-2018, 07:11 PM #43
- Join Date
- Jul 2012
- Location
- Arlington Texas
- Posts
- 552
- Post Thanks / Like
Re: Most aggressive compound...
You know it!! What part of Texas are you from? Mavericks were terrible this year. I`m thinking those fenders come off pretty easy. I know he said they were off last time it was painted. I think it would be easier all the way around with the fenders off. The owner has pulled the trim so many times I think he can pull all that and the weather stripping in about 15 minutes. Originally Posted by Stokdgs
I know those fenders are going to be tricky. It`s a convertible also. I don`t think it will be that bad. Might take the doors off too to get a better coat on those exterior hinges, and I want to spray the jams. Might as well pull the seats and carpet and spray everything. I think whoever painted it last time did. I saw a new dent in it when I checked it out. All the paint had flaked off inside and around the dent. There are a lot of spots where paint has come off like that. Terrible prep job.
It will be nice to have someone to get advice from. I sure appreciate it. I haven`t shot base coat clear coat. When you`re actually spraying do you go right from base to clear or do you let the base cure for a while before spraying the clear. I`ve got some rust to deal with on this thing too. Mostly paint chips, some good sized, exposed bare metal and we`re just left for years to rust.
-
06-03-2018, 07:17 PM #44
- Join Date
- Jul 2012
- Location
- Arlington Texas
- Posts
- 552
- Post Thanks / Like
Re: Most aggressive compound...
Good looking car. Trying to avoid wool, but I`ll go there if I have to, probably just use my PE14 if I do. I ordered some of those pads from CarPro with the really short wool, about 3/8", to use on a DA if I need it. Originally Posted by pdqgp
-
06-03-2018, 11:23 PM #45dansautodetailing.com
- Join Date
- Apr 2009
- Location
- NorCal.. Avatar = Swan Lake, Hallstatt, Austria
- Posts
- 5,191
- Post Thanks / Like
Re: Most aggressive compound...
DaveT435 --
I was born in San Antonio, and we moved to Corpus Christi, Austin, and Dallas, so my Dad could finish at SMU., and then back to S.A.
We saw a lot of little towns all along those places as well..
For sure, the VW will be much easier to work on if the fenders are off the car.. Just remember, keep the gun the same distance all the way around, up and down, each pass, so the paint is even.. It wants to run on the more curvy parts..
Sounds like the prep on the paint you saw was done by places like Maaco, Earl Schieb, etc... Their prep = wash it, run some steel wool over the paintwork with perhaps a solvent, wipe it off, spray the paint... That`s why it`s flying off in 1-2years after...
You have to pay a lot extra to have them actually D/A the paint, perhaps apply a primer or sealer, perhaps block sand it, and then apply the watered down cheap paint..
I always put down a few coats of the the Dupont Factory Pack Paint first, then as it was flashing away, start adding clear to the factory paint, a couple coats, more clear to the paint, then just clear coats at the end..
All of this of course as you know, is based on the type of thinner you use - slow-dry or fast-dry, and the ambient temps you are dealing with..
All of this back then worked really well because the thinner would be absorbed by all the layers down to the primer, so they all melted into each other and became one strong thick layer.. Not going to fall off or peel off ever..
Another thing to consider is where are you going to be doing the work ? Booth?? Shop or Garage?.. It was always better for me even with both options, to get all the paint/clear on at one time, so as it dried, I would have to deal with stuff falling onto it only 1 time...
Another reason for the last Block Sand with 600 grit paper and a guide coat, just in case there were some junk that fell into the paint, or some high spots or low spots that got missed...
Nothing - nothing - nothing looks better no matter what the color or texture, etc., than flat, flat, paintwork... It will always reflect light straighter and will always be the most pleasing to the eye..
And you can also decide just how flat you want to make it as you go..
As I always do, everything, paint-wise, correcting paint-wise, interior/exterior Detailing-wise, it all has to match from one end to the other, then from the first horizontal panel across the top to the last horizontal panel...
Dan F

 Reply With Quote
Thread Information
Users Browsing this Thread
There are currently 1 users browsing this thread. (0 members and 1 guests)
Similar Threads
-
Looking For Aggressive Polish/Compound To Work w/ OP-ll
By Rhino in forum Machine Polishing & SandingReplies: 0Last Post: 06-08-2009, 07:18 AM -
Aggressive compound recommendation?
By imported_Detailing Technology in forum Car Detailing Product DiscussionReplies: 20Last Post: 03-04-2009, 11:05 PM -
Which is more aggressive ââ¬â OPT Hyper Compound or SIP?
By twitch in forum Car Detailing Product DiscussionReplies: 5Last Post: 03-14-2008, 04:50 PM -
most aggressive compound w/ PC
By steck in forum Car DetailingReplies: 7Last Post: 06-01-2005, 11:13 PM -
Most aggressive compound for clearcoats
By termigator in forum Car Detailing Product DiscussionReplies: 12Last Post: 03-31-2005, 02:19 PM
Bookmarks