

I received all of my gear Friday and figured I would treat my Onyx Black 2015 Yukon to some detailing. I spent a good 6-7 hours on the job using Citrus Wash, Clay Block+Luber, VSS, Black Light, and Jetseal (in that order). I used a Torque 10FX with a White pad for VSS and the black finishing pad for Jetseal. I applied Blacklight by hand using the applicator pad provided by the kit. I tried VSS with the orange pad supplied by the 10FX kit, but it seemed like more swirls and scratches showed up after I did my test panel. I then used the White pad for VSS for the remainder of the vehicle. Overall, the results seemed "Ok" as in the hologram issue is gone and some of the more prominent swirls are gone. I am still not quite satisfied considering the videos I have seen seemed to eliminate scratches and swirls all together.
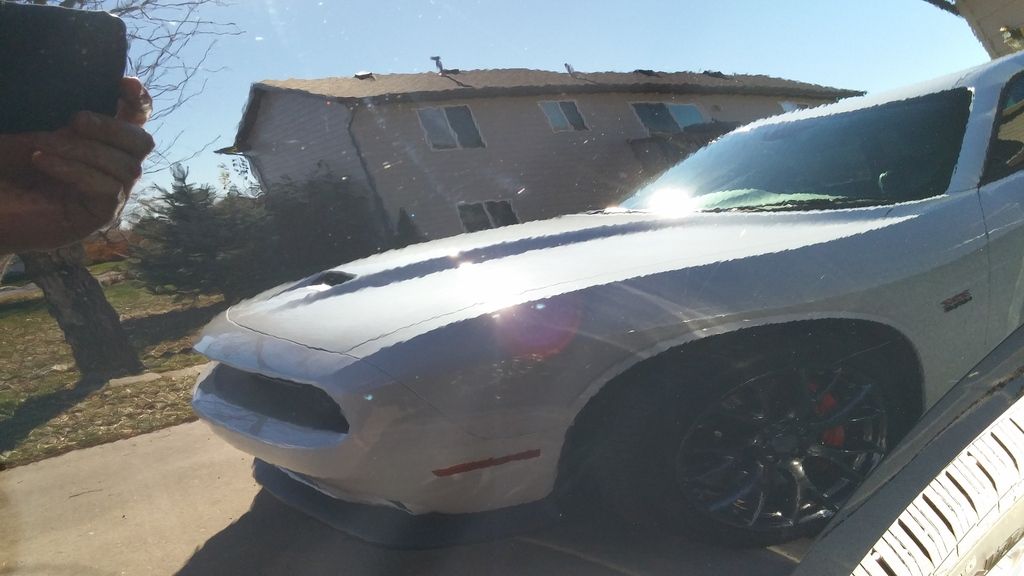
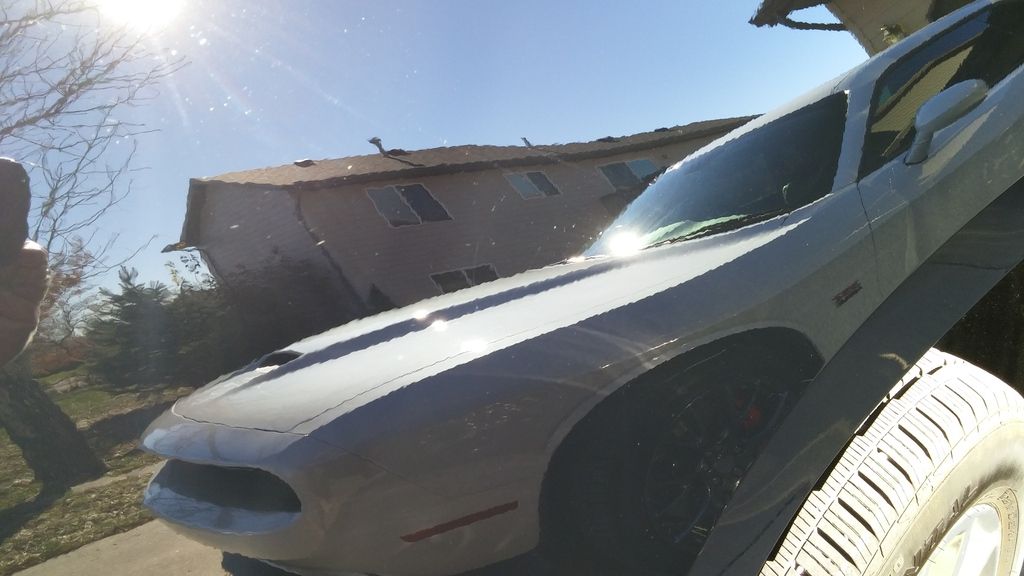
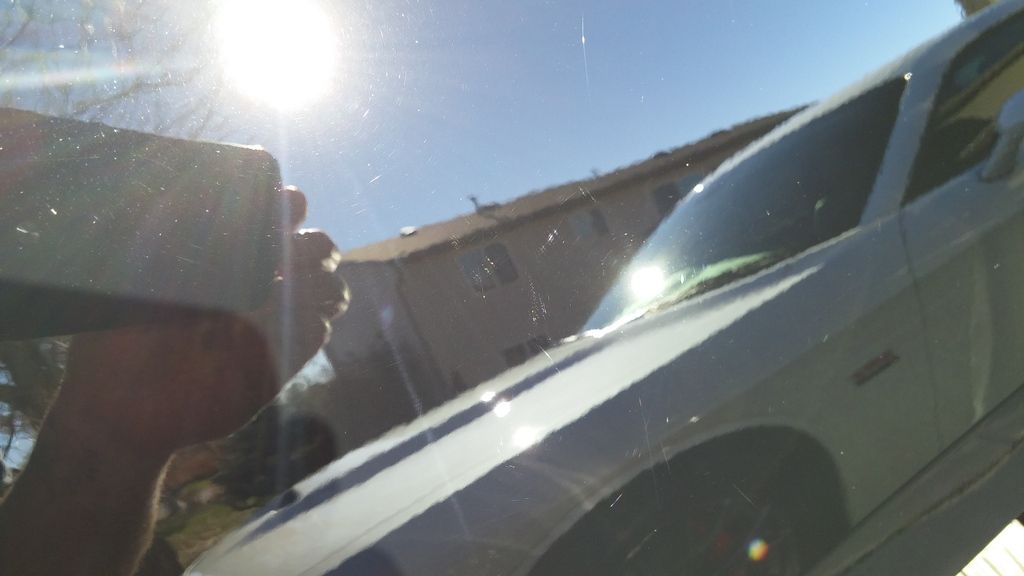
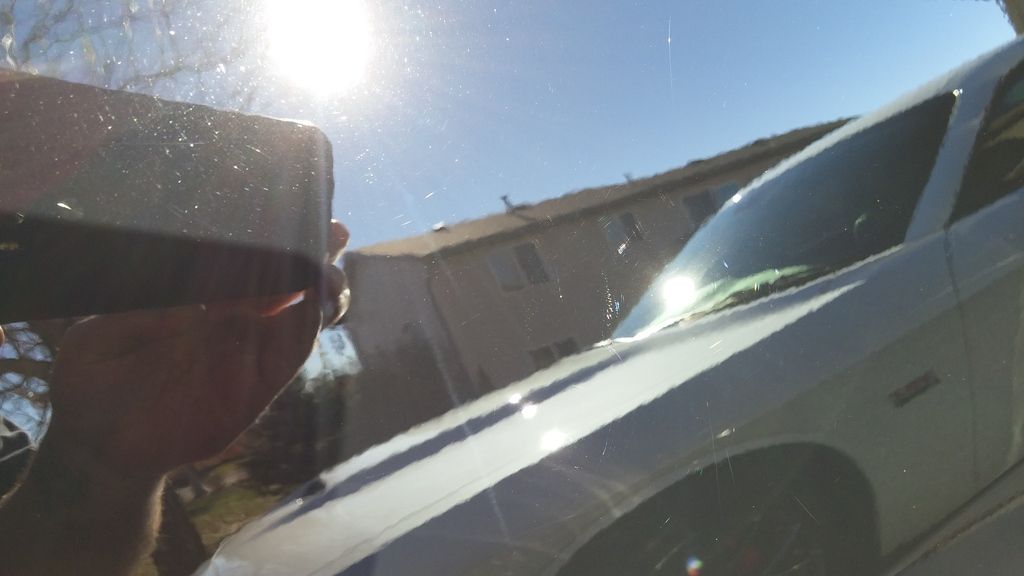
As for technique, I applied VSS in five dots and sprayed some EcoSmart on the pad to prep. I dotted out a few spots on the panel before I turned the machine on as per video. Once I had a few spots down I switched the machine on to setting 1 or 15 and spread out the product on the panel. Once it was spread out I bumped up to setting 4 or 35 and worked the product going side to side and up and down for about two minutes. Or at least until the product started to seem clear or I could see myself in the reflection. Once I could see myself I turned off the machine and buffed with a microfiber towel. For the most part the swirls were kinda gone, but there was still some spider webbing there. I did about one pass per panel on the truck. I used the same White pad and reapplied VSS as I moved from panel to panel. I did not clean the pad until I was done. I used my Black finishing pad for Jetseal the same way as I did for VSS. Small applications of Jetseal as I moved from panel to panel. Once I got the truck out in the sun there seemed to be quite a few spots of spider webbing and/or a few heavy duty scratches that were there. I have a attached a few pictures to try and show the final product.
My question is, are my results pretty typical of GM black paint or is my technique flawed/needs improvement?
Results 1 to 11 of 11
-
11-27-2015, 11:43 PM #1


- Join Date
- Nov 2015
- Location
- South Dakota
- Posts
- 3
- Post Thanks / Like

Help with Onyx Black 2015 Yukon...Pics inside!

2015 Dodge Challenger SRT 392 Ivory White Pearl Tri-Coat/Laguna Black
2015 GMC Yukon XL Black/Cocoa DunePost Thanks / Like - 1 Likes, 0 Thanks, 0 Dislikes Stokdgs liked this post
-
11-28-2015, 01:34 AM #2dansautodetailing.com


- Join Date
- Apr 2009
- Location
- NorCal.. Avatar = Swan Lake, Hallstatt, Austria
- Posts
- 5,191
- Post Thanks / Like
Re: Help with Onyx Black 2015 Yukon...Pics inside!
Oh, here it is - your GMC Yukon -
You did a pretty good job for the first time.. GM Paint is usually pretty hard,, so it takes a little bit of work to get the defects out..
You will need lots of pads to do a better job, as they load up with dead paint particles and dead compound, so you need to be wiping the pad down with a clean white towel, so you can see what color is coming off, and do another section of the panel..
For any DA machine to work it has to have pad rotation and in the case of a regular DA, as much downward pressure as you can give it on high speed and not lose too much pad rotation..
Pad rotation is what works the compound, polish, etc., the best into the top layer of the paint and smooths down all the sharp points and levels them all so you get straight light reflections back at you.
And along the way, this will also get all or most all of the defects, scratches, swirls, rubs, etc., out of the paintwork and all you will see is clear, very glossy, reflections, when you look at it in good lighting..
More time spent on each section will get better results, but you really need several pads, especially for a big Yukon in Black...
Then you will need a good pad cleaner - I have used snappy clean for over 10 years and there is nothing out there that I care about trying since this product works perfectly and yields clean pads with no soap, or any residue in them after they are dry and re-used...
If you can use your garage and get good lighting, this will be easier to do and you can also perhaps control the temps so its not too cold this time of year in there..
So, looks like you are on the road just fine !
You will be able to make that Yukon look like a giant black rolling Mirror, sometime, with more hours on the machine with good pads and products !
Dan FPost Thanks / Like - 4 Likes, 0 Thanks, 0 Dislikes
-
11-28-2015, 09:46 AM #3Detail Impressions

- Join Date
- Feb 2013
- Location
- Ringgold, GA
- Posts
- 179
- Post Thanks / Like
Re: Help with Onyx Black 2015 Yukon...Pics inside!
Above has great feedback! I checked CG site and its shares
For heavy scratches and swirls, use the Orange Hex-Logic buffing pad.
For medium scratches and swirls, use the Green Hex-Logic buffing pad.
For light scratches and swirls, use the White Hex-Logic buffing pad.
So this product is pad depended, which means more cut with a green and then more with an orange.
If you have a more aggressive pad try a test spot, I always test the worst area.
Keep the pads clean, brush and towel on the fly cleaning.
Give us some more feedback, look good for your first job and you took on a breast! Wow the size of that truck........makes my back hurt just looking at it...
-
11-28-2015, 09:51 AM #4Autopia Specialist

- Join Date
- Jan 2014
- Posts
- 4,832
- Post Thanks / Like
Re: Help with Onyx Black 2015 Yukon...Pics inside!
I think Dan ^ hit the nail on the head about pads. You can`t cut corners with black, so you always have to be working clean and with quality products. If you really want to get all of those scratches out, try a more aggressive compound with a microfiber cutting pad first. Don`t be surprised if it leaves the black paint with some haze. Then try following up with a quality finishing polish with that same black finishing pad to refine the finish and remove the haze; leaving you a mirror finish.
If that SUV was mine, I`d plan on coating that monster to make maintenance a breeze.
Btw good job! You`re on the right track Instagram: www.instagram.com/rayswaydetailing
Facebook: www.facebook.com/RaysWayDetailing
Website: www.RaysWayDetailing.com
-
11-28-2015, 10:09 AM #5

- Join Date
- Feb 2015
- Location
- Nederland, TX
- Posts
- 1,533
- Post Thanks / Like
Re: Help with Onyx Black 2015 Yukon...Pics inside!
gm paint is semi hard. don`t be afraid to be aggressive with it. maybe higher speed with pressure.
everyone is is also right above pads. that`s one thing you hardly read about when first starting off. you need multiple pads to work cleanly and effectively. I would estimate 4-5 pads for a Yukon. maybe 6 for an XL.
-
11-28-2015, 06:30 PM #6
- Join Date
- Mar 2013
- Location
- San Diego, CA
- Posts
- 341
- Post Thanks / Like
Re: Help with Onyx Black 2015 Yukon...Pics inside!
Make sure you get the results you are looking for on your Test Spot before doing the entire vehicle
Chemical Guys polishes get mixed reviews
Is the 1st picture the "Before"?
-
11-29-2015, 12:05 PM #7
- Join Date
- Sep 2002
- Location
- NE Ohio
- Posts
- 86,984
- Post Thanks / Like
Re: Help with Onyx Black 2015 Yukon...Pics inside!
Grimmysnr- Welcome to Autopia!
I`ve never used those products or that machine, but generally speaking you`ve received the right advice..this stuff just takes time.
To accomplish much correction with just one (or three or...) pass would require very aggressive pads/products/polisher.
I myself used a *LOT* more than 6 pads for most steps when I had a Yukon XLD, and many hours over the course of quite a few days.
I seldom do even half a panel without thorougly cleaning the pad or getting out a fresh one, at least during the aggressive work.
I prefer to work areas *much* smaller than the usual 2`x2`.
As noted, you oughta pick an area to use as a test-spot, or choose one panel to do, and work that area until it`s the way you want it. Don`t be surprised if it takes you all day to do that one section, let it take as long as it takes and just see how that goes. When you`re dealing with "normal marring" (i.e., nothing terribly deep), as you appear to be, you don`t need to take off much clear to make things look OK, so no matter how long it takes, or how many passes, just remind yourself that you`ve yet to polish away that little bit of clear that`s scratched up.
Also, ask youself 1) how much you *really* care...how close to perfect it needs to be for *you* to feel satisfied, 2) how much time/effort you can put into this, and 3) whether or not you`ll be able to *keep* it marring-free once you`ve done all this work (consider- how did it get that way in the first place?).
-
11-29-2015, 01:24 PM #8
- Join Date
- Mar 2013
- Location
- San Diego, CA
- Posts
- 341
- Post Thanks / Like
Re: Help with Onyx Black 2015 Yukon...Pics inside!
"Don`t be surprised if it takes you all day to do that one section, let it take as long as it takes and just see how that goes."
I disagree.
If any panel, including your large hood is taking more than 1 or 2 hours....something is not right. At that point you need to re-evaluate your technique.
I have seen that the following are the usual suspects when not achieving enough correction/cut:
1. Arm Speed is too fast. Slow down to 2" per second.
2. Not enough downward pressure on the machine. Don`t be afraid...as long as the pad is still rotating.
If if you are having issues finishing down; the issue is generally that you are not working clean. I clean with a pad brush after every section. It takes 10 seconds and eliminates a variable. I also use 4-5 pads for compounding and 3-4 for polishing on an average sized vehicle.
-
11-29-2015, 05:34 PM #9
- Join Date
- Nov 2015
- Location
- South Dakota
- Posts
- 3
- Post Thanks / Like
Re: Help with Onyx Black 2015 Yukon...Pics inside!
This is all great feedback and exactly what I am looking for. As I was working on the truck I could see the pad becoming saturated and the VSS seemed to be breaking down a lot sooner. I was also unsure if it was necessary to prime the pad with EcoSmart before the start of a new panel. I have to say once I got to the back of the truck I wasn`t really sure if what I was doing was working. I was still ok with the results, but I felt it should have been better. The truck is used as a daily driver for my wife and our family road trip vehicle when those times come. Having it perfect is probably not very realistic since I cannot keep it "show ready" all the time. I do feel that swirls and water spots are very unsightly and for the most part should be mostly eliminated. Once I got done and I saw that there will swirls and a few water spots still there now I realize how much more time I need to allot to the project to get it better. I spent 6-7 hours of machine time working in the various products and then sealed in my results with Jetseal. I do think if I were to have done this all by hand it would have easily been into the 12 hour mark or more. My main concern was spending too much time on one area and end up doing more damage to the paint from when I started. However, if you folks say that more is necessary then I feel a bit safer with spending more time per panel. I just thought that once I could see myself then all I was doing was merely burning off clear coat. Needless to say being my first time out this was something that I wanted to avoid at all costs. Originally Posted by Stokdgs

The first picture is my "after". All of those photos are of the same right rear quarter panel from varying angles in relation to sunlight. I worked in my garage all day so this was the first sunlight pictures that I was able to take. Unfortunately, I cannot pull the truck out in the sun for very long because it gets very hot very quickly. Then I have to wait before I can begin work on that side again. Originally Posted by allenk4
I think this was principally my main issue here. Obviously, I need more pads to work with which makes perfect sense. I will order more. My question here then is, when it is appropriate to use microfiber versus foam? I watched a few videos and from what I gathered microfiber has superior cutting ability vs foam. Is this true? When using VSS, V36, or any other cutting compound is microfiber better for these applications? Switch to foam for glazes, waxes, and sealants? Originally Posted by allenk4
Your two points are appropriate as I was going probably too fast per panel and my downward pressure was more or less, just the weight of the machine. I was a little hesitant to press to hard mostly for consistency and then what I mentioned before about burning the clear. When working the product on the panel and you begin to see your reflection, how much more time is appropriate after that? When is a good time to stop and wipe of the residue? While I wasn`t really working a 2x2 spot my panels were the right front quarter, then the right passenger door, then the right aft passenger door, and then the rear quarter etc etc. Hypothetically speaking how much time per panel should I really spend? Is it appropriate to reapply product to the panel if it becomes transparent too quickly?
Again I appreciate all of these responses from all of you. Please keep the flow of information going!
2015 Dodge Challenger SRT 392 Ivory White Pearl Tri-Coat/Laguna Black
2015 GMC Yukon XL Black/Cocoa Dune
-
11-30-2015, 12:28 PM #10
- Join Date
- Sep 2002
- Location
- NE Ohio
- Posts
- 86,984
- Post Thanks / Like
Re: Help with Onyx Black 2015 Yukon...Pics inside!
Originally Posted by allenk4
Depending one what products/machine is being used, my experience/opinion differs. Maybe we`ll just have to agree to disagree.
My view is that people often expect this stuff to go faster than it will *for them* and suggesting that they spend a day (note that what a "day" constitutes will differ from person to person) working one panel can help foster the proper mindset. Sure, a significantly more aggressive approach could speed that up a lot, but at the cost of removing more clear than necessary/advisable. Heh heh, M101 on a MF Cutting Disk certainly *will* level the clear fast, but it`s not something I do without giving it some thought
I`ve been doing this stuff for a long, long time..and correcting a large panel of metallic paint without removing one iota more clear than necessary can still take me a while even with all the recent advances. But again, I`m all about preserving cc thickness so I never just hammer it as if the clear didn`t have to last for many more decades.
I do agree about how finishing out oughta be quick and easy, given a clean work environment. I often suspect that people step down to mild pads/products too soon and expect their Finishing Polish to do too much.
-
12-02-2015, 04:36 PM #11
- Join Date
- Dec 2005
- Posts
- 486
- Post Thanks / Like
Re: Help with Onyx Black 2015 Yukon...Pics inside!
Originally Posted by Accumulator
What he said... x2
Both my cars are daily drivers and I generally wash them once a week if possible.
I use a 2-bucket method but no matter how careful you are on a daily you are going to attain a certain level of marring if you wash as often as I do.
Basically every time you touch the paint you have the possibility to mar the paint.
I`m nuts and wash every weekend because I hate driving a dirty car... but also because I`m nuts hehe.
If my car were black (and I owned a black car once.... once) I`d probably have to correct it every 6 months or so to make it look "perfect" all the time. Not worth it for me, and like I wrote before I`m nuts!
I generally correct my car once a year... usually at the end of the year and I make it as perfect as I can. I don`t generally have to do a lot of correction on it because I`m careful when I wash... but still it`s not perfect.
I would try again with the test panel and get is as "perfect" as you want it and then go from there. And then realize what you will and won`t tolerate in "perfection".
I also agree that you definitely need to take your time.
When I started I rushed a lot more than I thought I was rushing.

 Reply With Quote
Thread Information
Users Browsing this Thread
There are currently 1 users browsing this thread. (0 members and 1 guests)
Similar Threads
-
2015 GMC Yukon Denali, exterior detail
By Dellinger in forum Click & Brag -The Detailers ShowcaseReplies: 8Last Post: 01-15-2015, 05:46 AM -
She`s learnin` on black! (few pics inside)
By J.J. in forum Car DetailingReplies: 9Last Post: 05-23-2007, 09:03 AM -
Black 95 Cobra, full detail, pics inside
By sftempest66 in forum Click & Brag -The Detailers ShowcaseReplies: 13Last Post: 07-24-2006, 12:29 PM -
Black 32 Ford detail today..Come inside for pics
By slammin86 in forum Click & Brag -The Detailers ShowcaseReplies: 14Last Post: 09-07-2005, 01:35 PM -
Before & after pics of Pinnacle Black Onyx Tire Gel
By SilverLexus in forum Car Detailing Product DiscussionReplies: 18Last Post: 12-10-2004, 06:01 PM
Bookmarks