

great upgrades Zach ! thanks for taking the time to write this up.
Results 16 to 30 of 49
-
05-23-2014, 05:10 PM #16


- Join Date
- Jul 2011
- Location
- Land O Lakes, FL
- Posts
- 5,395
- Post Thanks / Like

Re: DIY LED Work Light (much better than halogen!)
-
05-27-2014, 08:39 AM #17

- Join Date
- Mar 2013
- Posts
- 552
- Post Thanks / Like
Re: DIY LED Work Light (much better than halogen!)
Isn`t that the point Originally Posted by Woob


Great point, and something I should have mentioned. I also have a few small sand bags that I keep around for this just in case I bump one of the stands. Originally Posted by ski2

Retired Professional Detailer
-
07-14-2014, 06:37 PM #18
- Join Date
- Jul 2014
- Posts
- 29
- Post Thanks / Like
Re: DIY LED Work Light (much better than halogen!)
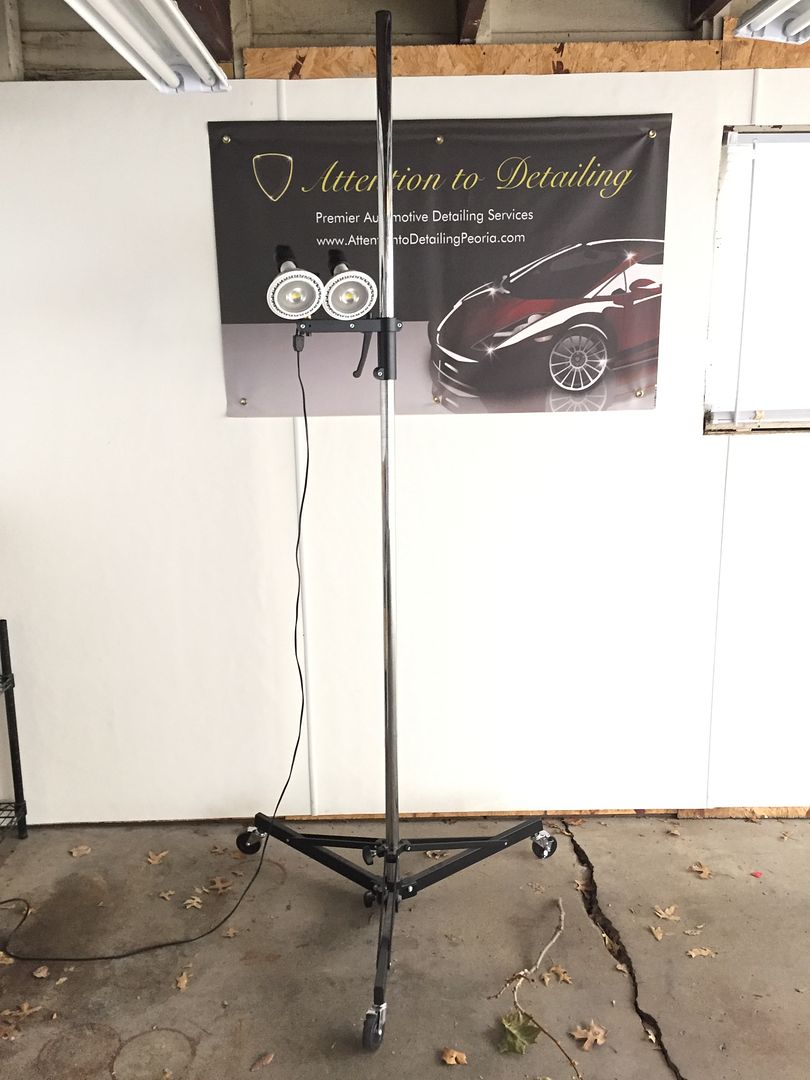
I used the info on this thread and built the lamp setup last weekend. It is very top heavy as others have said. I simply took a 5lb rubberized disc weight and sip tied it to the three arms coming off the bottom of the central pole. Worked like a charm!
-
09-01-2015, 03:24 PM #19Autopia Specialist

- Join Date
- Jan 2014
- Posts
- 4,832
- Post Thanks / Like
Re: DIY LED Work Light (much better than halogen!)
Great thread Zach! I`ll be using your guide to build my own stand soon. Thanks for sharing!
Instagram: www.instagram.com/rayswaydetailing
Facebook: www.facebook.com/RaysWayDetailing
Website: www.RaysWayDetailing.com
-
09-01-2015, 03:51 PM #20AspiringProductSpecialist

- Join Date
- Mar 2014
- Location
- SE PA
- Posts
- 3,604
- Post Thanks / Like
Re: DIY LED Work Light (much better than halogen!)
I`m kinda surprised we haven`t seen a PBMG branded light stand by now. Seems like it would be a hot seller! Originally Posted by Vega@Autopia
Post Thanks / Like - 1 Likes, 0 Thanks, 0 Dislikes Ronkh liked this post
-
09-01-2015, 04:10 PM #21
- Join Date
- Mar 2013
- Posts
- 552
- Post Thanks / Like
Re: DIY LED Work Light (much better than halogen!)
Happy to help

Be sure to pick up some rubber washers or even metal washers to help increase clamping load on the lights as the bulbs are quite heavy and the bulb holder will struggle to hold them after a while without some help!
As others have mentioned, if you wish for a more sturdy base, a small sandbag or 5lb weight also helps tremendously on the bottom of the stand.
Retired Professional Detailer
-
09-01-2015, 07:12 PM #22

- Join Date
- May 2013
- Posts
- 2,013
- Post Thanks / Like
Re: DIY LED Work Light (much better than halogen!)
I have been meaning to do this for some time now. I bought the bulbs over a year ago and they have just been sitting.
 2006 Saleen S281 Supercharged - Black
Post Thanks / Like - 1 Likes, 0 Thanks, 0 Dislikes
zmcgovern45 liked this post
-
09-01-2015, 07:22 PM #23Wax Waster

- Join Date
- Mar 2008
- Location
- SwFL
- Posts
- 27,090
- Post Thanks / Like
Re: DIY LED Work Light (much better than halogen!)
and Jen says I procrastinate.............................. Originally Posted by XxBoostinxX
Formerly the "Best Detailer", now just Super Wax Waster Man. Not necessarily tactful, but normally right. It`s good to be da King !!!Post Thanks / Like - 1 Likes, 0 Thanks, 0 Dislikes
XxBoostinxX liked this post
-
09-01-2015, 08:01 PM #24
- Join Date
- May 2013
- Posts
- 2,013
- Post Thanks / Like
Re: DIY LED Work Light (much better than halogen!)
Lol! I bought a Husky LED work light so it got put off. Originally Posted by Ronkh
2006 Saleen S281 Supercharged - Black
Post Thanks / Like - 1 Likes, 0 Thanks, 0 Dislikes
Ronkh liked this post
-
09-02-2015, 02:49 PM #25
- Join Date
- Feb 2009
- Location
- Orlando
- Posts
- 471
- Post Thanks / Like
Re: DIY LED Work Light (much better than halogen!)
I found some ankle weights at a thrift store that worked great. It has removal-able weights, and I took out 2, so I am at about 4 lbs. Originally Posted by zmcgovern45
-
09-02-2015, 02:56 PM #26
- Join Date
- Feb 2009
- Location
- Orlando
- Posts
- 471
- Post Thanks / Like
Re: DIY LED Work Light (much better than halogen!)
And BTW, thanks Zach for putting this together! I built one several months ago, but did pick up 4 of the Lowe`s bulb before they completely disappeared. Now need to get a 2nd stand that goes lower and a `peg` for the lower sections.
-
09-07-2015, 08:53 AM #27Autopia Specialist
- Join Date
- Jan 2014
- Posts
- 4,832
- Post Thanks / Like
Re: DIY LED Work Light (much better than halogen!)
Thanks again Zach! I got my light stand together following your guide and it came out GREAT. I polished this car with the lights off in the showroom, and only using the lights from this LED stand.
I ordered the stand and dual sockets from Amazon like Zach.


Then purchased the bulbs at Home Depot.


But even with the lights on in the showroom, the size of the area these bulbs light up to show EVERY imperfection is amazing. The light source on the left is my Flex Swirl Finder light, while the two lights on the right are the LED Light Stand. I still carry the FLEX light in my pocket, but leave the big lights on behind me.

Light stand + dual socket swivel head: $26.18 on amazon
Bulbs: $29.97 x 2 = $59.94 at HD
Used 2.5lb ankle weights = $5
Total cost = $91.12Instagram: www.instagram.com/rayswaydetailing
Facebook: www.facebook.com/RaysWayDetailing
Website: www.RaysWayDetailing.com
Post Thanks / Like - 4 Likes, 0 Thanks, 0 Dislikes
-
11-28-2015, 10:37 AM #28
- Join Date
- Mar 2013
- Posts
- 552
- Post Thanks / Like
Re: DIY LED Work Light (much better than halogen!)
Got a steal on some new light stands.... took these lights to a whole new level.
These Studio Titan Sidekick stands were being sold by a local studio on craigslist for $150 for a set of 3... they retail for ~$200 each. These things are monsters... 7` tall, 3` base with locking casters. The easily adjustable light mount is awesome and can hold a ton of weight... no doubt a HUGE upgrade, but certainly at a premium price.
I will likely do an updated thread with some other upgrades that I have made to these lights over time.
Glad to see this type of setup being used in so many shops throughout the world though
-Zach
-
11-28-2015, 02:39 PM #29
- Join Date
- Apr 2007
- Posts
- 18
- Post Thanks / Like
Re: DIY LED Work Light (much better than halogen!)
Awesome write up and thanks a lot! Saves me from having to do the research for this project.
-
11-28-2015, 02:50 PM #30Autopia Specialist
- Join Date
- Jan 2014
- Posts
- 4,832
- Post Thanks / Like
Re: DIY LED Work Light (much better than halogen!)
Ya I see your stand in a lot of pictures. The new stand looks a lot nicer. Especially not having to turn a few knobs to adjust the height. Nice catch! Originally Posted by zmcgovern45
Instagram: www.instagram.com/rayswaydetailing
Facebook: www.facebook.com/RaysWayDetailing
Website: www.RaysWayDetailing.com

 Reply With Quote
Thread Information
Users Browsing this Thread
There are currently 1 users browsing this thread. (0 members and 1 guests)
Similar Threads
-
Single 500w Halogen work light for $7.49
By LoiG37 in forum Good DealsReplies: 2Last Post: 12-04-2009, 06:18 PM -
Halogen Light Set
By Boba7523 in forum Car DetailingReplies: 27Last Post: 12-05-2008, 09:53 PM -
Halogen work light
By CptMidway in forum Professional Detailer General DiscussionReplies: 4Last Post: 07-12-2008, 10:58 AM -
would you buy this halogen light stand?
By BigAl3 in forum Car Detailing Product DiscussionReplies: 6Last Post: 12-19-2005, 10:00 PM -
Halogen Work Light
By Mmmph in forum Car DetailingReplies: 21Last Post: 08-06-2004, 04:01 PM
Bookmarks